Quantcast
Channel: Akruti – STYLECRAZE
Viewing all 2726 articles
Browse latest View live

The Story of Laxmi Agarwal: The Acid Attack Survivor Portrayed By Deepika Padukone

$
0
0

It’s said that art mirrors life, and finds inspiration in it. So, when recently Deepika Padukone put up a post on her social media, revealing her look for her upcoming movie, it made for an arresting piece of art, which forced the spectators to look for its real-life inspiration. And when the inspiration itself is larger than life, then it’s no wonder that the artwork it inspired is generating such waves. I am talking about the real-life shero who is behind Padukone’s latest reel-life avatar — Lakshmi Agarwal.

A Childhood That Was Taken Away Too Soon

A Childhood That Was Taken Away Too Soon

thelaxmiagarwal / Instagram

Imagine yourself at 15. What were your concerns then? Probably the classmate you had a crush on, or the pimple that surfaced at every inopportune opportunity, or maybe the board exams that you had to take.

Lakshmi too had similar concerns, but more than that she wanted to devote herself to the world of art. Sharing her story with a newspaper, she said “I had always wanted to be a singer or a Kathak dancer, but my father was a cook and we didn’t have enough money for lessons. When I took up the job, I thought I’d put some money aside to learn music. The day before the incident, I had spoken to the didi who conducted the music classes. I was supposed to attend my first lesson the next day. That day never came. (1)”

Why?

This is because a few men decided her life was inconsequential. She had been on her way to the bookshop, where she worked part-time, when a man, who at 32 was more than twice her age, accosted her along with two of his companions and threw a large beer bottle filled with acid at her for refusing his proposal. That was in 2005. But this was not the end for Lakshmi. Far from it, her story was just beginning.

The Struggle That Yielded A Leader

The Struggle That Yielded A Leader

thelaxmiagarwal / Instagram

While she was still struggling with the aftermath of this horrific incident, and in need of immediate medical intervention — she came to need seven medical surgeries in order to lessen the severity of her burns and reconstruct her face, which had become badly misshapen as a result of the acid burn — she took on the battle to get the government to notice the plight of her and others like her.

In 2006, She filed PIL (Public Interest Litigation ) in the Supreme Court asking for an amendment in the laws meting out punishment for such offenses, along with compensation for the victims. She also asked the court to put a ban on the sale of acid across the country citing the increasing incidence of such crimes all over the country. This eventually led to the banning of the sale of the substance to anyone under the age of 18 in the country and also imposing a set of restrictions on its sale (2).

The Laurels That Followed

Deciding that the fight was bigger than her, Lakshmi went on to work as a coordinator for the Stop Acid Attacks foundation, which is where she met the love of her life, Alok Dixit, a social activist. Joined together by a cause bigger than them, the dynamic duo founded the Chhanv Foundation, an NGO dedicated to the rehabilitation of acid-attack victims. She even went on to co-own two cafes, called Sheroes, in Agra and Lucknow, along with Dixit.

Lakshmi went on to win laurels such as International Women Of Courage award, presented to her by Michelle Obama, in 2014, and NDTV Indian of the Year, which was presented to her by Ranbir Kapoor. She was even given the opportunity to be a TV presenter, when she was asked to host a show called Udaan, on New Express. A dream, which she nurtured since childhood, came true in the unlikeliest of circumstances (3).

was blessed with a daughter

thelaxmiagarwal / Instagram

Perhaps, the biggest laurel among these was when Lakshmi got a chance to have her own family. She got into a live-in relationship with Dixit and was blessed with a daughter, Pihu (4). It seemed that fortune finally had Lakshmi in good stead. But it wasn’t meant to last.

Like A Phoenix, She Rose From The Ashes

Like A Phoenix, She Rose From The Ashes

thelaxmiagarwal / Instagram

In 2018, the leading daily, Hindustan Times, published a report that detailed how Lakshmi had fallen upon hard times. Separated from her live-in partner, Alok Dixit, over some differences, she was struggling to make a livelihood and was on the verge of eviction from her residence (4).

Following this, a wave of support online and offline came to her rescue, with the likes of famous actors, such as Akshay Kumar and other private citizens coming to her aid, with offers of financial assistance, and job opportunities (5). This was soon followed by the offer of a biopic, on her life, directed by the famous director, Meghna Gulzar.

Today, she can be seen pursuing her cause with a renewed vigor, her own project “Stop Sale Acid” campaign. One only has to look at her social media profile to see a flurry of posts where she can be seen actively urging her followers to support her cause, which also won her the International Women Empowerment Award for 2019, given by IWES, UNICEF, Ministry of Women and Child Development, and the Ministry of Drinking Water and Sanitation. Needless to say, for Lakshmi, picture abhi baaki hai (6).

Be it dismissing patriarchal norms, or finding the strength to give other victims a voice, Lakshmi has consistently proven that she is no victim. And for this undying spirit of hers, we salute her.

The post The Story of Laxmi Agarwal: The Acid Attack Survivor Portrayed By Deepika Padukone appeared first on STYLECRAZE.


8 Clothing Hacks That’ll Make You Look Like A Million Dollars

$
0
0

If you’re flush with cash, then fashion is something that will come naturally to you. We’re not trying to say rich peeps are automatically blessed with a good fashion sense. We are pointing out how being rich gives one the luxury to afford the best of stylists in the industry, who can make you look like fashion icons. Having employed the ideal stylists, there’s no surprise when the Richie Richs of the world, leave home looking perfect.

With us, the normal and middle-class people, our individual budget is what dictates what goes into our wardrobe, right? But don’t you worry now, you don’t have to be a millionaire to look like one. There are a lot of fashion trends out there which are definitely budget-friendly and yet have the power to upscale your look. These hacks are pretty simple and will make you look like a million bucks without burning a hole in your pocket. Let’s have a look at them and get ready to mingle with the haves of the world, instead of the have-nots.

1. Go For Animal Prints

Go For Animal Prints

Shutterstock

You would know how the royalty all over the world like our Maharajas back here, loved decorating not just their palaces but also themselves with animal skins. Therefore, in order to obtain that regal look, try to find animal printed clothes for yourselves. You know, the ones that look like neat imitations of the fur or animal prints that the royals used to adorn themselves with. But, make sure you don’t make your outfit all about animal prints. Wear them in neutral ways like in the form of accessories like a scarf, shoes, or a bag.

2. Wear The LBD (Little Black Dress)

Wear The LBD (Little Black Dress)

Shutterstock

If there’s any classy, sassy, and elegant dress that needs to make it to the wardrobe of every woman, it has to be the LBD! Wearing a little black dress instantly makes you look sophisticated and extremely attractive. When you pick a little black dress for yourself make sure it isn’t embellished, but a little sparkle is agreeable. Try to keep it simple and opt for a deep, dark black. You don’t want to wear a dress that looks faded, do you?

3. Get Flattering Necklines

Get Flattering Necklines

Shutterstock

Look, it’s absolutely okay and there’s nothing wrong in showing off your body and feeling proud about it. But, if you want to look like a royal, you need to avoid wearing tops or dresses that have a plunging neck. Try to keep it simple with the neck styles of your clothing. And if you ever want to wear something a little daring and still look like you’re from an elite community, then wear something which is demure and still makes you look attractive.

4. Wear Appropriately High, Heels

Wear Appropriately High, Heels

Shutterstock

You definitely can’t go around wearing shoes like the ones Lady Gaga wears. You’ll probably get ridiculed for it. No matter how crazy the footwear trends get around you, the ones that the millionaires are seen sporting remain the good old classy ones. Kindly avoid heels and platforms that are very high. We think that kitten heels are your safest bet when it comes to classy footwear. You get brownie points from us, if you manage to find one in a good print!

5. Get The Right Fit

Get The Right Fit

Shutterstock

One thing that makes the rich stand apart is their proper form-fitting, comfortable clothes. Therefore, make sure when you buy clothes for yourself, you get the right fit! Don’t buy a loose top as it will make you look sloppy. Also, don’t wear tight clothes as they might look a little tacky. If you are not able to find your correct fit in stores, we suggest you get your clothes tailor-made. It’s bound to make you look like you own a clothing line of your own.

6. Wear Neon Colors, But Subtly

Wear Neon Colors, But Subtly

Shutterstock

Yes, neon colors will make you look rich too. Just make sure you don’t wear all the elements of your look in a neon shade. That will make you look like you’ve come out straight from a carnival. Wear neon shoes or heels with a monotoned dress. Or team your jeans and a white shirt with a jacket in a neon shade. It will be more of like a grown-up trying to be playful with their clothing.

7. Accessorize The Right Way

Accessorize The Right Way

Shutterstock

Don’t go all chunky with your necklaces. Keep it minimal. If you want to wear a statement neckpiece, then skip the earrings. Or just wear simple, classy chains. You can layer two or three such simple chains and look hot and sassy!

8. Bag It Right

Bag It Right

Shutterstock

Have you seen the purses of the top-notch brands whose names we can never pronounce right? What’s so common in them? It’s their fine lines, neat colors, and simple colors. If you want your purses to look like they have been bought at a fashionable boutique, go for the simple stuff, don’t buy oversized or overly embellished ones.

Aren’t these such simple and easy-to-follow hacks? They are so doable that it’s mind boggling. Try these for yourself and see how effective they are. If you have any such easy-peasy tips, leave them in the comments section below.

The post 8 Clothing Hacks That’ll Make You Look Like A Million Dollars appeared first on STYLECRAZE.

Survival Tips And Self Defense Techniques You Must Know

$
0
0

As we enter adult life, we come to assume a lot of responsibilities that we weren’t even aware of previously. As a newbie adult, you learn that you have a financial responsibility now wherein you need to not just support yourself, but your parents as well. But what about the responsibility that you have towards yourself? It’s one that needs to be your topmost priority: it’s about keeping yourself safe as you face the outside world.

These days, there are a lot of weird psychopaths walking among normal people or rather wearing the mask of normal people. They are demons in disguise, and we know that there are mechanisms in place such as the law and order wing of the government who’d handle such people for us. But, when you’re face to face with a demon, you cannot rely on a group of designated officers sitting kilometers away, can you?

Therefore, it’s up to us to keep ourselves safe. We suggest that the first step that you take to start prepping yourself up for adult life be by learning simple self-defense techniques. It will keep you and the ones around you, safe. Here’s a list of survival tips and self-defense techniques that one must and should know about:

Prevention

Prevention

Shutterstock

This too is a self-defense technique peeps! The best way to use this self-defense technique is to make sure you don’t enter such a situation where you’d be in danger, in the first place. Here are a few tips for this:

  • When you approach your house door or your car and you’re alone, look around for a few seconds. Make sure there’s nobody suspicious around.
  • Make it a point to not wear any precious jewelry while you’re traveling alone.
  • Make it a habit to park your car in a well-lit area. And have the keys in your hand. You don’t want to reach the car door and search for your keys and miss out on noticing someone who’s sneaking right behind you.
  • Never walk down a dark alley, alone at night.
  • We never know who is stalking us. Therefore don’t make your commute routes predictable. Once in a while, take a different route just to discourage a stalker who might already be observing and memorizing the pattern.

Basic Techniques You Need To Be Aware Of

Basic Techniques You Need To Be Aware Of

Shutterstock

Remember that an attacker is an attacker. It can be an aged man or even a woman. If you sense direct danger, defend yourself. Don’t think twice about it. Here are a few ways to pin down an attacker:

  • The Eyes:
The Eyes

Shutterstock

Any harm, when done to the eyes, can leave the attacker disoriented, giving you enough time to escape. Poke their eyes with your knuckles or fingers. Don’t do a trial and error here. Just hit their eyes real hard.

  • The Nose:
The Nose

Shutterstock

If you’re somebody with long arms or if you have the confidence that you can reach the nasal bones, go ahead! With the help of your palm’s heel hit the nose in the upward direction. If the attacker is positioned behind you, then make use of your elbows.

  • The Ears:
The Ears

Shutterstock

You might not be aware of this, but supposedly, ears are one of the weakest points of the human body. Do an ear clap. Make a strong move by hitting the attacker right in his ears. This will force him to bend sideways. You can top this off by blowing a punch towards him with your other hand.

  • Throat And Neck:
Throat And Neck

Shutterstock

Haven’t we seen in movies how hitting the veins around the neck can make a person collapse? It’s true you see, a lot of our main veins (the carotid and the jugular) are located at the side of our neck. Hit the neck with your hand as if you were to break a brick. The blow needs to be short, yet powerful.

  • Torso:
Torso

Shutterstock

The center part of the torso is another place where you can attack the demon you’re facing. It’s the part which is under the rib region but right above your tummy. Hit the torso with your fist or your elbow, putting your entire body strength behind it.

  • Legs And Knees:
Legs And Knees

Shutterstock

You can successfully incapacitate the attacker by giving him/her a hard kick in the shin or the knee region. These two areas are the safest regions where the attacker cannot grab your foot.
Your body parts can be used as weapons. The head, knees, and elbows are naturally hard and can be used for self-defense.

Setting Strong Verbal Boundaries

Setting Strong Verbal Boundaries

Shutterstock

Verbal skills are an excellent form of self-defense. If a predator starts talking dirty to you, he’s likely just interviewing you to gauge if you are an easy mark for them or not. After all, words are capable of inducing fear. So, the next time somebody is very offensive to you, in a threatening manner, show them you are strong by responding in a very confident and calm way. This will make the attacker think that he wouldn’t be successful in his mission with you.

The techniques mentioned are useful for both children as well as adults. Make sure that you enlighten your friends and family about these easy self-defense techniques. After all, prevention is better than cure.

The post Survival Tips And Self Defense Techniques You Must Know appeared first on STYLECRAZE.

How The Worst Tragedy Of Her Life Turned Arunima Sinha Into A World Champion

$
0
0

I’ve always been inspired by women heroes who’ve proven their worth to the world, time and again, despite all of their disabilities. And when I came across the story of Arunima Sinha, I had this rush of emotions; I experienced feelings love, anger, hatred, inspiration, all woven into one.

Every woman out there has her own struggle to deal with and so did Arunima. But her struggle pushed her to pursue a practically impossible dream; the dream of being the world’s first ever female amputee to climb Mount Everest. Do you want to know how she achieved this impossible dream? Read on to find out.

The Incident That Changed Her Life Forever

The Incident That Changed Her Life Forever

Shutterstock

In 2011, Arunima was on her way to Delhi from Ambedkarnagar, a small district outside Lucknow. She was on her way to rectify a DOB (date of birth) error on the call letter she had received from the CSIF. She got into the general compartment of the Padmavat Express. The train was crowded, and she was traveling alone, but somehow, she managed to get a corner seat. Suddenly four-five thugs approached her and started to pull on a gold chain that she was wearing. It was something that was gifted to her by her mother. She fought back with all her might; she was even on the winning edge. But in all her struggle, she was alone. No one in the very crowded compartment came to her aid.

What happened next was changed the course of Arunima’s life. The thugs grabbed her and threw her out of the moving train.

The result? She fell on the opposite tracks and even before she could move, just in a matter of seconds, a train went over her left leg. She screamed in pain and passed out. She lay there all night, until the next morning when the villagers saw her and took her to the nearest hospital. Her left leg had to be amputated in order to prevent gangrene. She even lost a lot of blood.

While she was fighting for her life, her story had spread like wildfire and had become a media sensation. Of course, this helped her get admitted into a hospital with better facilities (thanks to the then sports minister Ajay Maken). But then the politicians and government bodies began the dirty blame game. When they couldn’t settle the blame on each other, they made Arunima a victim of it. Rumors started to speculate that she must’ve committed suicide or that she was traveling without a ticket on the train and chose to jump off the moving train.

The Decision

The Decision

Shutterstock

She lay in her hospital bed at her weakest and vulnerable, feeling helpless about her family and herself as the onslaught on her image only continued. Her left leg had been amputated. In her right leg, a rod was put in, going from the knee to the ankle, to hold together her broken bones. On that bed, in that condition, she decided to climb the Everest.

She says that she made that decision to reclaim her lost voice and shut everyone up. When she informed her doctors about the plan, they just laughed it off. They told her family that the trauma which she is going through has taken a toll on her mental health.

While a patient with a prosthetic limb takes some months or even years to be able to walk again Arunima started to walk on the very second day. As soon as she made her exit from the hospital, she went to meet Bachendri Pal, the first Indian woman to climb the Everest. Arunima says that Bachendri Pal encouraged her on her decision to scale the Everest.

The Journey To The Top Of The World

The Journey To The Top Of The World

dr.arunima_sinha / Instagram

After doing a basic training course at the Nehru Institute of Mountaineering (the best in Asia), she underwent a rigorous training for the next 18 months. She climbed some small, yet very dangerous mountains and even had some near-death experiences while doing so. It was Tata Steel that provided her with a sponsorship, that made her mission possible.

She finally set off to climb the Everest in 2013. Her prosthetic limb obviously posed new problems such as making at difficult to find her grip while climbing the mountains. Her Sherpa told her that she was on a suicidal mission. You see, every Everest climber needs to traverse through four camps on the way to the peak. After reaching the fourth camp, there are another 3500 feet that lead to the summit. She recalls how she could see several erstwhile climbers’ bodies strewn all around her. But she continued to trudge on.

On The Top Of The World

On The Top Of The World

Shutterstock

It was on 21st of May 2013 that Arunima reached the Everest summit. In spite of being warned about the low oxygen supply, she managed to climb and reached the top. Once there, she put up mother India’s flag on the peak along with pictures of her idol Swami Vivekananda. She clicked a few pictures and took videos of herself. She did this because she wasn’t sure if she would make it down alive, therefore, the pictures and videos were the proofs of the great feat that she’d accomplished. Fortunately, she managed to survive the downward climb and lived on to tell her tale to the world.

Life Lessons

Life Lessons

dr.arunima_sinha  / Instagram

Arunima says that climbing mountains helped her revive her tragedy-struck life. She says she learned to be confident, resilient and developed leadership and team-building capabilities because of her mountaineering. She can always be heard telling others that it doesn’t matter as to what one achieves in life. It’s how that achievement made you a better person.

Arunima continues to inspire both men and women around the world to date. In fact, Arunima has made it her mission to climb all the highest peaks in every continent of the world. She’s successfully climbed four — Everest in Asia, Elbrus in Europe, Kosciuszko in Australia, and even Kilimanjaro in Africa. She was also awarded the Padma Shri award from the Government of India for her great achievements. And as she continues to write her legacy, we salute Arunima for her undying spirit in achieving these impossible feats. We can only be inspired by such women forever.

The post How The Worst Tragedy Of Her Life Turned Arunima Sinha Into A World Champion appeared first on STYLECRAZE.

छाती (सीने) में दर्द के 10 घरेलू उपाय – Home Remedies for Chest Pain In Hindi

$
0
0

जब भी किसी को अचानक सीने में दर्द होता, तो उसे हार्ट अटैक का डर सताने लगता है। यकीनन, कभी-कभी यह चिंता का विषय हो सकता है, लेकिन जरूरी नहीं कि हर बार छाती में दर्द होना हर्ट अटैक ही हो। यह सामान्य दर्द भी हो सकता है, जिसके कई कारण हो सकते हैं। ऐसे में सवाल यह उठता है कि आखिर चेस्ट पेन किन-किन कारणों से होता है और इसका इलाज क्या है।

अगर आपके मन में भी छाती में दर्द को लेकर इसी तरह के सवाल आते हैं, तो यह लेख खास आपके लिए है। इस लेख में हम आपको चेस्ट पेन के कारण बताएंगे। साथ ही आपको छाती में दर्द के उपाय भी बताएंगे।

विषय सूची


आइए, सबसे पहले छाती में दर्द होने के कारणों के बारे में जानते हैं।

सीने में दर्द होने के कारण – Causes of Chest Pain in Hindi

हर व्यक्ति को सीने में दर्द होने के कारण अलग-अलग हो सकते हैं। किसी को चेस्ट के लेफ्ट साइड में दर्द होता है तो किसी को चेस्ट के राइट साइड में दर्द। इसके अलावा, किसी को यह दर्द तेज और ज्यादा देर के लिए हो सकता है, तो किसी को यह दर्द हल्का और कम समय के लिए हो सकता है।

दिल संबंधी कारण
  • हार्ट अटैक।
  • ह्रदय की रक्त वाहिकाओं के अवरुद्ध होने पर एनजाइना।
  • पेरिकार्डिटिस, जो आपके ह्रदय के पास एक थैली में सूजन आने के कारण होता है।
  • मायोकार्डिटिस, जो हृदय की मांसपेशियों में सूजन के कारण होता है।
  • कार्डियोमायोपैथी, हृदय की मांसपेशी का एक रोग।
  • एऑर्टिक डाइसेक्शन, जो महाधमनी में छेद होने के कारण होता है।
फेफड़े संबंधी कारण
  • ब्रोंकाइटिस
  • निमोनिया
  • प्लूरिसी
  • न्यूमोथोरैक्स, जो फेफड़ों से हवा का रिसाव के कारण छाती में होता है।
  • पल्मोनरी एम्बोलिज्म या फिर रक्त का थक्का
  • ब्रोन्कोस्पाज्म या आपके वायु मार्ग में अवरोध (यह अस्थमा से पीड़ित लोगों में आम है)
मांसपेशी या हड्डी संबंधी कारण
  • घायल या टूटी हुई पसली
  • थकावट के कारण मांसपेशियों में दर्द या फिर दर्द सिंड्रोम
  • फ्रैक्चर के कारण आपकी नसों पर दबाव
अन्य कारण
  • दाद जैसी चिकित्सीय स्थिति
  • पेन अटैक, जिससे तेज डर लगता है।

आप चेस्ट पेन के साथ-साथ अन्य लक्षण भी महसूस कर सकते हैं, जैसे :

छाती में दर्द के लक्षण – Signs And Symptoms Of Chest Pain In Hindi

हृदय संबंधी लक्षण
  • सीने में जकड़न और दबाव
  • जबड़े, पीठ या हाथ में दर्द
  • थकान और कमजोरी
  • सिर चकराना
  • पेट में दर्द
  • थकावट के दौरान दर्द
  • सांस लेने में तकलीफ
  • जी मिचलाना
अन्य लक्षण
  • मुंह में अम्लीय/खट्टा स्वाद
  • निगलने या खाने पर दर्द
  • निगलने में कठिनाई
  • शरीर की मुद्रा बदलने पर ज्यादा दर्द होना या ठीक महसूस करना
  • गहरी सांस लेने या खांसने पर दर्द
  • बुखार और ठंड लगना
  • घबराहट या चिंता

छाती में दर्द होने पर सिर्फ आपको तकलीफ होती है, बल्कि आपको रोजाना के काम करने में भी कठिनाई हो सकती है। इसलिए, जरूरी है कि इसका सही समय पर इलाज करा लिया जाए। नीचे हम चेस्ट पेन से राहत दिलाने के लिए 10 घरेलू उपाय बता रहे हैं।

छाती के दर्द से राहत पाने के लिए 10 घरेलू उपाय – Home Remedies To Treat Chest Pain In Hindi

1. लहसुन

Garlic

Shutterstock

सामग्री :
  • एक चम्मच लहसुन का रस
  • एक कप गुनगुना पानी
क्या करें?
  • एक कप गुनगुने पानी में एक चम्मच लहसुन का रस डालें।
  • इसे अच्छी तरह मिलाएं और रोजाना पिएं।
  • आप रोज सुबह लहसुन के दो टुकड़े चबा भी सकते हैं।
ऐसा कब-कब करें?

इस प्रक्रिया को दिन में एक या दो बार दोहराएं।

यह कैसे काम करता है?

हृदय में रक्त प्रवाह बिगड़ने के कारण हृदय संबंधी समस्याएं हो सकती है। इस कारण सीने में दर्द का खतरा बढ़ जाता है। इसलिए, रोजाना लहसुन का इस्तेमाल सीने में दर्द से बचाता है। लहसुन हृदय में रक्त प्रवाह को दुरुस्त कर हृदय रोग से बचाता है (1), (2)। छाती में दर्द के उपाय में यह बेहतरीन नुस्खा है।

2. एलोवेरा

Aloe vera

Shutterstock

सामग्री :
  • ¼ कप एलोवेरा जूस
क्या करें?
  • एलोवेरा जूस को पी लें।
ऐसा कब-कब करें?
  • आप दिन में एक से दो बार एलोवेरा जूस पिएं।
यह कैसे काम करता है?

एलोवेरा एक चमत्कारी पौधा है, जो कई प्रकार के स्वास्थ्य लाभ प्रदान करता है। यह आपके कार्डियोवस्कुलर सिस्टम को मजबूत करने, अच्छे कोलेस्ट्रॉल को नियमित करने, आपके ट्राइग्लिसराइड के स्तर को कम करने और रक्तचाप को कम करने में भी मदद कर सकता है (3)। ये सभी छाती के दर्द से राहत दिलाने में मदद करते हैं।

3. विटामिन

Vitamins

Shutterstock

अध्ययनों में यह बात सामने आई है कि विटामिन-डी और विटामिन-बी12 की कमी से सीने में दर्द हो सकता है। यहां तक कि इससे मायोकार्डियल इंफार्कशन या हार्ट अटैक भी हो सकता है (4), (5)। इसलिए, अगर आप चेस्ट पेन से पीड़ित हैं, तो अपने खानपान पर ध्यान दें। आप पौष्टिक खाना खाएं, जिसमें भरपूर रूप से विटामिन हों।

आप मछली, चीज] अंडे की जर्दी, अनाज, सोया उत्पाद और मीट अपने खानपान में शामिल करें। आप डॉक्टर की सलाह से विटामिन के जरूरी अनुपूरक भी ले सकते हैं।

4. सेब का सिरका

Apple vinegar

Shutterstock

सामग्री :
  • एक चम्मच सेब का सिरका
  • एक गिलास पानी
क्या करें?
  • एक गिलास पानी में एक चम्मच सेब का सिरका डालकर अच्छी तरह मिला लें।
  • फिर इस पानी को पी लें।
ऐसा कब-कब करें?

आप खाना खाने से पहले या जब भी चेस्ट पेन हो, तो इस मिश्रण को पिएं।

यह कैसे काम करता है?

सेब के सिरके में एंटी-इंफ्लेमेटरी गुण होता है, जो हार्टबर्न और एसिड रिफ्लक्स से राहत दिलाने में मदद करता है। इन्हीं के कारण सीने में दर्द की शिकायत होने लगती है (6)। छाती में दर्द के उपाय में यह जाना-माना उपचार माना जाता है।

5. गर्म पेय

Hot drinks

Shutterstock

एक कप गर्म हर्बल चाय या कुछ भी गर्म पीने से अपच या ब्लोटिंग के कारण सीने में होने वाले दर्द से राहत मिल सकती है। गर्म पेय ब्लोटिंग व अपच को कम कर हृदय को स्वस्थ रखता है।

6. हल्दी और दूध

Turmeric and milk

Shutterstock

सामग्री :
  • ½ चम्मच हल्दी पाउडर
  • एक गिलास गर्म दूध
क्या करें?
  • एक गिलास दूध में आधा चम्मच हल्दी पाउडर मिलाएं।
  • हल्दी वाले इस दूध को पी लें।
ऐसा कब-कब करें?

आप रोजाना रात को सोने से पहले हल्दी वाला दूध पिएं।

यह कैसे काम करता है?

हल्दी करक्यूमिन का बेहतरीन स्रोत है। यह कोलेस्ट्रॉल ऑक्सिडेशन, क्लोट फॉर्मेशन व धमनी में थक्के को बनने से रोकता है। ये सभी हृदय की समस्याओं और सीने में दर्द का कारण बन सकते हैं (7), (8)। करक्यूमिन में एंटी-इंफ्लेमेटरी गुण होता है, जो सीने में दर्द की तीव्रता को कम करने में मदद करता है।

7. तुलसी

Basil

Shutterstock

सामग्री :
  • आठ से दस तुलसी के पत्ते
क्या करें?
  • तुलसी के पत्तों को चबा लें।
  • इसके अलावा, आप तुलसी की चाय भी पी सकते हैं।
  • आप तुलसी के पत्तों का रस निकालकर इसमें शहद मिलाकर खा सकते हैं।
ऐसा कब-कब करें?

बेहतर परिणाम के लिए आप रोजाना इसका सेवन करें।

यह कैसे काम करता है?

तुलसी में प्रचुर मात्रा में विटामिन-के और मैग्नीशियम होता है। सफेद मैग्नीशियम हृदय तक रक्त प्रवाह को दुरुस्त करता है और रक्त वाहिकाओं को आराम देता है। वहीं, विटामिन-के रक्त वाहिकाओं की दीवारों पर कोलेस्ट्रॉल के निर्माण को रोकता है (9), (10)। यह हृदय संबंधी विकारों के साथ-साथ सीने में दर्द के उपचार में मदद करता है।

8. लाल मिर्च

Red chilly

Shutterstock

सामग्री :
  • एक चम्मच लाल मिर्च पाउडर
  • किसी भी फल का एक गिलास जूस
क्या करें?
  • फल के एक गिलास जूस में एक चम्मच लाल मिर्च पाउडर मिलाएं।
  • इस जूस को पी लें।
ऐसा कब-कब करें?

आप इस जूस को दिन में एक बार पिएं।

यह कैसे काम करता है?

इस मिर्च में कैप्सैसिन होता है, जिसमें एंटी-इंफ्लेमेटरी गुण होता है। यह आपके सीने में दर्द की तीव्रता को कम करने में मदद करता है (11)। यह हृदय में रक्त के प्रवाह को दुरुस्त करने में भी मदद करता है, जिससे हृदय रोगों को रोका जा सकता है।

9. मेथी के दाने

Fenugreek seeds

Shutterstock

  • एक चम्मच मेथी के दाने
क्या करें?
  • एक रात पहले मेथी दानों को पानी में भिगोकर रख दें और अगली सुबह इन्हें खाएं।
  • इसके अलावा, आप एक चम्मच मेथी दानों को पांच मिनट के लिए पानी में उबाल लें। फिर इस पानी को छानकर पिएं।
ऐसा कब-कब करें?

आप इस पानी को दिन में एक से दो बार पिएं।

यह कैसे काम करता है?

मेथी के बीज में एंटी-इंफ्लेमेटरी और एंटीऑक्सीडेंट गुण होते हैं, जो हृदय के स्वास्थ्य को बढ़ाते हैं और सीने में दर्द को रोकते हैं (12)। हृदय में रक्त के प्रवाह को बढ़ावा देते हैं और कोलेस्ट्रॉल के स्तर को कम करते हैं।

10. बादाम

Almonds

Shutterstock

सामग्री :
  • मुट्ठी भर बादाम
क्या करें?
  • कुछ घंटों के लिए बादाम को पानी में भिगो दें।
  • फिर इसके छिल्के हटाकर बादाम खा लें।
  • आप तुरंत राहत के लिए बादाम के तेल और गुलाब के तेल को बराबर मात्रा में मिलाकर अपने सीने पर लगा सकते हैं।
ऐसा कब-कब करें?

आप ऐसा रोजाना करें।

यह कैसे काम करता है?

बादाम पॉलीअनसेचुरेटेड फैटी एसिड का समृद्ध स्रोत है। यह न केवल हृदय के स्वास्थ्य को बढ़ावा देता है, बल्कि कोलेस्ट्रॉल के स्तर को कम करने में भी मदद करता है (13)। यह हृदय रोग और सीने में दर्द के उपचार में मदद कर सकता है।

ये थे सीने में दर्द के घरेलू उपाय। आइए, अब इससे जुड़े कुछ टिप्स जान लेते हैं।

टिप्स
  • अधिक परिश्रम से बचें।
  • संतुलित आहार का सेवन करें।
  • शराब का सेवन सीमित करें।
  • तंबाकू के सेवन से बचें।
  • खुद को तनाव मुक्त रखें।
  • मत्स्यासन (फिश पोज), भुजंगासन (कोबरा पोज) और धनुरासन (बो पोज) जैसे योगासनों का अभ्यास करें।
  • आप एक्यूप्रेशर भी करवा सकते हैं।

आप कभी भी सीने में दर्द की समस्या को नजरअंदाज न करें। अगर ऊपर बताए गए घरेलू उपाय से आराम भी मिले, तो डॉक्टर से संपर्क करने में कोताही न बरतें। हम उम्मीद करते हैं कि यह लेख आपके काम आएगा। इससे संबंधित अपने अनुभव हमारे साथ जरूर शेयर करें।

अक्सर पूछे जाने वाले सवाल

भोजन निगलते समय मेरी छाती में दर्द क्यों होता है?

अगर आप ग्रासनलीशोथ (अन्नप्रणाली में सूजन) से पीड़ित हैं, तो आपको खाना निगलते समय सीने में दर्द की समस्या हो सकती है।

युवाओं में चेस्ट पेन होने के क्या कारण हैं?

युवा वयस्कों में सीने में दर्द के सामान्य कारण अधिक तनाव, सर्दी, खांसी, फुफ्फुसीय, पेरिकार्डिटिस और हाइपरट्रॉफिक कार्डियोमायोपैथी हैं।

क्या गर्भावस्था के शुरुआती दौर में सीने में दर्द हो सकता है?

हां, गर्भावस्था के दौरान शरीर में बदलाव, तनाव, हार्टबर्न और अपच सीने में दर्द के सबसे सामान्य कारण हैं।

क्या ठंड के मौसम में सीने में दर्द हो सकता है?

हां, लेकिन इसका सटीक कारण अभी तक नहीं खोजा जा सका है। ऐसा कार्टिलेज (एक प्रकार की हड्डी) में सूजन के कारण हो सकता है।

मेरे सीने के दाएं भाग में दर्द क्यों होता है?

सीने के दाएं भाग में दर्द फेफड़ों में सूजन या फिर चेस्ट लाइनिंग का संकेत हो सकता है। इसे फुफ्फुसशोथ भी कहा जाता है। जब आप फुफ्फुसशोथ से पीड़ित होते हैं, तो खांसते, छींकने या सांस लेने की कोशिश करने पर आपको तेज दर्द का अनुभव हो सकता है। मांसपेशियों में खिंचाव या कॉस्टोकोन्ड्रिटिस, अग्नाशयशोथ और दाद जैसी चिकित्सा स्थिति भी आपके सीने के दाहिने हिस्से में दर्द का कारण बन सकती है।

संबंधित आलेख

The post छाती (सीने) में दर्द के 10 घरेलू उपाय – Home Remedies for Chest Pain In Hindi appeared first on STYLECRAZE.

ऑयली स्किन के लिए मेकअप कैसे करें – Makeup Tips for Oily Skin in Hindi

$
0
0

मेकअप ऐसी चीज है, जिसे सही ढंग से किया जाए, तो व्यक्तित्व में निखार आ जाता है। यूं तो हर लड़की अपने आप में खास और खूबसूरत होती है, लेकिन अगर वो ठीक तरीके से मेकअप करे, तो उसकी खूबसबरती कई गुना बढ़ जाती है। इसलिए, जब भी आप मेकअप करें, तो अपनी त्वचा की प्रकृति को ध्यान में रखना जरूरी है। कई बार देखा गया है कि लोग अपनी त्वचा का टेक्सचर समझे बिना ही मेकअप कर लेते हैं, जिससे निखार आने की जगह चेहरे का हुलिया बिगड़ जाता है। अगर आपकी त्वचा ऑयली है, तो जरूरी है कि ऑयली त्वचा के हिसाब से ही मेकअप किया जाए।

स्टाइलक्रेज के इस लेख में हम आपको ऑयली स्किन के लिए मेकअप करने का तरीका बताएंगे। इसके अलावा, ऑयली स्किन के लिए कुछ खास टिप्स भी देंगे।

विषय सूची


लेख के शुरुआत में हम जानेंगे कि मेकअप से पहले क्या करें।

मेकअप से पहले अपनी ऑयली त्वचा को तैयार कैसे करें?

आपका मेकअप अच्छा दिखे और देर तक टिका रहे, इसके लिए आपको मेकअप से पहले अपनी त्वचा पर काम करने की जरूरत होती है। नीचे हम बताने जा रहे हैं कि मेकअप से पहले आप किस तरह अपनी स्किन को तैयार करें :

1. क्लींजिंग, टोनिंग और मॉइस्चराइज

ऑयली स्किन को सूट करता हुआ क्लींजर लें, जिसमें सैलिसिलिक एसिड फार्मूला हो। यह आपकी त्वचा को बिना रूखा बनाए एक्सफोलिएट करने में मदद करता है। इसके बाद टोनर लगाएं। फिर चेहरे पर ऑयल-फ्री क्रीम या लोशन लगाएं।

2. गुलाब जल का स्प्रे

गुलाब जल आपकी त्वचा को दिनभर तरोताजा बनाए रखने में मदद करता है। मेकअप करने से पहले गुलाब जल को अपने चेहरे और गर्दन पर स्प्रे करें और इसे सूखने दें। आप चाहें तो, मेकअप से पहले सेटिंग स्प्रे भी लगा सकती हैं। यह आपके चेहरे पर पतली परत बना देगा और अतिरिक्त तेल के कारण मेकअप को फैलने से बचाएगा।

3. प्राइमर जरूर लगाएं

चेहरे पर निकलने वाले सीबम (अतिरिक्त तेल) को नियंत्रित रखने के लिए प्राइमर लगाना जरूरी है। यह न सिर्फ तेल को नियंत्रित रखता है, बल्कि मेकअप को लंबे समय तक टिकने में मदद करता है। इसके अलावा, इसे लगाने से आपका फाउंडेशन भी टिका रहेगा।

आइए, अब जानते हैं तैलीय त्वचा पर मेकअप कैसे किया जाता है।

ऑयली स्किन के लिए मेकअप कैसे करें?

आप मेकअप के लिए हमेशा ऑयल-फ्री मेकअप प्रोडक्ट का ही इस्तेमाल करें।

ऑयली स्किन पर मेकअप के लिए आपको चाहिए :

  • प्राइमर
  • फाउंडेशन
  • ब्लेंडिंग स्पॉन्ज
  • सेटिंग पाउडर
  • सेटिंग स्प्रेनीचे हम स्टेप बाई स्टेप मेकअप करने के आसान तरीके बता रहे हैं। ऑयली स्किन पर मेकअप करने के लिए इन तरीकों को फॉलो करें :

1. फाउंडेशन लगाएं

Apply Your Foundation

प्राइमर लगाने के बाद जब आपकी त्वचा मेकअप के लिए तैयार हो जाए, तो सबसे पहले फाउंडेशन लगाएं। फाउंडेशन का चुनाव अपनी स्किन टोन के हिसाब से करें। ध्यान रहे कि फाउंडेशन का रंग ऐसा न हो, जो आपकी रंग को सूट न करें। अपने रंग के अनुरूप अच्छी गुणवत्ता वाला फाउंडेशन इस्तेमाल करें। बेहतर परिणाम के लिए आप फाउंडेशन में थोड़ा-सा मॉइस्चराइजर मिलाएं और इसे अपने चेहरे से लेकर गर्दन तक अच्छी तरह लगा लें। इसे लगाकर ब्लेंडिंग स्पॉन्ज के हल्के दबाव के साथ फैलाएं।

2. अब लगाएं कंसीलर

Go In With Concealer

कंसीलर आपके चेहरे पर मौजूद दाग-धब्बों को कवर करने में मदद करता है। इसके अलावा, अगर आपकी आंखों के नीचे काले घेरे हैं, तो कंसीलर की मदद से इन्हें दबाया जा सकता है। फाउंडेशन लगाने के बाद आप कंसीलर लगाएं। इसे आप ब्रश या उंगली की मदद से भी लगा सकती हैं। ध्यान रहे कि आपका कंसीलर आपके स्किन टोन से मैच करता हुआ हो।

3. पाउडर की मदद से सेट करें

Set With A Powder

फाउंडेशन और कंसीलर लगाने के बाद ट्रांसलूसेंट पाउडर को स्पॉन्ज से लगाते हुए मेकअप को सेट करें। इससे ऑयली स्किन ऑयल फ्री दिखती है और मेकअप काफी देर तक टिका रहता है।

4. अब इस्तेमाल करें सेटिंग स्प्रे

Spritz On Some Setting Spray

अब आखिर स्टेप है सेटिंग स्प्रे से मेकअप सेट करना। अच्छी तरह फाउंडेशन, कंसीलर और ट्रांसलूसेंट पाउडर लगाने के बाद आप चेहरे पर सेटिंग स्प्रे करें। ध्यान रहे कि आप ज्यादा स्प्रे न करें। इसकी एक पतली परत ही काफी है। इसकी मदद से आपका मेकअप लंबे समय तक टिका रहेगा।

5. अब करें बाकी का मेकअप

आपके चेहरे का बेसिक मेकअप हो गया है, अब जरूरत है इसमें और निखार लाने की। अब आप मैट ब्लश, थोड़ा-सा आई शैडो, आईलाइनर, काजल और लिपस्टिक लगाकर अपने मेकअप को पूरा करें। इसके लिए आप अपनी रंग के हिसाब से लिपस्टिक व आईशैडो का कलर चुन सकते हैं।

Finish The Rest Of Your Makeup

स्पेट-बाय-स्टेप मेकअप करने से आपको भी इस फोटो की तरह फाइनल लुक मिल जाएगा।

ऑयली स्किन के लिए मेकअप टिप्स – Makeup Tips for Oily Skin in Hindi

अब आपको आइडिया हो गया होगा कि ऑयली स्किन का मेकअप कैसे करते हैं। ऊपर बताए गए तरीके अपनाकर आप न सिर्फ बेहतरीन लुक पा सकती हैं, बल्कि यह लंबे समय तक टिका भी रहेगा। ऑयली स्किन के लिए मेकअप का तरीका जानने के बाद नीचे हम कुछ टिप्स दे रहे हैं, जो आपकी मदद करेंगे।

  • ऑयली स्किन वालों को न सिर्फ अपनी त्वचा को नियमित रूप से मॉइस्चराइज करना चाहिए, बल्कि इसे हाइड्रेट भी रखना चाहिए। इसके लिए जरूरी है कि आप प्रचुर मात्रा में पानी पिएंं।
  • अगर आप मेकअप के दौरान कॉम्पैक्ट का इस्तेमाल करती हैं, तो इसका चुनाव सावधानी से करना चाहिए। बहुत से ब्रांड बेस्ट होने का दावा करते हैं, लेकिन इसके बावजूद त्वचा के रोमछिद्रों को पूरी तरह बंद कर देते हैं, जिससे चेहरा बदसूरत दिख सकता है। ऐसे में आप मैट कॉम्पैक्ट का चयन करें।
  • अगर आपको लगे कि मेकअप करते समय अतिरिक्त तेल निकल रहा है, तो ब्लोटिंग पेपर से इसे सेट करते रहें। ब्लोटिंग पेपर त्वचा से अतिरिक्त तेल हटाने में मदद करता है।
  • पाउडर लगाना जरूरी है, लेकिन इसका अत्यधिक इस्तेमाल बुरा असर डाल सकता है। इसलिए, पाउडर को थोड़ी मात्रा में ही लगाएं।
  • ऑयली स्किन के लिए मेकअप करते समय ऐसे उत्पाद का इस्तेमाल करना चाहिए, जो खास ऑयली स्किन के लिए बने हों। ऐसे में टी ट्री, बेंटोनाइट या काओलिन क्ले युक्त उत्पादों का इस्तेमाल करना बेहतर रहेगा।

संभव है कि ऑयली स्किन के लिए आपने कई उपाय किए होंगे। हो सकता है कुछ असरदार साबित हुए हों या कुछ से नुकसान हुआ हो। ऐसे में सही उत्पाद का चयन करना जरूरी है, लेकिन इसके साथ त्वचा की नियमित रूप से सही देखभाल करनी भी जरूरी है। हम उम्मीद करते हैं कि ऑयली स्किन के लिए मेकअप करना आपको आ गया होगा। अब आपको जहां भी जाना हो और मेकअप करना हो, तो ऊपर बताए गए तरीके को अपनाएं और हर पार्टी में छा जाएं।

संबंधित आलेख

The post ऑयली स्किन के लिए मेकअप कैसे करें – Makeup Tips for Oily Skin in Hindi appeared first on STYLECRAZE.

4 True Stories About True Love

$
0
0

Love looks not with the eyes, but with the mind, and therefore is winged Cupid painted blind.

The great bard, Shakespeare, made this canny observation in one of his very popular comedies, A Midsummer Night’s Dream. The quote loosely translates to mean that true love is not found with the faculties of logic or rationality, but rather with the faculty of imagination.

But we are the children of 21st Century, right? We don’t believe in the love of this kind, rather should I say, we have been given no reason to believe that love of this kind does exist. For us, love blossoms over fire selfies on Instagram, and really dope Tinder bios. Believe me, I too, am a product of this world and shared this pretty cynical view of romance, that is, until I came across these heart-rending accounts of true love. Don’t believe me? Read them and see for yourself!

1. The One True Love Which Inspired Him To Literally Move Mountains

The One True Love Which Inspired Him To Literally Move Mountains

Source: Outlook

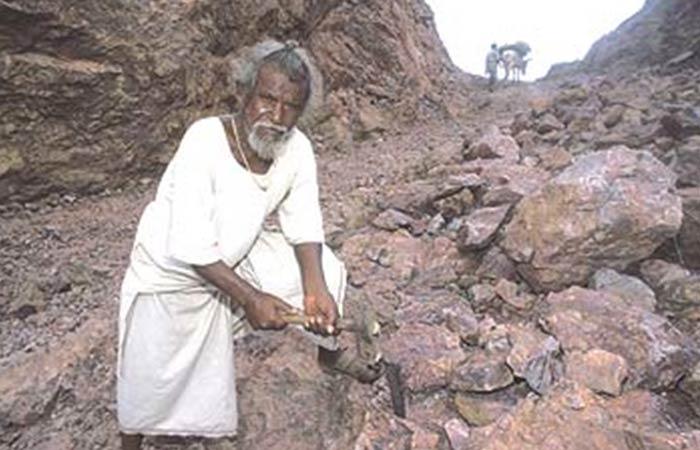
What’s the hardest thing that you had to do for your beloved? Well, whatever your answer is, I am pretty sure it can’t equal Dasrath Manjhi’s, 22 year-long, herculean project of cutting apart a mountain to make sure no one ever has to suffer the loss of love the way he had to.

Early in the 60s, Dasrath, a resident of a small village called Gelaur, in the Gaya province of Bihar, was an ordinary man, happy to live in his humble circumstances, with the love of his life, Phalguni Devi. Until, one day when she fell ill, and he had to rush her to the nearest hospital. She died on the way. She would have had a fighting chance had she reached the hospital on time, but the 25 feet high, 360 feet long rock that lay in the way made it impossible.

After an incident like this, any smaller man may have resigned himself to a life of bitter cynicism, but not Manjhi. For 22 years, he toiled with his bare hands, to reduce that rock to dust, resulting in a very unassuming but larger-than-life monument to love (1).

2. When This Man Traversed Halfway Across The Globe…On A Cycle

When This Man Traversed Halfway Across The Globe…On A Cycle

pkmahanandia / Instagram

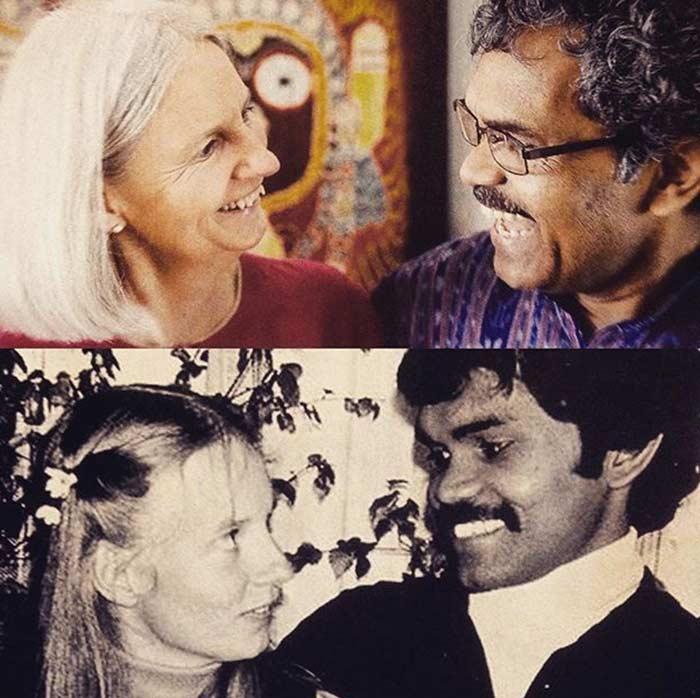
Born into an “untouchable” community, Pradyumna Kumar Mahanandia, better known as P.K. Mahanandia, always knew that he was destined for a great love, owing to a prophecy. An astrologer had predicted that PK would not have an arranged marriage, rather he would marry someone who was from a faraway land, owned a jungle and played the flute.

As luck would have it, PK had this prophecy fulfilled when he met his would-be wife, Charlotte Von Schedvin, a Swedish national, who wanted to get her portrait made from him, in Delhi, where PK was working as a street artist. What followed was an instant connection and a whirlwind love story that culminated into a wedding ceremony, conducted according to the tribal traditions.

Soon it was time for Charlotte to go home. PK decided to stay back and work to establish himself. The two corresponded over letters for almost a year, but when that couldn’t satisfy the pangs of love, PK decided to take the matters in his hand.

He sold his meager belongings and bought a bicycle and decided to cover the distance between Sweden and India on that bicycle. Pedaling on that cycle for five months, coupled with hitchhiking, traveling through Pakistan, Afghanistan, Iran, and Turkey, PK finally reached Europe. Once there, he met Charlotte’s parents and got, officially hitched (2), (3). Talk about an epic love story!

3. This Power Couple Whose Love Laid The Foundation Of An Empire

This Power Couple Whose Love Laid The Foundation Of An Empire

Source: DNA India

When they first met, no one had an inkling that they would be such an incredible couple who would go on to change the course of history. It is said that behind every successful man, there’s a woman. And nowhere does this saying come as close to fruition as in the Murthy’s case.

Sudha and Narayan Murthy are an iconic couple who are known today as the founders of the Indian software giant, Infosys. What isn’t common knowledge is that it was Sudha’s hard work (she literally gave her hard-earned money to Narayan Murthy) that laid the foundation for the company. While she found her calling as a writer, she is often asked if she felt bad about sacrificing her career to further her husband’s dream. To this, Sudha Murthy as a very simple answer. She says that while programming and working at Infosys was her ambition. Infosys meant more than that to her husband and for her, and that was more important (4).

So rethinking your Tinder choices, are you? Same.

4. When They Were In It Together

When They Were In It Together

turiapitt / Instagram

At the age of 24, Turia Pitt, a resident of Australia had a pretty sorted life. She had completed her Bachelors in Mining, she was blessed with a healthy body and she had also found her special one. But all this changed in the blink of an eye when she got caught in a grass fire, while competing in an ultramarathon, in 2011.

She suffered 65 percent burns to her body, and had to remain in the hospital for almost two years, and undergo over 200 surgeries.

All this while, Michael Hoskin, her boyfriend, never left her side. He supported her through this tough time and they finally ended up getting engaged in 2015. Today, they are a happy family which includes their son, Hakavai Hoskin (5).

They truly make for a modern-day tale of ideal love, don’t you think?

Truly inspiring, aren’t they? Do you know of any other inspiring true stories of love? Share them with us in the comments section.

The post 4 True Stories About True Love appeared first on STYLECRAZE.

11 Photos Of Kareena & Karisma Kapoor To Inspire Every Stylish Sister Duo Out There

$
0
0

If you are a 90s child, then you would know that Karisma Kapoor was the ultimate golden girl of the Bollywood in those days. I remember watching Dil To Pagal Ha, as a kid and being completely entranced by this chirpy and gorgeous golden-haired girl. She perfectly captured the bubbly, vivacious appeal of the ideal girl next door.

A few years later, her kid sister Kareena made her debut on the big screen and it became clear that the Kapoor genes were specifically imbued with the histrionic trait. The perfect antithesis of her sister, Kareena was all about the sass.

While the two sisters went on to prove their mettle as bankable actors, it was their unique fashion sense that made them stand out as the favorites of the paparazzi. Taking a page out of the Kapoor fashion book, we decided to compile a hot list of the most amazing Kapoor sister looks, for all the sister duos (even trios, we are all about the sisterhood) to take inspiration from. After all, sisters who slay together, stay together, right?

1. Bringing The 90s Back

Nothing like a relaxed T-shirt-jeans combo to lounge around in. But the Kapoor sisters manage to make that look like an ultra-glam avatar by accessorizing the plain combo with heels and opting for distressed flared jeans instead of the plain ol’ skinny jeans. Casuals done right, don’t you think?

2. Cocktail Evening Attire Done Right

If you are looking for a cocktail evening inspiration for an upcoming family event, look no further than this refreshing evening gown combo sported by the Kapoor sisters. While Kareena is upping the glam quotient in her black version, Karisma’s pink brings in the much-needed pop of color.

3. The Classic Shop-Till-You-Drop Gear

When it comes to dressing down for a vacay or just a good old shopping trip, the Kapoor sisters have got the right idea. Clad in matching black and denim combos, the sisters strike the right note by accessorizing the look with matching cross-body bags.

Our favorites are the super comfy and super stylish sneakers!

4. Slaying It In Monochrome

The Isha Ambani wedding bash held in Udaipur last December saw Bollywood’s who’s who lighting up the venue in their fashionable best. But the way the Kapoor sister duo took the elegant white and presented their own version of the color, it made them own the red carpet.

5. Two Peas In A Golden Pod

If you observe the individual styles of the Kapoor sisters, you would realize that more often than not, they take the same color palate and present their own twists of it. The look captured above showcases their ethereal beauty in their unique golden versions.

6. This Ethnic Avatar

A definite case of “Sisters before misters”. This picture captures the real and reel, royalty at its best. If this is not squad goals, then I don’t know what is. If you have an upcoming wedding to attend, you can take a few tips from Bebo on how to sizzle in gold. And if you are the samajhdaar, elder sister who wants something that’s a little less blingy, then you can find inspiration in Lolo’s simmering white avatar.

7. Flattering Formals

Veering into the category of power dressing, the Kapoor sister duo looks smashing in their respective formal wear. Inspiration for your future magazine cover? I think so too! Instead of going for a plain, boring pantsuit, you can give your own twist to it by going for a cape-styled blazer, just as Kareena did. And Karisma’s splash of white on a monochrome dress is fashion at its best. Clean, simple, and classic.

8. An Evening Out In Style

Pictured above, the sisters are sporting two completely different looks which somehow work very well together. Karisma’s polka dress is giving us old Hollywood vibes, whereas Kareena’s boho outfit is all about the laidback style.

9. Bringing The Black Back

Same-same but different. Perfect for those days when you want to have a signature style, but you don’t want it to resemble a uniform. If you are a fan of wearing matching outfits with your sibling, this is how you do it.

10. Twinning In Khaki

Matching undershirts — check. Matching glasses — check. Matching jackets — check. Acing the twinning game — definite check!

11. This Sugar And Spice Combo

While this power duo always aces the sister fashion, I think they excel at it when it comes to ethnic wear. Karisma’s demure off-white saree complements Kareena’s bright green and purple sharara combo perfectly.

They truly are a stylish sister duo, aren’t they? These two sisters sure do know how to rock the outfit game together. Which of these looks did you like best? Share your views with us in the comments section.

The post 11 Photos Of Kareena & Karisma Kapoor To Inspire Every Stylish Sister Duo Out There appeared first on STYLECRAZE.


This Two-Time Cancer Survivor’s Bridal Shoot Shows Beauty Lies In Our Courage To Embrace Life

$
0
0

Cancer is that dreaded C-word that often functions as the full stop on its victim’s life. It holds their lives captive in its grasp while everything around them, their friends, families and their lives, continues to move at an inexorable pace.

From what we have heard about this dreadful disease, from the countless survivors, and the families of those who perished at its hands, it seems like a single brush with this life-changing disease is enough to make you feel disheartened. But what if you manage to emerge victorious in your battle with this invasive disease only to be caught in its grasp again, that would surely break anyone’s spirit, right?

While it may be the case with any lesser mortal, it certainly wasn’t for Vashnavi Poovanedran.

Beating Cancer Twice: What It Meant To Her

Beating Cancer Twice What It Meant To Her

naviindranpillai / Instagram

Five years back, Vashnavi, who goes by the name Navi Indran Pillai, was diagnosed with breast cancer. Following a proper diagnosis and treatment, she had defeated cancer. But last year, she discovered that she had relapsed and now she had Stage-4 breast cancer. But the champion that she is, she beat it again.

What It Meant To Her

naviindranpillai / Instagram

However, the treatment took its toll and Navi lost her hair, her “crowning glory” to it. In our society, the term “beautiful” is circumscribed within rigid boundaries, and it’s one where being bald is certainly not included. So it is no wonder that this was a devastating change for her. Considering almost every girl has thought about her dream wedding day, Navi, too, had thought about it, and often. However, in her new circumstances, she tried to imagine what her wedding day would look like, whether she would be able to convert her dreams into reality. Whether she would be a beautiful bride, now that she had lost one of the most conventional assets of beauty?

In her own words, “Cancer treatments has given us a lot of limitations, has robbed us from beauty and taken away our confidence. As a little girl, we have always dreamt of what our big day will be like and how we would look as a bride. But having cancer has stripped some of us from fulfilling these dreams. A lot of cancer survivors have postponed or even canceled their big day.”

Bald Is Beautiful

Bald Is Beautiful

naviindranpillai / Instagram

Not the one to sit in a corner, Navi thought about others like her, who had undergone similar changes. She decided that she wouldn’t be held back by the archaic laws of the world of beauty. Like a boss, she decided to turn the convention on its head and celebrate her bold, bald style. And she did so by staging a gorgeous and unique bridal photoshoot, to inspire other cancer survivors and make them appreciate their beauty. In doing so, she also managed to reclaim one of her dreams, which she feared she had lost to her dreaded disease — that of being a beautiful bride

Bald Is Beautiful1

naviindranpillai / Instagram

She summed up her thought process in these choice words, “For me, as a cancer survivor, I dreamt of the day I marry the love of my life. Dreamt, what it is like to look like a bride, to feel like a bride. Having gone through cancer treatments (chemotherapy, etc.), losing my hair was by far the hardest thing I ever had to go through. I felt that I was not beautiful enough to be loved and was not beautiful enough to look or ever feel like a bride. Hair, it is our ‘crowning glory’ and having that taken away from you is devastating. But we choose to accept what we have, appreciate what we are and welcome what is coming.”

Bald Is Beautiful2

naviindranpillai / Instagram

Bald Is Beautiful3

naviindranpillai / Instagram

And looking at the pictures, we couldn’t agree more. Navi seems to light up every frame, with her bindaas avatar and sunny disposition. However, the credit for this unique achievement also goes to her team of dedicated makeup artists and photographers who made sure that Navi truly looked like an ethereal bride.

Bald Is Beautiful4

celesgrd / Instagram

In an interview with BBC Hindi, Navi acknowledged that though getting married and being a gorgeous bride, was one of her dreams, it wasn’t her only dream. Rather the photoshoot was an exercise in self-confidence and self-acceptance. She wanted other cancer survivors to accept themselves and realize their own beauty, rather than having it measured against the conventional benchmarks only to realize that it’s falling short (1).

Clad in a red silk saree, and white veil, Navi made for an arresting vision. But more than that, we are in awe of her indomitable and generous spirit, where she went above and beyond and did something which would be an inspiration to countless others who find themselves in similar circumstances. Navi, more power to you. You are an inspiration for all of us who seek motivation to own our inner beauty and be kinder to ourselves.

What did you think of Navi’s unique bridal shoot? Share your thoughts with us in the comments section.

The post This Two-Time Cancer Survivor’s Bridal Shoot Shows Beauty Lies In Our Courage To Embrace Life appeared first on STYLECRAZE.

உடல்நலத்தை காக்கும் இலவங்கப்பட்டையின் 10 பயன்கள்! – Cinnamon Benefits in Tamil

$
0
0

இலவங்கப்பட்டை ஒரு ஆற்றல் வாய்ந்த மசாலா பொருளாகும். இதன் நறுமணத்திற்காக மட்டுமல்லாமல் இதிலுள்ள சக்திவாய்ந்த மருத்துவ குணங்களுக்காகவும் பல ஆயிரம் ஆண்டுகளாக மக்களால் பயன்படுத்தப்பட்டு வருகிறது. இலவங்கப்பட்டையிலுள்ள முக்கிய பண்புகளான ஆண்டி ஆக்ஸிடென்ட், புற்றுநோய், நீரிழிவு நோய், மனக் கோளாறு, மூட்டு வீக்கம் போன்ற நோய்களை ஏற்படுத்தும் மூலக்கூறுகளை எதிர்த்து போரிடுகிறது. இப்படிப்பட்ட சக்திவாய்ந்த இலவங்கப்பட்டையின் பலன்கள் தெரிய வேண்டுமென்றால் தொடர்ந்து கீழே படியுங்கள்.

இலவங்கம் மரத்திலிருந்து எடுக்கப்படும் பட்டையே இலவங்கப்பட்டையாகும். சுவையும் நறுமணமும் கொண்ட இவை பெரும்பாலும் இலங்கையில் வளர்கின்றன. இலவங்கப்பட்டையில் பல வகைகள் இருந்தாலும், எல்லாம் ஒன்று அல்ல. இலவங்கப்பட்டையில் உள்ள படிக (கவுமாரின்) உள்ளடக்கம் தான் இதனை வேறுபடுத்துகிறது.

பொதுவாக இலவங்கப்பட்டையில் இருக்கும் கவுமாரின் என்ற பொருள் கல்லீரலுக்கு பாதிப்பை ஏற்படுத்தும் என்று கூறப்படுகிறது. அதனால், இலவங்கப்பட்டையை எடுத்துக் கொள்ளும்போது குறைவான கவுமாரின் இருக்கும் இலவங்கப்பட்டையை தேர்வு செய்யுங்கள்.

இலவங்கப்படையில் நான்கு வகை உள்ளது. Different Types Of Cinnamon (And Which Is The Best)

  1. இந்தோனேசிய இலவங்கப்பட்டை (இதில் ஒரு கிலோவுக்கு 2.15 கிராம் படிக வகை (கவுமாரின்) இருக்கிறது)
  2. சைகான் இலவங்கப்பட்டை (இதில் ஒரு கிலோவுக்கு 6.97 கிராம் உள்ளது)
  3. கசியா இலவங்கப்பட்டை (இதில் ஒரு கிலோவுக்கு 0.31 கிராம் உள்ளது)
  4. சிலோன் இலவங்கப்பட்டை (இதில் ஒரு கிலோவுக்கு 0.0-017 கிராம் மட்டுமே உள்ளது)

அசல் இலவங்கப்பட்டை அல்லது மெக்சிக்கன் இலவங்கப்பட்டை என்றும் சிலோன் இலவங்கப்பட்டை அழைக்கப்படுகிறது. மற்ற எல்லாவற்றையும் விட பாதுகாப்பான இலவங்கப்பட்டை இதுவே. ஆனால் மற்றவற்றில் இருந்து இதனை எப்படி அடையாளம் கண்டுகொள்வது? நீங்கள் இலவங்கப்பட்டையை தூளாக வாங்கினால் கண்டுபிடிப்பது சிரமம். ஆனால் குச்சியாக வாங்கும் போது, எவற்றில் மெல்லிய அடுக்கு உள்ளதோ அவையே சிலோன் இலவங்கப்பட்டையாகும்.

உங்களுக்கு தேவையான சிலோன் இலவங்கப்பட்டை குச்சியை அமேசான் தளத்தில் வாங்கலாம். இதை நீங்கள் பல உணவுகளில் சேர்த்து பல அற்புதமான நன்மைகளை பெறுங்கள்.

இலவங்கப்பட்டையின் பலன்கள் என்ன?: (What Are The Benefits Of Cinnamon?)

1. இலவங்கப்பட்டையில் உள்ள சக்திவாய்ந்த ஆண்டி ஆக்ஸிடெண்ட்கள்:

சக்திவாய்ந்த ஆண்டி ஆக்ஸிடெண்ட்டான பாலிபீனால் இலவங்கப்பட்டையில் நிரம்பியுள்ளது. மசாலா பொருட்களில் இலவங்கப்பட்டையில் தான் அதிகமான ஆண்டி ஆக்ஸிடெண்ட்கள் உள்ளன. பாலிபீனால் தவிர பீனாலிக் ஆசிட் மற்றும் இதர ஃபிளவனாய்டுகளும் இலவங்கப்பட்டையில் உள்ளன. நமது ரத்தத்தில் நைட்ரிக் ஆசிட் உயராமல் குறைக்க உதவுகிறது இலவங்கப்பட்டை.

2. உங்கள் உடலில் வீக்கம் வராமல் பாதுகாக்கிறது

பல்வேறு வகையான வீக்கங்களை குறைக்க இலவங்கப்பட்டை உதவுகிறது. மற்ற மசாலாவோடு சேர்த்து இலவங்கப்பட்டையை நமது உணவில் பயன்படுத்தும் போது உங்களுக்கு தேவையான எதிர்ப்பு அழற்சி கிடைக்கிறது.

3. புற்றுநோய் வராமல் தடுக்கிறது

இலவங்கப்பட்டை புற்றுநோய் கட்டியை ஆரம்பக்கட்டத்திலேயே அழித்து, அது பரவவிடாமல் தடுக்கிறது. மேலும் இலவங்கப்பட்டையில் உள்ள பாலிபீனால், மூளை புற்றுநோய் ஏற்படாமல் பாதுகாக்கிறது.

4. உங்கள் இருதயத்தை பலப்படுத்துகிறது

நமது ரத்தத்தில் உள்ள கெட்ட கொழுப்பை குறைத்து நல்ல கொழுப்பின் அளவை நிலைப்படுத்தி நெஞ்சு வலி வராமல் தடுக்கிறது இலவங்கப்பட்டை. பல விலங்குகளில் செய்யப்பட்ட ஆய்வின் படி ரத்த அழுத்தத்தை குறைக்க இலவங்கப்பட்டை பயன்படுவதாக தெரியவந்துள்ளது.

கொழுப்பு அதிகமான உணவை உண்பதால் ஏற்படும் உடல் நலக் கோளாறுகளையும் தீர்க்க இலவங்கப்பட்டை உதவுகிறது. உங்கள் உணவில் கொழுப்பை குறைக்க விரும்பினால், உடனடியாக இலவங்கப்பட்டையை உணவில் சேர்த்துக் கொள்ளுங்கள். மேலும் ரத்த ஓட்டத்தை மேம்படுத்துகிறது.

5. ரத்தத்தில் உள்ள சர்க்கரை அளவை குறைக்கிறது

இலவங்கப்பட்டையை சாப்பிடுவதால் நமது ரத்தத்தில் உள்ள சர்க்கரை அளவு குறைவதாக பல ஆய்வுகள் தெரிவிக்கின்றன. ஆனால் கல்லீரல் பிரச்சனை உள்ளவர்கள் மருத்துவர்களின் ஆலோசனை இல்லாமல் இலவங்கப்பட்டையை எடுத்துக்கொள்ளக் கூடாது. டைப் 2 நீரிழிவு நோய் உள்ளவர்கள் தினமும் இலவங்கப்பட்டையை உணவில் எடுத்துக்கொண்டால் ரத்தத்தில் உள்ள சர்க்கரை அளவு வெகுவாக குறைவதாக ஆய்வுகள் தெரிவிக்கின்றன.

6. ஜீரனசக்தியை அதிகரிக்கிறது

இலவங்கப்பட்டையில் உள்ள எண்ணெய் சக்திவாய்ந்த ஆண்டி ஆக்ஸிடெண்ட் பண்புகளை கொண்டுள்ளது. செரிமானப் பாதையில் தொற்றை ஏற்படுத்தும் பாக்டீரியாவை எதிர்த்து இவை போராடுகிறது. நீங்கள் தினமும் அருந்தும் காலை தேனீரில் ஒரு சொட்டு இலவங்கப்பட்டை எண்ணையை சேர்த்து பருகுவதால் பல நன்மைகள் கிடைக்கும்.

7. பற்களை பலப்படுத்தும்

பல் வலியை போக்க கூடிய சக்தி இலவங்கப்பட்டையில் உள்ளது. வாய் தொற்று மற்றும் துர்நாற்றத்தை போக்கவும் இலவங்கப்பட்டை பயன்படுகிறது. இலவங்கப்பட்டை குச்சியை மெல்வதால் அல்லது இலவங்கப்பட்டை தண்ணீரை வைத்து கொப்பளிப்பதால் வாய் துர்நாற்றம் நீங்குகிறது.

8. தொண்டை வலியை குணப்படுத்துகிறது

இலவங்கப்பட்டையில் பாக்டீரியாவை எதிர்க்கும் பண்புகளும் ஆண்டி ஆக்ஸிடெண்ட்களும் இருப்பதால், எளிதாக தொண்டை வலியை போக்குகிறது. டீ ஸ்பூன் அளவு இலவங்கப்பட்டை தூளை நீங்கள் அருந்தும் தேனீரில் கலக்கி குடித்தால் உங்களுக்கு தேவையான நிவாரனம் கிடைக்கும்.

9. உங்கள் தோலின் நலத்தை மேம்படுத்தும்

முகப்பருவை போக்க சிறந்த மருந்து இலவங்கப்பட்டையில் உள்ளது. அதற்கு நீங்கள் செய்ய வேண்டியது எல்லாம், மூன்று மேஜைக் கரண்டி தேனோடு ஒரு டீ ஸ்பூன் இலவங்கப்பட்டையை கலக்குங்கள். அந்த பசையை எடுத்து உங்கள் முகத்தில் பூசிக் கொள்ளுங்கள். பத்து நிமிடங்களுக்குப் பிறகு குளிர்ந்த நீரால் உங்கள் முகத்தை கழுவுங்கள். தீங்கு ஏற்படுத்தும் பாக்டீரியாவை இலவங்கப்பட்டை எதிர்த்து உங்கள் தோலின் ஈரத்தை மீடெடுக்கிறது.

முக்கிய குறிப்பு: ஒரு போதும் இலவங்கப்பட்டையை நேரடியாக தோலில் பூசாதீர்கள். அது எரிச்சலை ஏற்படுத்தும்.

10. முடி வளர உதவுகிறது

முடி வளர்வதற்கு இலவங்கப்பட்டை உதவுகிறது. உங்கள் உச்சந்தலையில் ரத்த ஓட்டத்தை அதிகரித்து முடி வளர உதவி புரிகிறது இலவங்கப்பட்டை. அதற்கு முதலில் இலவங்கப்பட்டை பசையை தயார் செய்ய வேண்டும். முதலில் அரை கப் ஆலிவ் எண்ணையும் ஒரு டீ ஸ்பூன் தேன் மற்றும் இலவங்கப்பட்டையை எடுத்துக் கொள்ளுங்கள். தற்போது ஆலிவ் ஆயிலை அடுப்பில் வைத்து ஆவி வரும் வரை சூடு படுத்துங்கள். அடுப்பிலிருந்து இறக்கிய பிறகு தேனையும் இலவங்கப்பட்டையும் அதோடு சேருங்கள். நன்றாக கலக்கி, உங்கள் உச்சந்தலையில் பூசுங்கள். 15 நிமிடங்கள் கழித்து வழக்கம் போல் ஷாம்பூ போட்டு குளியுங்கள். வாரத்திற்கு ஒரு முறை இது போல் இலவங்கப்பட்டை பசையை பூசுவதால், உங்கள் முடியின் வளர்ச்சி அதிகரிப்பதோடு முடி கொட்டுவதும் நிற்கிறது.

இலவங்கப்பட்டையில் உள்ள ஊட்டச்சத்துக்கள்: (what Is The Nutritional Profile Of Cinnamon?)

இலவங்கப்பட்டையில் ஏராளமான கலோரிகள், வைட்டமின்கள், மினரல் சத்துக்கள் நிறைந்து கிடைக்கிறது. இதில், கார்ப்போஹைட்ரேட், நார்ச்சத்து உணவுகள், நல்ல கொழுப்பு, ஸ்டார்ச், புரேட்டீன், சர்க்கரை, ஆல்கஹால், வைட்டமின் ஏ, வைட்டமின் சி, வைட்டமின் டி, வைட்டமின் கே, வைட்டமின் இ, தையமின், ரிபோஃப்ளாவின், நியாசின், வைட்டமின்பி6, ஃபோலேட், வைட்டமின்பி12, பேண்டோதெனிக் அமிலம், கோலைன்,கால்சியம், அயன், சோடியம், ஜிங்க்,காப்பர், செலினியம்,மாங்கனீசு உள்ளிட்டவைகள் இலவங்கப்பட்டையில் உள்ளது.

இலவங்கப்பட்டையை எடுத்து கொள்வது எப்படி? (How To Take Cinnamon)

  • இலவங்கப்பட்டை பொடியை சமையலில் சேர்ப்பதன் மூலம் அதிகசுவையும், மணமும் உணவிற்கு கிடைக்கிறது. ரம்மியமான மணத்தை தருவதாலும், உணவின் சுவையையை அதிகரிக்க செய்வதாலும் இதனை மசாலாவின் நாயகன் எனவும் அழைக்கின்றனர்.
  • இலவங்கப்பட்டையில் பல்வேறு மருத்துவ குணங்கள் இருந்தாலும். ஊட்டச்சத்து நிபுணர்களின் ஆலோசனைப்படி அதனை எடுத்துக் கொள்வதே நல்லது.
  • இலவங்கப்பட்டையை சூடான நீரில் போட்டு அதில் சில துளிகள் எலுமிச்சை சாறை விட்டு தேநீர் குடிப்பதன் மூலம் உடலுக்கு பல்வேறு நன்மைகள் கிடைக்கிறது. இது கொழுப்பு அதிகம் கூடாமல் தடுக்க உதவுகிறது.

இலவங்கப்பட்டையின் விளைவுகள்: (What Are The Side Effects Of Cinnamon?)

கல்லீரல் பிரச்சனைகள் உள்ளவர்கள் இலவங்கப்பட்டை சாப்பிடுவதை தவிர்க்க வேண்டும், மேலும், சர்க்கரை நோய் உள்ளவர்களும், மாத்திரை மருந்து எடுத்துகொண்டு உள்ளவர்களும் மருத்துவர்களின் ஆலோசனைப்படி பயன்படுத்த வேண்டும். இரத்த கொதிப்பு உள்ளவர்களும், அறுவைச்சிகிச்சை செய்தவர்களும் இலவங்கப்பட்டையை தவிர்ப்பது நல்லது. மேலும், அறுவைச் சிகிச்சை மேற்கொள்ள உள்ளவர்களும் அறுவைச்சிக்சையின் 2 வாரத்திற்கு முன்பே இலவங்கப்பட்டையை தவிர்க்க வேண்டும்.

முடிவு

நறுமணப் பொருட்களில் மிகவும் சிறந்தது இலவங்கப்பட்டை. இது நறுமணத்திற்காக மட்டும் பயன்படாமல் பல மருத்துவ குணங்களையும் கொண்டுள்ளது என்பதை நம் கட்டுரை வாயிலாக தெரிந்து கொண்டு இருப்பீர்கள் என நம்புகிறோம். நீங்கள் உடல் எடையை குறைப்பவராக இருந்தால் இன்று முதலே இலவங்கப்பட்டையை எடுத்துக் கொள்ள தயாராகுங்கள்

The post உடல்நலத்தை காக்கும் இலவங்கப்பட்டையின் 10 பயன்கள்! – Cinnamon Benefits in Tamil appeared first on STYLECRAZE.

கற்றாழையின் 17 அற்புத பயன்கள்! – Aloe Vera Benefits in Tamil

$
0
0

ஆலுவேரா எனப்படும் கற்றாழையில் நம்ப முடியாத ஏராளமான நன்மைகள் நிறைந்துள்ளது. கற்றாழை பல்வேறு இடங்களில் சுலபமாக கிடைக்கிறது. வெயில் காலத்தை சமாளிக்க இயற்கையாகவே படைக்கப்பட்டது இந்த கற்றாழை. இது சரும நோய்களுக்கும், முடி உள்ளிட்ட பல்வேறு பிரச்சனைகளில் இருந்து நம்மை காக்கிறது. இந்த கற்றாழையில் இருந்து சாறு மற்றும் ஜெல் பெறப்படுகிறது. இதில் ஏராளமான ஊட்டச்சத்துக்கள் நிறைந்துள்ளது.

கற்றாழையின் பெயர்கள் Aloe Vera Names

இந்த கற்றாழை எகிப்து நாட்டில் 16 நூற்றாண்டில் பயன்படுத்தப்பட்டுள்ளதற்கான சான்றுகள் உள்ளது. கற்றாழை இந்தியா, எகிப்து மட்டுமல்லாமல் பல்வேறு நாடுகள் அதை மகிமையை உணர்ந்து பயன்படுத்தப்பட்டு வருகிறது. இந்த கற்றாழை இந்தியாவில் பல்வேறு பெயர்களை கொண்டு அழைக்கப்படுகிறது. தமிழில் கற்றாழை, இந்தியில் ஹிரித்குமாரி, தெலுங்கில் கலாபண்டா, மலையாளத்தில் குமாரி, கன்னடத்தில் லோலிசரா, மராத்தியில் கோரோபிடா, பெங்காளியில் கொர்டாகுமாரி என்ற பெயர்களில் அழைக்கப்படுகிறது.

கற்றாழையின் பயன்கள் (Aloe Vera Benefits)

தோற்றத்தில் மட்டுமல்ல மருத்துவத்திலும் கற்றாழையின் செயல்பாடுகள் அழகுதான். அதன் பயன்கள் என்னென்ன என்பதை தற்போது காண்போம்.

Aloe Vera Benefits

Shutterstock

தோலுக்கு கிடைக்கும் நன்மைகள் (Aloe Vera Benefits for Skin)

வயதான தோற்றத்தை கற்றாழை மூலம் எப்படி தடுக்கலாம்?

முகத்தில் ஏற்படும் சுருக்கங்கள் தான் வயதான தோற்றத்தை கொடுக்கும். இந்த வயதான தோற்றத்தை தடுப்பதில் கற்றாழை முக்கிய பங்கு வகிக்கிறது. வயதான தோற்றத்தை தடுக்க கற்றாழையை கொண்டு தோலை பாதுகாக்கும் கீரிம் எவ்வாறு தயாரிக்க வேண்டும் என்பதை இங்கு காணலாம்.

தேவையான பொருட்கள்
  1. 1 தேக்கரண்டி ஆலிவ் வேரா ஜெல்
    அரை தேக்கரண்டி ஆலிவ் ஆயில்
  2. 1 தேக்கரண்டி ஓட்ஸ்
தயாரிக்கும் முறை

மேலே கூறிய அனைத்து பொருட்களையும் ஒரு கிண்ணத்தில் போட்டு அதனை பேஸ்ட் மாதிரி பிசைந்து கொள்ள வேண்டும். பின்னர் அந்த கலவையை முகத்தில் தடவி 30 நிமிடங்கள் காத்திருக்க வேண்டும். பின்னர், முகத்தை குளிர்ந்த நீரில் கழுவ வேண்டும்.

முகத்தை கழுவிய பின்னர் முகத்தில் உள்ள சுருக்கங்கள் குறைந்து இளமையும் காணப்படுவதை கண்டு நீங்களே நெகிழ்ச்சியடைவீர்கள். கற்றாழை முகத்தை பொலிவை தருவதோடு இறந்த செல்களை நீக்கி புதிய செல்களை புத்துயிர் பெற செய்கிறது. கற்றாழையை தொடர்ந்து பயன்படுத்துவதால் தோல் மிருதுவாக இருக்கும் என்பதை ஆராய்ச்சிகள் மூலமும் நிருபித்துள்ளனர்.

மிருவதான சருமத்தை பெற

கற்றாழை ஜெல் பயன்படுத்துவதால் தோல் மிருதுவனதாக இருக்கும். முகப்பரு மற்றும் எண்ணெய் வழியும் முகத்தை தடுக்கவும் இந்த கற்றாழை பயன்படுகிறது.

பயன்படுத்தும் முறை

காற்றாழையில் இருந்து நேரடியாக அதன் ஜெல்லை எடுத்து முகத்தில் பயன்படுத்தலாம். இல்லையென்றால் கடைகளில் விற்கும் கற்றாழை ஜெல்லையும் வாங்கி பயன்படுத்தலாம்.

தேவையான பொருட்கள்

கற்றாழை மட்டுமே போதுமானது.

தயாரிக்கும் முறை

கற்றாழை வெட்டி அதில் உள்ள ஜெல்லை மட்டும் எடுத்து கொள்ள வேண்டும். பின்னர் அதை பயன்படுத்துவதற்கு முன்னர் ஒரு கிண்ணத்தில் கற்றாழை ஜெல்லை போட்டு பிரிட்ஜ்ஜில் வைக்க வேண்டும். பின்னர் அதை முகத்திற்கு பயன்படுத்த வேண்டும்.

இந்த கற்றாழை ஜெல்லை முகத்தில் பயன்படுத்துவதால் முகம் எப்போதும் ஈரப்பதத்துடன் காணப்படும். இதனால் வறண்ட சருமத்திலிருந்து விடுபடலாம்.

முகப்பருவை தடுத்து அழகை மெருகேற்ற

கற்றாழையின் ஜெல் உங்களது முகத் தோலில் படிந்துள்ள கரும்புள்ளிகளை நீக்கி பொலிவுறச் செய்யும். மேலும், முகப்பருக்களை கட்டுப்படுத்தக் கூடிய வல்லமை கொண்டுள்ளது.

Reduces Acne And Helps Lighten Blemishes

Shutterstock

பயன்படுத்தும் முறை

கற்றாழை மற்றும் சிறு துளி எலுமிச்சை சாறு கலந்த கலவையினை பயன்படுத்தினால் சரும நோய்கள் நீங்கும். தழும்புகளை நீக்கும் குணங்களும் இதில் உள்ளது. எலுமிச்சை சாறு மற்றும் கற்றாழை கலந்த கலவையானது முகப்பருக்களை வேருடன் அழிக்கும் திறன்களையும் கொண்டுள்ளது.

தேவையான பொருட்கள்
  1. 1 தேக்கரண்டி கற்றாழை ஜெல்
  2. 2 முதல் 3 துளி எலுமிச்சை சாறு
தயாரிக்கும் முறை
  • கற்றாழை ஜெல் மற்றும் எலுமிச்சை சாறினை நன்றாக கலக்க வேண்டும்.
  • அந்தக் கலவையினை முகத்தில் தேய்த்து மசாஜ் செய்ய வேண்டும்.
  • இவ்வாறு செய்வதன் மூலம் ஒரே இரவில் நல்ல பலனைக் காண முடியும்.

கிடைக்கும் பலன்கள்

கற்றாழையின் ஜெல்லானது அதிகப்படியான நோய் எதிர்ப்புச் சக்தி கொண்டுள்ளதால் சருமத் தொடர்பான பிரச்சனைகளை எளிதில் கட்டுப்படுத்துகிறது. முகப்பருக்களை வேருடன் அளித்து பொலிவுறச் செய்யும் தன்மை இதில் உள்ளது. உயிரிழந்த செல்களை நிக்கி புதிய செல்களை புத்துயிர் பெற செய்கிறது.

விளைவுகள்

சூரியனிள் வெப்பத்திற்கு ஏற்றவாறு எலுமிச்சை சாறினை குறைத்துக் கொள்வது நல்லது.

சூரிய ஒளியில் இருந்து தோலை பாதுகாக்கும்

கற்றாழை ஜெல்லானது சூரிய ஒழியினால் பாதிக்கப்பட்ட பகுதிகளை பாதுகாக்கிறது. எரிச்சல் மிக்க பகுதிகளில் கற்றாழை ஜெல்லினை நேரடியாக பூசிக் கொள்வதன் மூலம் நற்பயன்களை அடையலாம்.

Helps With Sunburns

Shutterstock

சூரிய ஒளியில் இருந்து கற்றாழை எவ்வாறு பாதுகாக்கிறது

கற்றாழை ஜெல்லில் அதிகப்படியான நோய் எதிர்ப்புச் சக்திகள் உள்ளது. இது புறஊதாக் கதிர்களிடம் இருந்து நம் சருமத்தினைக் காக்கிறது. சரும நோய்களுக்கும் இது சிறந்த நிவாரணியாக செயல்படுகிறது. ஊட்டச்சத்துக்கள் மிகுந்த இந்த கற்றாழை ஜெல்லானது பலவிதமான சரும நோய்களில் இருந்து நம்மைக் காக்கிறது.

காயங்கள் மற்றும் பூச்சிக்கடியில் இருந்து பாதுகாக்க

கற்றாழை ஜெல்லில் உள்ள அதிகப்படியான நோய் எதிர்ப்புச் சக்தியானது நம் சருமத்தில் உள்ள அனைத்துவிதமான நோய்களையும் நீக்குகிறது.

காயங்கள் நீக்கும் கற்றாழை

கற்றாழை ஜெல்லில் உள்ள நோய் எதிர்ப்பு சக்தியானது காயங்கள் மற்றும் பூச்சிக் கடிக்கு மருந்தாக பயன்படுகிறது. மேலும், கற்றாழை ஜெல்லின் மூலம் தயாரிக்கப்படும் கலவையானது சருமத்தில் ஏற்படும் எரிச்சலுக்கும் மருந்தாக பயன்படுகிறது.

தழும்புகளைக் குறைக்கும் கற்றாழை

தோல் சுருக்கம் மற்றும் முகத்தில் ஏற்படும் தழும்புகளுக்கும் மருந்தாக இந்த கற்றாழை ஜெல் பயன்படுகிறது. முக்கியமாக கர்ப்பிணி பெண்களுக்கு அறுவைச் சிகிச்சைகளுக்குப் பிறகு ஏற்படும் தழும்புகளை குணப்படுத்த பயன்படுகிறது. இதனை பயன்படுத்தும் இடங்களில் சிறு எரிச்சல் ஏற்பட்டாலும் தொடர்ந்து பயன்படுத்தி வந்தால் தழும்புகள் மறையும்.

கற்றாழையின் மூலம் முடிக்குக் கிடைக்கும் நன்மைகள் (Benefits For Hair)

முடி அடர்த்தியாக வளர

கற்றாழை ஜெல்லானது சரும பிரச்சனைகளுக்கு மட்டுமல்ல, முடி தொடர்பான பிரச்சனைகளுக்கும் மருந்தாகப் பயன்படுகிறது. பெரும்பாலும், அடர்த்தியான முடிகள் வளர இது உதவுகிறது.

எவ்வாறு பயன்படுத்துவது

கற்றாழைஜெல் மற்றும் கடகு எண்ணெய் கலந்த கலவையானது அடர்த்தியான முடி வளர பயன்படுகிறது.

தேவையான பொருட்கள்
  1. 2 தேக்கரண்டி கற்றாழை ஜெல்
  2. 1 தேக்கரண்டி கடகு எண்ணை
பயன்படுத்தும் முறை

கற்றாழை ஜெல் மற்றும் கடகு எண்ணெய்யினையும் நன்றாக கலக்க வேண்டும். பின்னர் அந்தக் கலவையினை உச்சந்தலையில் வைத்து நன்றாக மசாஜ் செய்ய வேண்டும். ஓர் இரவு கழித்து தலையினை நன்றாக சேம்பு போட்டு கழுவுவ வேண்டும். இந்த கற்றாழை ஜெல்லானது உச்சந்தலையில் உள்ள இறந்த செல்களை நீக்கி அடர்த்தியான முடியினைப் பெற உதவுகிறது.

பொடுகுத் தொல்லை நீங்க

இரசாயனம் அதிகமான சேம்புகளைக் காட்டிலும் கற்றாழை ஜெல்லானது உங்களது தலையில் உள்ள பொடுகுத் தொல்லைகளை எளிதில் நீக்கும்.

Reduces Dandruff

Shutterstock

தலையில் பொடுகு ஏற்பட ஏராளமான காரணங்கள் உள்ளன. எண்ணெய் வழிந்த தலை, தலையில் அதிகப்படியான இறந்த செல்கள், சுகாதாரமின்மை, தொடர்ந்து தலையினை சுத்தமாக வைத்துக் கொள்ளலாமல் இருத்தல் உள்ளிட்டவை இதற்குக் காரணமாகும். கற்றாழை ஜெல்லில் உள்ள நோய் எதிர்ப்புச் சக்தியானது இந்தப் பிரச்சனைகள் அனைத்தையும் எளிதில் தீர்க்கும் குணாதசியங்களைக் கொண்டுள்ளது.

உச்சந்தலையில் முடி கொட்டுவதை தடுக்கும்

தலையில் ஏற்படும் அமிலத் தன்மையின் காரணமாக உச்சந்தலையில் முடிகொட்டுதல் பிரச்சனை ஏற்படுகிறது. பெரும்பாலானோருக்கு இது அதிகப்படியாகவே காணப்படும் பிரச்சனையாகும். உச்சந்தலையில் மட்டும் ஏற்படும் இதுபோன்ற பிரச்சனைகளை கற்றாழை ஜெல்லானது குணப்படுத்தும் மருத்துவத் தன்மைக் கொண்டுள்ளது.

எவ்வாறு வேலை செய்கிறது

அதிக இரசாயனமிக்க சேம்புக்களை தொடர்ந்து பயன்படுத்துவன் மூலம் இதுபோன்ற பிரச்சனைகள் அதிகம் ஏற்படுகிறது. இதற்குத் தகுந்த தீர்வு கற்றாழை மட்டுமே. கற்றாழை ஜெல்லினை பயன்படுத்துவதன் மூலம் இந்தப் பிரச்சனையை சுலபமாக தீர்க்கலாம்.

தலையில் புழுவெட்டு நீங்க

தலையில் ஏற்படும் புழுவெட்டு போன்ற பிரச்சனைகளுக்கு கற்றாழை ஜெல்லானது மிகச் சிறந்த மருந்தாக பயன்படுகிறது. தலைமுடியின் வேரில் ஏற்படும் அலர்ஜிக்கு கற்றாழையே சிறந்த மருந்தாக பரிந்துரைக்கப்படுகிறது.

Conditions Hair

Shutterstock

கற்றாழை ஜெல்லினை தலை முழுவதும் தடவி, பின் சிறிது நேரத்திற்குப் பிறகு சேம்புக் கொண்டு கழுவுவதன் மூலம் புழுவெட்டில் இருந்து தலையினைக் காக்கலாம்.

எவ்வாறு பயன்படுகிறது

கற்றாழையில் உள்ள புரதச் சத்துக்கள் தலையில் உள்ள இறந்த செல்களை நீக்கி புதிய செல்களை ஊக்குவிக்கிறது. இதன் மூலம் பலவீனமான மற்றும் உதிர்ந்த முடிகள் நீங்கி புதியதாகவும், அடர்த்தியாகவும் முடிகள் வளர்கிறது.

உடலுக்கு ஏற்படும் நன்மைகள் (Benefits of Aloe Vera for Health)

அழற்சி நீக்கும் கற்றாழை

கற்றாழை சாறினை பருகுவதன் மூலம் உடலில் ஏற்படும் அழற்சி நீங்குகிறது.

கற்றாழை சாறு தயாரிக்க தேவையானப் பொருட்கள்

ஒரு கற்றாழை தண்டு, ஒரு டம்பள் தண்ணீர், ஒரு தேக்கரண்டி தேன்

எவ்வாறு பயன்படுத்துவது

கற்றாழையின் மேல் தோலினை நீக்கி உள்ளே உள்ள கண்ணாடி போன்ற ஜெல்லினை மட்டும் எடுத்துக் கொள்ள வேண்டும். அதனை நன்றாக அரைத்துக் கொள்ள வேண்டும். பின், அதில் தண்ணீர் மற்றும் தேனைக் கலந்து மீண்டும் அரைத்து கலவையாக்கி கொள்ள வேண்டும்.

பயன்படுத்தும் முறை

இந்தக் கலவையினை அழற்சி மற்றும் பூச்சிக் கடித்த இடங்களில் தடவ வேண்டும்.கற்றாழையில் உள்ள நோய் எதிர்ப்பு சக்தியானது அழற்சி மற்றும் பூச்சிக் கடியின் மூலம் பாதிக்கப்பட்ட இடங்களை விரைவில் குணப்படுத்தும்.

விளைவுகள்

குறிப்பாக இந்த கற்றாழை ஜெல்லினை இரைப்பை தொடர்பான அலர்ஜி பிரச்சனைகள் இருக்கும் நபர்கள் பயன்படுத்துவதை தவிர்க்க வேண்டும்.

நெஞ்செரிச்சல் மற்றும் அசிடிட்டி நீங்க

இந்த கற்றாழை சாறானது நெஞ்செரிச்சல், அசிடிட்டி, நெஞ்சு வலி மற்றும் வயிறு தொடர்பான பிரச்சனைகளுக்கு மருந்தாகப் பயன்படுத்தப்படுகிறது. கற்றாழை ஜெல்லில் உள்ள நோய் எதிர்ப்புச் சக்திகள் வயிறு தொடர்பான பிரச்சனைகளுக்கு மருந்தாகப் பயன்படுத்தப்படுகிறது.

கொழுப்பு மற்றும் இரத்தத்தில் சர்க்கரை அளவை கட்டுப்படுத்த

Reduces Cholesterol And Regulates Blood Sugar

Shutterstock

கற்றாழை ஜெல்லானது கொழுப்பு சம்பந்தமான பிரச்சனைகளை ஆரம்பக்கட்டத்திலேயே கட்டுப்படுத்த பயன்படுகிறது. மேலும், இது இரத்தத்தில் உள்ள சர்க்கரையின் அளவை சீராக பராமரிக்கவும் பெரிதும் உதவுகிறது. குறிப்பாக, நீரழிவு நோய் உள்ளவர்கள் இந்த ஜெல்லினை தொடர்ந்து பயன்படுத்துவதன் மூலம் உடல் நலத்தில் முன்னேற்றத்தினைக் காணலாம். மருத்துவத் துறையிலும் இது நிரூபிக்கப்பட்டுள்ளது.

பற்கள் மற்றும் ஈறுகளுக்கு ஆரோக்கியத்தை தரும் கற்றாழை

கற்றாழையில் இருந்து தயாரிக்கப்படும் பற்பசையானது பற்கள் மற்றும் ஈறுகளுக்கு ஆரோக்கியத்தைத் தருகிறது. இந்த பற்பசையின் மூலம் பல் துலக்கினால் பற்கள் வலுப்பெறும். ஈறு தொடர்பான பிரச்சனைகள் நீங்கும். மேலும், வாய் துர்நாற்றத்திலிருந்து விடுபடலாம். இந்த பற்பசையினை வீட்டிலேயே தயாரிக்கலாம்.

Maintains Oral Health

Shutterstock

தேவையான பொருட்கள்
  • 3 தேக்கரண்டி கற்றாழை ஜெல்
  • 5 தேக்கரண்டி சமையல் சோடா உப்பு
  • 5 தேக்கரண்டி வெஜிடபில் கிளசரின்
  • புதினா
  • யூக்கலிப்டஸ் எண்ணை
  • கண்ணாடிப் பாத்திரம்
செய்முறை

முதலில் கற்றாழை ஜெல்லினை சமையல் சோடா உப்புடன் நன்றாக சேர்க்க வேண்டும். பின், கிளசரின் மற்றும் புதினா சேர்த்து கண்ணாடிப் பாத்திரத்தில் நன்றாகக் கலக்கவும். பிறகு அதனுடன் யூக்கலிப்டஸ் எண்ணை சேர்த்து கலக்கியப்பின் சிறிது நேரத்தில் உங்களுடைய ஆரோக்கியமான பற்பசை தயாராகி விடும்.

பயன்படுத்தும் முறை

கற்றாழையின் ஜெல்லில் உள்ள கிருமிநாசினியானது பல் மற்றும் ஈறுகளில் ஏற்படும் பிரச்சனைகளைத் தீர்க்கிறது. இந்த கற்றாழை பற்பசையினை பயன்படுத்துவதன் மூலம் ஈறு வீக்கம், பல் கூச்சம் உள்ளிட்ட பிரச்சனைகளில் இருந்து விடுபடலாம்.

நோய் எதிர்ப்பு சக்தியை அதிகரிக்கும் கற்றாழை

கற்றாழையானது நோய் எதிர்புச் சக்திகளை அதிகரிக்கிறது. மேலும், இரத்த அணுக்களில் புதிய செல்களை ஊக்குவிக்கிறது. மேலும், கற்றாழையிலிருந்து கிடைக்கும் நைட்ரிக் ஆக்ஸைடு மற்றும் சைட்டோகின்கள் மூலம் உங்களது நோய் எதிர்புச் சக்திகளை அதிகரிக்க செய்கிறதுs

புற்றுநோயைத் தடுக்கும் கற்றாழை

கற்றாழையில் உள்ள நோய் எதிர்ப்புச் சக்தியானது புற்று நோயை உருவாக்கும் செல்களை அழிக்கும் தன்மைகளையும் கொண்டுள்ளது. கற்றாழையில் உள்ள நோய் எதிர்ப்புச் சக்தியானது நேரடியாக புற்றுநோய்க் கட்டிகளை அழிக்கும் தன்மையினைக் கொண்டுள்ளது.

விளைவுகள்

இரைப்பை பிரச்சனைகள் உள்ளவர்கள் மற்றும் கர்ப்பிணிப் பெண்கள், பாலூட்டும் தாய்மார்கள், கல்லீரல் பிரச்சனை உள்ளவர்கள் இந்த கற்றாழை ஜெல்லினைத் தவிர்க்க வேண்டும்.

மூலப்பிரச்சனையை தடுக்கும் கற்றாழை

மூலப் பிரச்சனைகளுக்கு கற்றாழை அருமருந்தாகப் பயன்படுகிறது. குறிப்பாக வயது முதிர்வு காரணமாக ஏற்படும் மலச்சிக்கல் பிரச்சனைகளுக்கு கற்றாழையில் உள்ள குறிப்பிட்ட அமிலத் தன்மையானது சிறந்த மருந்தாகப் பயன்படுத்தப்படுகிறது.

Helps In Treating Hemorrhoids

Shutterstock

எவ்வாறு பயன்படுத்துவது

மலச்சிக்கலினால் ஏற்படும் எரிச்சல், அரிப்பு போன்ற பிரச்சனைகளுக்கு கற்றாழை ஜெல் சிறந்த மருந்தாகப் பயன்படுத்தப்படுகிறது. இந்த கற்றாழை ஜெல்லினை ஆசனவாயிலில் ஏற்படும் கொப்புளங்களில் தடவுவதன் மூலம் மூலப்பிரச்சனைகளில் இருந்து விடுபடலாம். குறிப்பாக இதுபோன்ற நோயினால் பாதிக்கப்பட்டவர்கள் தொடர்ந்து கற்றாழையை பயன்படுத்தி வந்தால் பிரச்சனைகளில் இருந்து வெகுவாக விடுபடலாம். இரத்தத்தில் சர்க்கரையின் அளவு குறைவாக உள்ளவர்கள், மற்றும் நீரழிவு நோயாளிகள் மருந்துவரின் ஆலோசனைப் படி பயன்படுத்தலாம்.

கற்றாழையினை தேர்வு மற்றும் பராமரிக்கும் முறை (How To Select And Store Aloe Vera)

கற்றாழைச் செடியானது வறண்ட நிலத்திலும் வளரும் தன்மைக் கொண்டுள்ளது. கற்றாழைச் செடியில் உள்ள ஓர் இலையினை மட்டும் வெட்டி வைப்பதன் மூலம் அதில் இருந்து மஞ்சள் நிற அமிலம் வெளியேறும். அதனை முழுவதுமாக நீக்கியப் பின்பு நீரில் நன்றாகக் கழுவி பின் உலர வைக்க வேண்டும். பின், மேலே உள்ள பச்சை நிறத் தோலினை மட்டும் நீக்கி உள்ளே உள்ள கண்ணாடிப் போன்ற ஜெல்லினை எடுத்துக் கொள்ள வேண்டும். இதனை கத்தி அல்லது தேக்கரண்டி மூலம் எளிதில் எடுத்துக் கொள்ளலாம். அந்த கற்றாழை ஜெல்லினை பிரிட்ஜ்ஜில் வைத்து பாதுகாத்து வைத்துக் கொள்ள வேண்டும். இந்த ஜெல்லினை மேலே குறிப்பிட்டுள்ளதைப் போல தேவைக்கு ஏற்ப பயன்படுத்திக் கொள்ளலாம்.

The post கற்றாழையின் 17 அற்புத பயன்கள்! – Aloe Vera Benefits in Tamil appeared first on STYLECRAZE.

ஆளி விதைகளிகள் 11 அற்புத பயன்கள் – Flaxseeds Benefits in Tamil

$
0
0

ஆளி விதை ஓர் அட்டகாசமான உணவுதான். தாவர உணவுப் பொருட்களிலேயே ஒமேகா 3 கொழுப்பு அமிலங்கள் அதிகம் கொண்டது இது. நமது உடல் செயல்பாடுகளுக்கு அவசியமான இந்தக் கொழுப்பு அமிலங்களை, நமது உடலால் சுயமாக உற்பத்தி செய்ய முடியாது.

Flax seed is an excellent food.

Shutterstock

இந்தக் கொழுப்பு அமிலம் உடலுக்குத் தேவையான அத்தியாவசியக் கொழுப்பு அமிலம் (Essential fatty acid – EFA). ஒமேகா 3 கொழுப்பு அமிலத்துடன் ஒமேகா 6-ம் இருப்பதால், செல் செயல்பாடுகளை ஆரோக்கிய மாக வைத்திருக்கிறது. மூளை வளர்ச்சிக்கு உதவியாக இருப்பதுடன், இதயத்துக்குப் பாதுகாப்பையும் ஆளி விதை உறுதிப்படுத்துகிறது. உடல் நோய் எதிர்ப்பாற்றலை வலுப்படுத்துவதிலும் முக்கியப் பங்காற்றுகிறது.

Plays an important role in strengthening

Shutterstock

ஆளி விதைகளால் நமக்கு என்ன செய்ய முடியும்? What can we do with flax seeds?

What can we do with flax seeds

Shutterstock

இதில், அதிக அளவு மக்னீசியம், பாஸ்பரஸ், செம்பு, தியாமின், மாகனீஸ் மற்றும் நார் சத்துக்கள் அதிக அளவில் இருக்கின்றது. ஒமேகா 3 கொழுப்பு அமிலங்கள் அதிகம் உள்ளதால் காயங்களினால் ஏற்படும் வீக்கங்களை குறைக்கிறது. இதயத்திற்கு ஆரோக்கியத்தை தருகிறது. புற்றுநோய்கள் வராமல் தடுக்கிறது. இதில் உள்ள ஃபைபர் செரிமான பிரச்சனையை போக்குகிறது.

ஆளி விதைகளின் உடலுக்கு கிடைக்கும் நன்மைகள் என்ன? What are the benefits of flax seeds?

புற்றுநோயை எதிர்த்து போராடும்

Fight against cancer

Shutterstock

ஆளி விதையில் உள்ள பைட்டோ கெமிக்கல்கள் ஆன்டி ஆக்ஸிடன்ட்டுகள் போல செயல்பட்டு புற்று நோய் பிரச்சனையை எதிர்த்து போராடும் வல்லமை உடையது. மேலும் இதில் உள்ள லிக்னன்கள், உடலினுள் கெமிக்கல்களால் மாற்றப்பட்டு உடலில் உள்ள ஹார்மோன்களை சமநிலையில் வைத்திருக்கும்.

இதில் உள்ள ஒமேகா 3 கொழுப்பு அமிலங்கள், மார்பகம், புரோஸ்டேட், குடல் புற்றுநோய் தாக்கத்தை குறைக்கும்.

நீரிழிவு நோய்க்கு பயன்படும் ஆளி விதை

Flax seed used for diabetes

Shutterstock

ஆளி விதையின் லிக்னான்ஸ்களை தினசரி உணவில் சேர்த்துக் கொள்வதன் மூலம் இரத்தத்திலுள்ள சர்க்கரையின் அளவு மேம்படுகிறது என்று ஆய்வுகள் தெரிவிக்கின்றன. ஹீமோகுளோபின் ஆய்வுகளின் போது, இரத்தத்தில் 2 வகையான நீரிழிவு நோய்கள் கணடறியப்படுகின்றன. இரண்டு வகையான நீரிழிவு பிரச்சனைக்கு ஆளி விதை அற்புத மருந்தாக பயன்படுகிறது. மேலும் இதில் உள்ள நார்சத்து செரிமான பிரச்சனைகளை எளிதில் போக்கும்.

இதயத்தின் நண்பன்

Flaxseeds Protect The Heart

Shutterstock

ஒமேகா 3 நிரம்பியுள்ள ஆளி விதைகள் தமனிகள் கெட்டிப்படுவதை தவிர்க்கின்றன. வெள்ளை அணுக்களை இரத்த நாளங்களின் உள் வளையங்களுடன் இணைத்து வைப்பதன் மூலம் தமனிகளில் கழிவுகள் சேருவதையும் ஒமேகா 3 தவிர்க்கிறது. இந்த ஒமேகா 3 ஆளி விதைகளில் பெருமளவு குவிந்துள்ளது. இதனால் இதயத்திற்கு ஆரோக்கியத்தை தருகிறது.

வீக்கங்களை குறைக்கும்

2 தேக்கரண்டி ஆளி விதையில் 140% சத்துக்கள் நிரம்பியுள்ளது. மேலும், இதில் ஒமேகா 3 பெருமளவு உள்ளதால் காயங்களால் ஏற்படும் வீக்கங்களை விரைவில் குணப்படுத்துகிறது. அழற்சியினால் ஏற்படும் பிரச்சனைகளுக்கும் நல்ல தீர்வை தருகிறது.

உடல் எடை குறைத்தல்

Weight loss

Shutterstock

ஆளி விதைகளில் நார்ச்சத்துகள் நிரம்பியுள்ளதால் இது உடல் எடையை குறைக்க நினைப்பவர்கள் கட்டாயம் எடுத்து கொள்ள வேண்டும். இதனை சரியான அளவில் எடுத்து கொண்டால் பசியெடுக்காது . மேலும் இது உடல் எடையை கச்சிதமாக வைத்திருக்கவும் பயன்படுகிறது. இதில் உள்ள லிக்னன்ஸ் என்ற ஆன்டிஆக்ஸிடன்ட் தேவையற்ற கொழுப்புகளை

எரிக்க உதவும். அதுமட்டுமல்லாமல் சிறந்த ஊட்டச்சத்தையும் பாதுகாப்பையும் அளிக்கிறது.

செரிமான பிரச்சனையை தீர்க்கும்

ஆளி விதைகளில் ஏராளமான நார்ச்சத்துகள் நிரம்பியுள்ளது. இதனால் செரிமான பிரச்சனையை எளிதில் தீர்க்கும். ஆளி விதை முக்கியமாக மலமிளக்கியாகவும் பயன்படுகிறது. மலச்சிக்கலால் அவதிப்படுகிறவர்களுக்கு இதில் உள்ள நார்ச்சத்து பெருங்குடலில் அனைத்தையும் இளக்கி வெளியேற்றிவிடும். ஆளி விதை அரைத்து மாவாக்கிஉண்ணும் போது, கூடவே நன்றாக தண்ணீர் குடிக்க வேண்டும். இது சப்பாட்டின் அளவை கூட்டும், தினமும் தொடர்ந்து செய்தால்தான் அதன் பலனை முழுமையாக அனுபவிக்க முடியும். ஒமேகா 3 பெருமளவு உள்ளதால் காயங்களால் ஏற்படும் வீக்கங்களை குறைக்கும்.

மாதவிடாய் பிரச்சனைகள்

Menstrual problems

Shutterstock

ஆளி விதையில் லிக்னன் என்ற தாவர வேதிப்பொருள் இருப்பதால் பெண்களின் ஹார்மோன் சமநிலையைப் பாதுகாத்து, மாதவிடாய் சுழற்சியை இயல்பாக வைக்கிறது. ஓழுங்கற்ற மாதவிடாய்க் கோளாறுகளை சரி செய்யும்.

கர்ப்பிணி மற்றும் பாலூட்டும் தாய்மார்களுக்கு..

ஆளி விதையில் நார்ச்சத்து மற்றும் ஒமேகா 3 நிரம்பியுள்ளதால் கர்ப்பிணிகளுக்கு தேவையான புரோட்டின் சத்துக்கள் கிடைக்கிறது. பாலூட்டும் தாய்மார்களுக்கும் இது பயன்படுகிறது. மருத்துவர்கள் இதனை இவர்களுக்கு பரிந்துரைப்பது குறிப்பிடத்தக்கது.

சருமம் பொலிவு பெற

Get the skin brushing

Shutterstock

ஆளிவிதையில் உள்ள ஓமேகா 3 கொழுப்பு அமிலம் சருமத்திற்கு ஆரோக்கியத்தை தருகிறது. இது வறண்ட சருமத்தை மிருவாக்கும், தினமும் உடலில் ஏற்படும் மாசுக்களை நீக்குகிறது. இதில் உள்ள மூலப்பொட்கள் முகம் மற்றும் சரும பிரச்சனைகளுக்கு நல்ல தீர்வை தருகிறது. சுருக்கங்களை போக்கும், முகப்பருக்களை நீக்கும்,

அடர்த்திய முடி

ஆளிவிதையில் உள்ள ஓமேகா 3 கொழுப்பு அமிலம் முடி பிரச்சனையில் இருந்து பாதுகாக்கிறது. இது முடி உடையும் பிரச்சனை, முடி உதிர்தல் போன்ற பிரச்சனைகளில் இருந்து விடுபட்டு வலிமையான முடிகளை வளர செய்கிறது.

2 கப் தண்ணீர் சூட வைத்து அதில் 4 தேக்கரண்டி ஆளி விதைகள் போட்டு வேக வைக்க வேண்டும். பின்னர் சூடு தனிந்த பின்பு அதனை எடுத்து தினமும் உச்சந்தலையில் பூசிக் கொண்டால் வலிமையான முடி வளரும்.

ஆளி விதைகளில் கிடைக்கும் ஊட்டச்சத்துக்கள் Nutrients available in flax seeds

Nutrients available in flax seeds

Shutterstock

புரோட்டீன்கள்
கொழுப்பு அமிலங்கள்
நார்ச்சத்துக்கள்
நியாஸின்
பேண்டோதெனிக் அமிலம்
பிரிடாக்சின்
ரிபோஃப்ளாவினோடு
தையமின்
வைட்டமின் ஏ
வைட்டமின் சி
வைட்டமின் இ
வைட்டமின் கே
சோடியம்
பொட்டாசியம்
கால்சியம்
காப்பர்
அயன்
மக்னீசியம்
மாங்கனீசு
துத்தநாகம்

இந்த ஒரே ஒரு ஆளி விதையில் ஏராளமான அற்புத மூலப்பொருட்கள் ஒளிந்துள்ளது. இதனை பயன்படுத்துவதன் மூலம் ஏராளமான பயன்களை அடையலாம்.

ஆளி விதைகளை எப்படி உள்கொள்வது How To Eat Flaxseeds

How To Eat Flaxseeds

Shutterstock

ஆளி விதைகளை உறவைத்து பின்னர் அதனை 10 நிமிடங்கள் சூடு தண்ணீர் அல்லது 2 மணி நேரம் குளிர்ந்த நீரில் வைத்து பயன்படுத்த வேண்டும்.
இதனை முழுமையாக உட்கொள்வதன் மூலம் முழுவதுமான ஊட்டச்சத்துக்கள் கிடைக்கிறது,

ஆளி விதைகளை நீங்கள் காலை நேரத்தில் எடுத்து கொண்டால் ஊட்டச்சத்துக்கள் அதிகம் கிடைக்கும். இதனை சாப்பிடுவதற்கு உகந்த நேரமும் காலை தான். இதனை சாலடுகளிலும் சேர்த்தும் உட்கொள்ளலாம்.

ஆளி விதைகளை வறுத்தும் சாப்பிடலாம். இவ்வாறு சாப்பிடுவதன் மூலம் உடல் சூட்டை தணிக்கும்.
பேலியோ டயட் இருப்பவர்களும் இந்த ஆளி விதைகளை சாப்பிடலாம்.

எவ்வளவு தான் நன்மை இருந்தாலும் இந்த ஆளி விதைகளில் சில தீமைகளும் உள்ளது.

ஆளி விதைகளின் பக்க விளைவுகள் Side effects of flax seeds

நார்ச்சத்து நிறைந்த உணவுகளை நாம் ஒரேடியாக உணவில் சேர்த்துக்கொள்ளக் கூடாது. சிறிது சிறிதாகத்தான் சேர்த்துக்கொள்ள வேண்டும்

இரத்தத்தில் உள்ள சர்க்கரை நிலைகள்

ஆளிவிதைகள் சர்க்கரையின் அளவை குறைக்கும் என்பதால் நீரிழிவு
நோயினால் பாதிக்கப்பட்டு மருந்து எடுத்து கொள்பவர்கள் இதனை உட்கொள்வதை தவிர்க்க வேண்டும்.

குறைந்த இரத்த அழுத்தம்

Low blood pressure

Shutterstock

ஆளிவிதைகள் இரத்த அழுத்தத்தை அதிகமாக குறைக்கும். இதனால் இரத்த அழுத்தத்தால் பாதிக்கப்பட்டு மருந்து எடுத்து கொள்பவர்கள் கண்டிப்பதாக இதனை தவிர்க்க வேண்டும்.

இரத்தம் உறைதல்

ஆளிவிதைகள் இரத்தத்தை மெதுவாக தான் உறைய வைக்கும். இதனால் இரத்தப்போக்கு கோளாறுகள் இதனை சாப்பிடுவதை தவிர்க்க வேண்டும். அறுவை சிகிச்சைக்கு இரண்டு வாரத்திற்கு முன்பும் ஆளி விதைகளை உட்கொள்ளக் கூடாது.

ஹார்மோன் மற்றும் உணர்திறன் நிலைகள் அதிகரிக்கும்

ஆளி விதைகள் ஈஸ்ட்ரோஜன் ஹார்மோன்களை அதிகப்படுத்தும். இதனால் மார்பக மற்றும் கருப்பை புற்றுநோய் வரவாய்ப்புள்ளது.

கர்ப்பம் மற்றும் தாய்ப்பால் பிரச்சினைகள்

Pregnancy and breastfeeding problems

Shutterstock

ஆளி விதைகளை கர்ப்பிணிகள் மற்றும் பாலூட்டும் தாய்மார்கள் மருத்துவரின் ஆலோசனைப்படி பயன்படுத்த வேண்டும்.

முடிவுரை

எளிதில் கிடைக்கக்கூடிய இந்த ஆளி விதைகள் உடலுக்கு நல்ல ஆரோக்கியத்தை தரும் வல்லமை உள்ளது. உடல் எடையை குறைக்கும் அற்புத மருந்தாகவும் உள்ளது. மேலே கூறிய இதன் நன்மைகள் உங்களுக்கு மிகவும் பயனுள்ளதாக இருக்கும் என நம்புகிறோம்.

The post ஆளி விதைகளிகள் 11 அற்புத பயன்கள் – Flaxseeds Benefits in Tamil appeared first on STYLECRAZE.

2018 Fashion Trends: Bollywood In Pink Brigade

$
0
0

Pink will always be a favored color among women, irrespective of which age bracket they fall into. Why? Because it’s a fabulous color. It also makes one look smokin’ hot, and no kidding about that! And this year, when we saw Ranveer Singh wear pink for his promotional campaigns (for which he’s been applauded and trolled at the same time), we couldn’t help but think back to the last year when pink reigned supreme!

It was the year of pink, quite clearly. Because almost every diva from the Bollywood brigade was seen sporting various shades of pink and in various avatars. They looked drop-dead gorgeous wearing them. And if you’re wondering how you can incorporate this color in your wardrobe, we have prepared this cheat-sheet with various pink avatars of the Bollywood beauties. We hope it inspires you.

1. Aishwarya Rai Bachchan

She’s known worldwide as the beauty with brains. Her sense of style even inspires the elites of the fashion world to up their fashion game. Aishwarya is seen wearing a pink ensemble here. It has intricate embroidery details and net which gives this outfit a soft touch. Aren’t you inspired by this beauty diva to wear a pink outfit?

2. Disha Patna

Disha Patna

dishapatani / Instagram

Disha seems to be acing the lehenga game in this pastel pink lehenga! The Falguni Shane Peacock outfit screams cuteness, don’t you think? Have you ever considered wearing a lehenga in pastel pink with a netted dupatta and pairing it with a choli which is more like a bralette? If you haven’t thought about it, check this outfit, get inspired, and try it! You’ll look gorgeous, we bet!

3. Sonam Kapoor

Sonam Kapoor

sonamkapoor / Instagram

We know that ever since Sonam Kapoor entered the tinsel town, she’s been ruling the fashion world of Bollywood. She’s always seen wearing the latest trends and introducing them to her followers in India. Here too, she’s seen wearing a tailored suit in a pleasant shade of hot pink which is neither too mellow nor too loud. Minimal accessories and makeup with hair tied in a bun, she definitely gave us a fashion flashback.

4. Anushka Sharma

Anushka Sharma

anushkasharma / Instagram

We all love a good piece of striped clothing. But have you ever thought of wearing a pink-striped shirt with a fun character like the Supandi here? Comics and t-shirts can be such a fun combo, don’t you think? Well, at least Anushka here definitely thinks so.

5. Kiara Advani

Kiara Advani

kiaraaliaadvani / Instagram

What is the first image that popped into your mind after seeing Kiara here? Well, to us she resembles the wildflowers. We love the shade of pink here. And the ruffles in the outfit resemble petals here. You can look like a patakha with a pink outfit like this one.

6. Alia Bhat

Alia Bhat

aliaabhatt / Instagram

Alia looks like a strong, independent princess here, doesn’t she? We love this pink gown of hers, which is detailed with flower petal sequins. It’s almost like a beautiful pink garden has been craftily sewed into her dress. If you find an affordable version of this, pick it up right away!

7. Fatima Sana Shaikh

Fatima Sana Shaikh

fatimasanashaikh / Instagram

Sarees make an already pretty woman look even more beautiful. And since India is all about handloom sarees, how about a pink Benarasi saree? Just look at Fatima here, the hot pink saree has only accentuated her beauty to another level. We’d suggest you keep your blouse simple as the saree stands for grandeur and indulgence. Pair it up with heritage jewelry and you’ll look like a goddess.

8. Tamannaah Bhatia

Tamannaah Bhatia

tamannaahspeaks / Instagram

We are in love with this sober, pastel pink anarkali that Tamannaah is sporting. The wrap-on style just adds more elegance to the attire. Pairing a plain Anarkali like this with a floral printed dupatta puts a fresh twist on an otherwise traditional avatar. You can wear a pink anarkali like this to a family gathering or even on a bright summer day.

9. Sara Ali Khan

Sara Ali Khan

saraalikhan95 / Instagram

What does the pink dress that Sara is wearing remind you of? We’re thinking of bubblegum or candy. This satin pink dress which seems to have been knotted like a bow is all you need to charm your date. You’ll definitely find enough boys saying, “I heart you” to you.

10. Karisma Kapoor

Isn’t this such a happy picture? Karisma looks her elegant best in this dusty pink saree. The full sleeves blouse with white embroidery, is all you need to make a plain saree like this look sophisticated. Now you know that you can even pick a plain pink saree, customize it and pull off a look that says: Drop-dead gorgeous.

See, wearing pink doesn’t necessarily make you look like a little girl. Seek inspiration from the above-mentioned divas and paint the city in pink with equal panache and poise. Which is your favorite pick from above? Let us know in the comments below.

The post 2018 Fashion Trends: Bollywood In Pink Brigade appeared first on STYLECRAZE.

7 Cheap DIY Ways To Upgrade Your Wardrobe

$
0
0

We Indians love to shop. And we swear by this mantra whilst we are at it — “sasta aur tikau,” which translates to fashionable and affordable. However, often times, we can’t really follow this mantra because the world around us is only getting expensive with every ticking minute. And this makes being fashionable and penny-wise at the same time an impossible task to master.

According to us, the right way to go about it would be to first evaluate your wardrobe. Raid your own wardrobe and make an analysis report about what needs to be out of the door, what need to be replaced, and what needs to be recycled and transformed into something more useful. Once you are done with cleaning and organizing your wardrobe, you can sit and look at the section of clothes that can be reused and redesigned into something more fashionable. And if you’re wondering how on earth you could achieve that, well, grab some fashion magazines and go through them. There are plenty of DIY tutorials that will guide you through this fashionable journey, you can find them online. Go through them in your free time and identify your fashion style. Meanwhile, we’ve laid out some low-cost tricks and tips to give those old duds of your wardrobe, a new life. Read on and try them.

1. Add Drama To Your T-shirts With Stickers

Add Drama To Your T-shirts With Stickers

lovepatch_style / Instagram

Yeah! It’s as simple as that. We all have at least one or two t-shirts in our wardrobe which we just don’t want to get rid of. Our friends, our love interests, and even our parents get fed up of seeing us in them repeatedly. If given a chance, they’d just throw it into a trash can and pretend like they never existed in the first place. So what do you do to get their eyes off your beloved, adored t-shirt? You give your t-shirt a makeover.

For that, we suggest you go to the nearest craft store and pick up those iron-on adhesives with which you can stick your favorite stickers or those blingy patches which are available in the stores near you.

If you’re an artist, then grab a sketch pen or a paintbrush and draw something of your own on your t-shirt. It would be a unique piece, that’s truly yours!

2. Add Lace To Your T-shirt With Iron-On Hem Tape

Add Lace To Your T-shirt With Iron-On Hem Tape

Shutterstock

A lace top, a lace dress — these tiny lace details can make any garment stand out, don’t you think? Take out your boring top or t-shirt and add some iron-on hem tape. Either cut out a nice moon or heart at the back of your t-shirt and replace it with lace. Or you could add the lace borders around the neck of your t-shirt and amp it up.

3. Revamp Your Denim

 Revamp Your Denim

Shutterstock

If you’re bored of your old pair of jeans and want to give it a makeover, then, consider doing this: male markings on the legs of the jeans and cut the legs off to make it into denim shorts. Once that is done, pick a nice lace or a crochet border and attach it to the hems of your shorts. Either stitch it up or use iron tape to attach it. The end result will leave you with a very peppy pair of denim shorts which can be worn on a casual day outing or to the beach.

4. Shrug Your Scarf

 Shrug Your Scarf

Shutterstock

All that you’ll need for this is a scarf (the one that you no longer intend to cover your head with, but it has a good pattern on it) and some fabric glue. Just wear the scarf around you like a shrug. Then, glue the sides up so that it stays together. It’s as simple as that! This will leave you with a cool shrug which you can take along with you the next time you hit the beach.

5. Tie And Dye Your Old Dress

Tie And Dye Your Old Dress

Shutterstock

If you have a dress which has faded, but you don’t want to throw because it fits you perfectly and makes your figure look slender, then you should consider tie-dye. You’ll find organic color dyes in the nearest craft store, so pick your favorite color. Take the dress you want to dye. With the help of a thread, tie knots on your dress. Mix the dye in water as per instructions and soak your dress in it overnight. The next day, remove your dress from the dye water, squeeze out the excess liquid, remove the knots and leave it for drying. You now have a DIY dyed dress for yourself.

6. Knot Your T-shirts

Knot Your T-shirts

Shutterstock

If you are bored of wearing t-shirts the normal way, then we suggest you wear it the knotty way (pun intended). Just like how it’s shown in the image above. Tie a knot at the waist and slide one side of the t-shirt down to give it an off-shoulder effect. Pair it with high waist shorts or jeans and look like a pop queen.

These were some of the few DIY ideas we had in our minds. Do you have any other suggestions to add to this list? Let us know in the comments section below.

The post 7 Cheap DIY Ways To Upgrade Your Wardrobe appeared first on STYLECRAZE.

ஒரே இரவில் முருப்பருக்களை நீக்குவது எப்படி – Pimple Remedies in Tamil

$
0
0

முகத்தை பொலிவுடனும் பளபளப்பாகவும் வைத்து கொள்ள வேண்டும் என்ற எண்ணம் ஆண், பெண் இருபாலருக்கும் உண்டு. இதில் பெண்களுக்கு மிக அதிகம் உண்டு. எந்த வகையில் முகப்பருக்கள் வந்திருந்தாலும் அதனை நாங்கள் கூறும் டிப்ஸ்கள் மூலம் எளிய முறையில் முறையில் முகப்பருக்களை நீக்கலாம். நாட்டில் 88% பெண்கள் இந்த முகப்பரு பிரச்சனையில் பாதிக்கப்படுகிறார்கள். அவர்கள் முகப்பருக்களை போக்க சரியான தீர்வை தேடாமல் தரமில்லாத கீரிம்களை முகத்தில் தடவி முகத்தை பாழக்குகின்றனர். இது போன்ற பிரச்சனைக்களுக்கு SkinKraft’s SkinID™ Skin Questionnaire என்ற இணையதளத்தில் நீங்கள் கேள்விகள் கேட்டால் தோல் சம்பந்தமான நிபுணர்கள் உங்களது கேள்விகளுக்கு தகுந்த பதிலளிப்பார்கள்..

Acne Homepages

Shutterstock

முகப்பருக்கள் முகப்புண்கள், அழற்சி, முகத்தில் எண்ணெய் சுரப்பிகள் காரணமாகவும் முகத்தின் தோல் பாதிக்கப்பட்டு முகப்பருக்களாக வெளியில் தெரிகிறது. இது முகத்தில் கொப்புளங்கள், பருக்கள், புள்ளிகள் போன்றும் காணப்படும். எண்ணெய் சுரப்பிகள் உள்ளங்களை மற்றும் உள்ளங்காலை தவிர அனைத்து இடங்களிலும் இந்த பிரச்சனை ஏற்படும்.

பருக்கள் எப்படி ஏற்படுகிறது How do pimples occur?

பருக்கள் எப்பட்டவுடன் மருத்துவர்கள் ஆலோசனைப்படி சிகிச்சை எடுத்து கொண்டாதல் முருப்பருக்கள் பரவுவதை தடுக்கலாம். சிகிச்சை எடுத்து கொள்ளவில்லை என்றால் சருமத்தில் உள்ள பருக்களை நீக்குவது கடினம். பருக்கள் பல்வேறு காரணங்களால் முகத்தில் அதிகம் பரவுகிறது.

How do pimples occur

Shutterstock

  • இறந்த செல்கள் மூலம் பரவுகிறது.

முகத்தில் உள்ள இறந்த செல்களை அகற்ற வேண்டும். அவ்வாறு அகற்றவில்லை என்றால் முகத்தில் கரும்புள்ளிகள் மற்றும் முகப்பருக்கள் வளர அதுவே காரணமாக இருக்கிறது.

  • மரபணு மூலம் ஏற்படுகிறது

மரபணு பிரச்சனைகள் மூலமும் இந்த முகத்தில் முகப்பருக்கள் ஏற்பட்டால் அதற்கு தீர்வு காண முடியாது. தோல் நிபுணர்கள் ஆலோசனைப்படி நீங்கள் குறிப்பிட்ட காலத்திற்கு மருந்துகள் எடுத்து கொள்ள வேண்டியது அவசியம். அப்படி எடுத்து கொண்டால் ஒரளவுக்கு தடுக்க முடியும். ஆனால் முற்றிலும் தடுக்க முடியாது.

  • இளமைப்பருவம்

இளமைப்பருவத்தின் போதும் இந்த முகப்பருக்கள் வரும். பொதுவாக 13 வயதில் வரும் இந்த முகப்பருக்கள் 100ல் 85 பேருக்கு 35 வயது வரை நீடிக்கும். பெற்றோர்களுக்கு இந்த பிரச்சனை இருந்தால் வாரிசுகளுக்கும் வர அதிக வாய்ப்புள்ளது.

  • ஹார்மோன்கள்

இளமைப்பருவத்தில் ஹார்மோன்களின் அளவு மாறும். இதனால் அது போன்ற சமயங்களில் முகப்பருக்கள் ஏற்படும். இது பொதுவாக பெரும்பாலோனோருக்கு இந்த ஹார்மோன் பிரச்சனைகளினால் ஏற்படும்.

  • பாக்டீரியா

முகத்தில் உள்ள சுரப்பிகள் அடைப்பு மற்றும் பாக்டீரியா தொற்று போன்ற பிரச்சனைகளினாலும் முகப்பருக்கள் வரலாம். என்சைம் அதிகமாக இருப்பவர்களுக்கும் முகத்தில் பருக்கள் ஏற்படலாம். இந்த ஆண்ட்ரோஜன் ஹார்மோன் சுரப்பை அதிகப்படுத்தி பருக்களை அதிகரிக்க செய்கிறது.

  • டெஸ்டோஸ்டிரோன் ஹார்மோன்

டெஸ்டோஸ்டிரோன் ஹார்மோன் குறைவாக சுரக்கும் போது முகத்தில் பருக்கள் ஏற்படுகிறது. இறந்த செல்கள் முகத்தில் ஒட்டிக் கொண்டு இருப்பதன் மூலமும் முகப்பருக்கள் ஏற்படுகிறது.

  • பால் பொருட்கள்

பசுவின் பால் மற்றும் பால் சார்ந்த பொருட்களை அதிகமாக சாப்பிடுவதன் மூலமும் பருக்கள் பதிப்பு தீவிரமடையும். மேலும், அதிக கிளைசெமிக் உணவின் காரணமாகவும் பருக்கள் ஏற்படும்.

Oil products

Shutterstock

  • எண்ணெய் பொருட்கள்

இன்றை தலைமுறையினருக்கு முக்கிய பிரச்சனையாக இருப்பது இந்த
எண்ணெய் பொருட்களின் மூலம் ஏற்படும் முகபருக்கள் தான்.
எண்ணெய் பொருட்களை அதிகம் உட்கொள்வதன் மூலம் இந்த முகப்பருக்கள் அதிகரிக்க காரணமாக அமைகிறது.

  • மருந்து,மாத்திரைகள்

சில மருந்து மத்திரைகள் அதிகம் உட்கொள்வதால் ஆண்ட்ரோஜன் ஹார்மோன் சுரப்பை அதிகப்படுத்தி பருக்களை வரவேற்கிறது.

  • சரும தொடர்பான பொருட்கள்

முகப்பொலிவு கிடைக்கும் நானும் ஐஸ்வர்யா ராய் மாறி ஆகிடுவேன் என நினைத்து முகத்தில் அதிகமாக கீரிம்களை பயன்படுத்துவதால் அதுவும் முகப்பருக்கள் அதிகம் வர காரணமாக அமையும். சம்மந்தமில்லாத மருத்துவர்களின் ஆலோசனை இல்லாமல் தோல் சம்மந்தமான பொருட்களை முகத்தில் பயன்படுத்துவன் மூலம் இந்த பிரச்சனைகள் ஏற்படுகிறது.

  • மேக்கப்

ஆயில் மேக்கப் செய்து கொள்வதன் மூலமும் இந்த முகப்பரு பிரச்சனைகள் ஏற்படுகிறது. மேலும், அதிகமாக மேக்கப் போடுவதன் காரணமாகவும் முருப்பருக்கள் ஏற்படும். இயற்கை பொருட்களை பயன்படுத்தி மேக்கப் செய்து கொள்வதன் மூலம் இதிலிருந்து
விடுபடலாம்.

  • பயணங்கள்
Trips

Shutterstock

தொடர் பயணங்கள் மூலம் அங்குள்ள சுற்றுச்சூழல் மற்றும் வெப்பநிலை, ஈரப்பதம், வானிலை, தண்ணீரின் காரணமாகவும் முகத்தில் பருக்கள் வர வாய்ப்பு அதிகம் உள்ளது.

  • மன அழுத்தம்
 mental stress

Shutterstock

முகப்பருக்கள் வர மற்றொரு முக்கிய காரணமாக இருப்பது மன அழுத்தம். தனிமையின் காரணமாக ஏற்படும் மன அழுத்ததின் காரணமாகவும் இந்த முகப்பருக்கள் ஏற்படுகிறது.

  • உராய்வு மற்றும் தேய்த்தல்

தொடர்ந்து சருமத்தை தேய்த்து கொண்டு இருப்பதனாலும் இந்த முகப்பருக்கள் ஏற்படுகிறது. ஹெல்மெட் மற்றும் அழுத்ததின்
காரணமாகவும் இந்த பிரச்சனை ஏற்படுகிறது.

  • முகப்பரு என்பது என்ன?

பொதுவாக இளமைப்பருவத்தில் இந்த முகப்பரு பிரச்சனை அதிகம் காணப்படுகிறது. 11 வயதில் துவங்கும் இந்த முகப்பரு 100ல் 85 பேருக்கு 30
வயது வரை நீடிக்கும். இளமைப் பருவம் கடந்த

பிறகும் நீடிக்கவும் வாய்ப்புள்ளது.

பருக்கள் அகற்றுவதற்கான வீட்டு வைத்தியம் Home remedies for removal of pimples

1. பருக்கள் அகற்றுவதற்கான பற்பசை

Toothpaste to remove pimples

Shutterstock

  • தேவையான பொருட்கள் 

பற்பசை
சிறிய பஞ்சு

  • தயார் செய்யும் முறை

சிறிய பஞ்சுமும் பற்பசையுமே போதுமானது.

  • பயன்படுத்தும் முறை

சிறிய பஞ்சை கொண்டு பற்பசையை எடுத்து பருக்கள் ஏற்படுள்ள இடத்தில் தடவி ஒரு இரவு விடுவதன் மூலம் தீர்வு காணலாம்.

  • கிடைக்கும் பலன்கள் 

இந்த பற்பசையினை பயன்படுத்துவதான் மூலம்
முகப்பருக்களின் தீவிரத்தை குறைக்கிறது. இது நோய் எதிர்ப்பு சக்தியை அதிகரித்து பாக்டீரியாக்களை அழிக்கிறது. இந்த
பற்பசையினை முகம் மற்றும் கால்கள் மற்றும் கைகளில் இதனை பயன்படுத்தலாம். எண்ணெய் வழியும் முகத்தை சேர்ந்தவர்களும்,
சாதாரணமானாவர்கள் கூட இதனை பயன்படுத்தலாம்.

2. பருக்களை விரட்டும் அதிசய எண்ணெய்கள்

Wonderful oils that dissolve burdens

Shutterstock

  • குங்கிலியம் எண்ணெய் 

தயாரிக்க தேவையான பொருட்கள்

1 மற்றும் 2 சிறு துளி குங்கிலியம் எண்ணெய்
காது குடையும் பஞ்சு

  • பயன்படுத்தும் முறை

குங்கிலியம் எண்ணெய் எண்ணெய்யை காது குடையும் பஞ்சாய் நனைத்து அதனை நேரடியாக முகத்தில் தேய்த்து பயன்படுத்தலாம். ஒரு இரவு வரை இந்த எண்ணெய்யை தேய்த்து கொண்டால் நல்ல பலன் கிடைக்கும்.

  • கிடைக்கும் பலன்

குங்கிலியம் எண்ணெய் வீக்கம் மற்றும் பாக்டீரியாக்களை அழிக்கும் வல்லமை உடையது. இந்த எண்ணெய் சத்தான புதிய செல்களை புத்துயிர் பெற செய்கிறது. இது நெற்றியில் ஏற்படும் பருக்களையும் நீக்குகிறது. இந்த எண்ணெய்யை அனைவரும் பயன்படுத்தலாம்.

3. லாவெண்டர் எண்ணெய்

  • தேவையான பொருட்கள் 

சில துளிகள் லாவெண்டர் எண்ணெய்
மட்டுமே.

  • பயன்படுத்து முறை 

முகப்பருக்கள் உள்ள இடங்களில் இந்த லாவெண்டர் எண்ணெய் பயன்படுத்துவதன் மூலம் நல்ல தீர்வை காணலாம். இதனை சமருத்தில் தேய்த்து பின்பு சில மணி நேரங்கள் விட்டு மீண்டும் தேய்க்க வேண்டும். லாவெண்டர் எண்ணெய்யில் உள்ள நோய் எதிர்ப்பு சக்தியானது முகப்பருக்களை அழிக்கிறது. இந்த லாவெண்டர் எண்ணெய்யினை முகத்திற்கு மட்டுமே பயன்படுத்து மட்டுமின்றி அனைத்து
இடத்திற்கும் பயன்படுத்தலாம்.

4. எலுமிச்சை எண்ணெய்

  • தேவையான பொருட்கள் 

3 துளிகள் எலுமிச்சை எண்ணெய்
பஞ்சு

  • தயாரிக்கும் முறை

எலுமிச்சை எண்ணெய் மற்றும் பஞ்சு மட்டுமே
போதுமானது.

  • பயன்படுத்தும் முறை

முகத்தை நன்றாக கழுவி சுத்தம் செய்ய பின்பு. எலுமிச்சை எண்ணெய்யை பஞ்சில் நனைத்து பருக்கள் வந்த இடத்தில் தடவ வேண்டும். இந்த
எலுமிச்சை எண்ணெய்யை தடவிய பின்பு சில மணி நேரம் கழித்து மீண்டும் தேய்க்க வேண்டும். இரவில் தூங்க போவதற்கு முன்பு இதனை செய்ய வேண்டும்.

  • கிடைக்கும் பலன்கள்

எலுமிச்சை எண்ணெய்யில் நுண்ணுயிர்களை அழிக்கும் சக்தி உள்ளது. இது சருமத்தை பாதுகாக்கிறது. இந்த எண்ணெய்யை உடலில்
அனைத்து இடங்களிலும் பயன்படுத்தலாம். அந்தரங்க பகுதிகளை தவிர.

5. தேயிலை மர எண்ணெய்

  • தேவையான பொருட்கள்

1 அல்லது 2 சொட்டு தேயிலை மர எண்ணெய்
1 தேக்கரண்டி ஆலிவ் ஆயில் அல்லது எலந்தை எண்ணெய்

  • தயாரிக்கும் முறை

தேயிலை மர எண்ணெய் மற்றும்
1 தேக்கரண்டி ஆலிவ் ஆயிலை நன்றாக கலந்து கொள்ள வேண்டும்.

  • பயன்படுத்தும் முறை

கலக்கப்பட்ட எண்ணெய்யை பாதிக்கப்பட்ட இடங்களில் தடவி கொள்வதன் மூலம் முகப்பரு பிரச்சனையில் இருந்து விடுபடலாம். இந்த எண்ணெய்யை சமருத்தில் தேய்த பின்பு சில மணி நேரங்கள் கழித்து மீண்டும் சருமத்தில் தடவ வேண்டும்.

  • கிடைக்கும் பலன்கள்

தேயிலை மர எண்ணெய்யானது பொதுவாக அனைவரும் பயன்படுத்துகின்றனர். இது நெற்றி, கன்னம், உதடு போன்ற இடங்களில் நுண்ணுயிர்களை அழிக்கிறது. இது சிஸ்டிக் பருக்களுக்கு முக்கிய தீர்வாக பயன்படுகிறது.

6. திராட்சை எண்ணெய்

  • தேவையான பொருட்கள் 

சில துளிகள் திராட்சை எண்ணெய் மட்டுமே.

  • பயன்படுத்தும் முறை 

முகத்தை கழுவி சுத்தம் செய்த பின்பு சில துளிகள் திராட்டை எண்ணெய்யை எடுத்து முகத்தை தடவி சிறிது நேரம் மசாஜ் செய்ய வேண்டும். இந்த எண்ணெய்யை தடவி ஒரு நாள் முழுவதும் இருக்க வேண்டும்.

  • கிடைக்கும் பலன்கள் 

திராட்சை எண்ணெய் பொதுவாகவே நோய் எதிர்ப்பு சக்தி கொண்டது. இதனை பயன்படுத்துவன் மூலம் சமருத்திற்கு மிகவும் நன்மை கிடைக்கும். இது கரும்புள்ளிகள் மற்றும் முகப்பருக்களை நீக்குகிறது.

7. சீமைமுட்செவ்வந்தி எண்ணெய்

  • தேவையான பொருட்கள்

சீமைமுட்செவ்வந்தி எண்ணெய் காப்ஸ்யூல்கள்

  • பயன்படுத்தும் முறை

சீமைமுட்செவ்வந்தி எண்ணெய்யை பாதிக்கப்பட்ட இடங்களில் ஒரு இரவு வரை தடவ வேண்டும் பின்னர், காலையில் எழுந்த அதனை கழுவ வேண்டும். இது போல் சில நாட்களுக்கு சீமைமுட்செவ்வந்தி எண்ணெய்
காப்ஸ்யூல்களை தினமும் எடுத்து கொள்ள வேண்டும்.

  • கிடைக்கும் பலன்கள்

இந்த எண்ணெய்யை பயன்படுத்துவன் மூலம் முகப்பரு பிரச்சனையில் இருந்து விடுபடலாம். மேலும், சருமம் மிருவதாகவும், வறண்ட சருமத்தில் இருந்த தப்பிக்கலாம்,

8. எலுமிச்சைப் புல் எண்ணெய்

  • தேவையான பொருட்கள்

சிறு துளி எலுமிச்சைப் புல் எண்ணெய்
ஒரு சிறிய ஸ்ப்ரே பாட்டில்
தண்ணீர்

  • தயாரிக்கும் முறை

ஸ்ப்ரே பாட்டிலில் பாதியளவு தண்ணீர் நிரப்பிக் கொள்ள வேண்டும். பின்னர் அதில் எலுமிச்சைப் புல் எண்ணெயை கலந்து கொள்ள வேண்டும்.

  • பயன்படுத்தும் முறை

ஸ்ப்ரே பாட்டிலில் உள்ள எண்ணைய்யை முகத்தில் தடவி முகம் காயும் வரை இருக்க வேண்டும். காய்ந்த பின்னர் மீண்டும் அந்த எண்ணெய்யை தடவ வேண்டும்.

  • கிடைக்கும் பலன்

இது முகப்பருக்களை உருவாக்கும் பாக்டீரியாக்களை நீக்கும் தன்மை கொண்டது.

9. அர்கன் ஆயில்

Argan Oil

Shutterstock

  • தேவையான பொருட்கள்

அர்கன் ஆயில் மட்டுமே போதுமானது

  • பயன்படுத்தும் முறை

முகத்தை நன்றாக கழுவிய பின்பு அர்கன்
ஆயிலை முகத்தில் தடவி சிறுது நேரம் மசாஜ் செய்ய வேண்டும்.

  • கிடைக்கும் பலன்கள்

அர்கன் ஆயிலை சருமம் எளிதில் உள்ளிழுத்து கொள்ளும் தன்மை கொண்டது. மேலும், இதில் உள்ள வைட்டமின் இ முகத்தில் ஏற்படும்
பிளவுகளை தடுக்கிறது.

10. ஆமணக்கு எண்ணெய்

Castor oil

Shutterstock

  • தேவையான பொருட்கள்

ஆமணக்கு எண்ணெய்
துணி
தண்ணீர்

  • பயன்படுத்தும் முறை

முகத்தை நன்றாக கழுவி காய வைத்த பின்பு சிறு துளி ஆமணக்கு எண்ணெய்யை சருமத்தில் தடவி 2 அல்லது மூன்று மசாஜ் செய்து கொள்ள வேண்டும்.

  • கிடைக்கும் பலன்கள்

ஆமணக்கு எண்ணெய் முகத்தில்
அசுத்தங்களை ஏற்படுத்தும் பாக்டீரியாக்களை
அழிக்கிறது. இதில் உள்ள ரிச்சினியிக் அமிலம்சருமத்தை மிருவாகவும்,
ஆரோக்கியமானதாகவும் வைக்கிறது. இந்த
எண்ணெய் பயன்படுத்துவதற்கு முன்பு
மருத்துவரின் ஆலோசனை கேட்பது நல்து.

11. எப்சம் உப்பு

Epsom salt

Shutterstock

  • தேவையான பொருட்கள்

1 தேக்கரண்டி எப்சம் உப்பு
அரை கப் தண்ணீர்
பஞ்சு

  • பயன்படுத்தும் முறை

எப்சம் உப்பை தண்ணீர் கலந்து அந்த தண்ணீரை பஞ்சில் நனைத்து பாதிக்கப்பட்ட இடங்களில் தடவ வேண்டும். இதனை இரண்டு அல்லது
மூன்று முறை செய்ய வேண்டும்.

  • கிடைக்கும் பலன்கள்

எப்சம் உப்பை பயன்படுத்துவதன் மூலம் By using the Epsom salt

முகத்தில் உள்ள இறந்த செல்கள் நீக்கி புதிய செல்களை புத்துயிர் பெற செய்யும்.

12. ஆப்பிள் வினிகர்

  • தேவையான பொருட்கள்

1 கப் தண்ணீர்
1 கப் ஆப்பிள் வினிகர்
பஞ்சு

  • பயன்படுத்தும் முறை

ஆப்பிள் வினிகரை தண்ணீர் கலந்து அந்த
தண்ணீரை பஞ்சில் நனைத்து பாதிக்கப்பட்ட
இடங்களில் பயன்படுத்த வேண்டும். பின்னர் சிறிது நேரம் கழித்து குளிர்ந்த நீரில் அந்த இடத்தை கழுவ வேண்டும்.

  • கிடைக்கும் பலன்கள்

ஆப்பிள் வினிகரை பயன்படுத்துவதால் முகத்தை எண்ணெய் வழிவதை தடுக்கும்.
முகப்பருக்களுக்கு காரணமான
பாக்டீரியாக்களை அழிக்கும். முக்கில் ஏற்படும் பருக்களை கூட எளிதில் நீக்கி விடும்.

13. பேக்கிங் சோடா

  • தேவையான பொருட்கள்

1 தேக்கரண்டி சமையல் சோடா
தண்ணீர்

  • பயன்படுத்தும் முறை

சமையல் சோடா கலந்த தண்ணீரை பருக்கள் வந்த இடங்களில் தடவ வேண்டும். சிறிது நேரம் கழித்து சுடு தண்ணீர் அந்த இடங்களை கழுவ
வேண்டும்.

  • கிடைக்கும் பலன்கள்

இதனை சருமத்தில் பயன்படுத்துவதால்
முகப்பருக்களை தடுக்கும். மேலும் வீக்கங்களை கட்டுப்படுத்தும்.

14. மக்னீசிய பால்

  • தேவையான பொருட்கள்

மக்னீசிய பால் மட்டுமே போதுமானது பயன்படுத்தும் முறை மக்னீசிய பாலை நேரடியாக பருக்கள் மற்றும் வறண்ட சருமத்தில் பயன்படுத்தலாம். இதனை
குறைந்தது 30 முதல் 40 நிமிடம் வரை
பாதிக்கப்பட்ட இடங்களில் பயன்படுத்த
வேண்டும்.

  • கிடைக்கும் பலன்

இதனை பயன்படுத்துவதன் மூலம் பருக்கள்
மற்றும் வறண்ட சருமத்தில் இருந்து விடுபடலாம்.

15. மீன் எண்ணெய்

Fish oil

Shutterstock

  • தேவையான பொருட்கள்

மீன் எண்ணெய் மட்டுமே போதுமானது பயன்படுத்தும் முறை மீன் எண்ணெய் மாத்திரைகளை தண்ணீர் போட்டு பாதிக்கப்பட்ட இடங்களில் பயன்படுத்தலாம். முகப்பருக்கள் அதிகம்
உள்ளவர்கள் இதனை தொடர்ந்து சில மாதங்கள் எடுத்து கொள்ள வேண்டும். ஆனால் இந்த எண்ணெய் எல்லோருக்கும் உகந்தது இல்லை

  • கிடைக்கும் பயன்கள்

முகப்பருக்களினால் ஏற்படும் வீக்கங்களை குறைக்கிறது. பருக்கள் குணமாக இது
சீக்கரமான மருந்தும் கூட.

16. தேங்காய் எண்ணெய்

  • தேவையான பொருட்கள்

தேங்காய் எண்ணெய் மட்டுமே போதுமானது

  • பயன்படுத்தும் முறை

தேங்காய் எண்ணெய்யை சூடு செய்து பாதிக்கப்பட்ட இடங்களில் சில மணி நேரம்
மசாஜ் செய்ய வேண்டும்.

  • கிடைக்கும் பலன்கள்

வறண்ட சருமத்திற்கு தேங்காய் எண்ணெய்
மிகவும் நல்லது. இதில் நோய் எதிர்ப்பு உள்ளதால் பருக்களை தடுக்கும். இளமைப்பருவத்தில் ஏற்படும் பருக்களுக்கு தேங்காய் எண்ணெய் நல்ல தீர்வு

17. வாசலின்

  • தேவையான பொருட்கள்

வாசலின் மட்டுமே போதுமானது

  • பயன்படுத்தும் முறை

வாசலின் நேரடியாக பருக்கள் மற்றும் பாதிக்கப்பட்ட இடங்களில் பயன்படுத்தலாம். இதனை சில மணி நேரங்கள் தடவி இருக்க
வேண்டும்.

  • கிடைக்கும் பலன்கள்

வாசலின் ஒரு பெட்ரோலியம் ஜெல்லி என்பதால் இது வறண்ட சருமத்திற்கு பயன்படுகிறது. மேலும், பருக்கள் அதிகரிக்காமல் கட்டுப்படுத்துகிறது.

18. பூண்டு

  • தேவையான பொருட்கள்

2 அல்லது 3 பூண்டு
தண்ணீர்

  • பயன்படுத்தும் முறை

பூண்டில் சிறிது தண்ணீர் விட்டு பேஸ்ட் போல் அரைத்து கொள்ள வேண்டும். அதனை பாதிக்கப்பட்ட இடங்களில் நேரடியாக பயன்படுத்தலாம்.

  • கிடைக்கும் பலன்கள்

பூண்டு பருக்கள் உருவாவதை தடுக்கிறது. பூண்டு பேஸ்டை உச்சந்தலையில் பூசுவதன் மூலமும் பருக்களை தடுக்கலாம்.

19. தேன்

  • தேவையான பொருட்கள்

தேன் மட்டுமே போதுமானது பயன்படுத்தும் முறை தேனை பருக்கள் உள்ள இடங்களில் தடவ வேண்டும். இதனை குறைந்தது 30 முதல் 40 நிமிடம் வரை பாதிக்கப்பட்ட இடங்களில் பயன்படுத்த வேண்டும். பின்னர் நல்ல தண்ணீர் முகத்தை கழுவ வேண்டும்.

  • கிடைக்கும் பலன்கள்

தேன் பருக்களை விரட்டும் ஒரு அற்புத மருந்து இதில் நோய் எதிர்ப்பு சக்தி அதிகம் இருப்பதால் எளிதில் முகப்பருக்கள விரட்டியடிக்கிறது.

20. ஆஸ்பிரின் மாத்திரை

  • தேவையான பொருட்கள்

ஆஸ்பிரின் மாத்திரை
தண்ணீர்

  • பயன்படுத்தும் முறை

ஆஸ்பிரின் மாத்திரையை தண்ணீர் சேர்த்து பேஸ்ட் மாதிரி செய்து கொள்ள வேண்டும். அதனை பாதிக்கப்பட்ட இடங்களில் பயன்படுத்த வேண்டும். வறண்ட சருமம் இருப்பவர்கள் இதனை பயன்படுத்துவதை தவீர்க்கவும்.

  • கிடைக்கும் பலன்கள்

ஆஸ்பிரின் மாத்திரையில் வீக்கங்களை கட்டுப்படுத்தும் தன்மை உள்ளது. இதனால் முகப்பரு பிரச்சனைக்கு நல்ல தீர்வை தரும். இதனை முகம் மட்டுமின்றி அனைத்து இடங்களிலும் பயன்படுத்தலாம்.

21. ஐஸ்கட்டி

  • தேவையான பொருட்கள்

ஐஸ்கட்டி
துணி

  • பயன்படுத்தும் முறை

ஐஸ்கட்டியை பருக்கள் உள்ள இடங்களில் வைத்து சிறிது நேரம் தேய்க்க வேண்டும்.

  • கிடைக்கும் பலன்கள்

பருக்களினால் ஏற்படும் வீக்கங்களை ஐஸ்கட்டை பயன்படுத்துவதால் குறைகிறது. மேலும் மிருவதுவான சருமம் கிடைக்கிறது.

அலோ வேரா
தேவையான பொருட்கள்
அலோ வேரா இலை மட்டுமே போதுமானது

  • பயன்படுத்தும் முறை

அலோவேர ஜெல்லை பாதிக்கப்பட்ட இடங்களில் பயன்படுத்த வேண்டும்.
கிடைக்கும் பலன்கள்
பருக்களினால் ஏற்படும் பிரச்சனைகளுக்கு அலோவேர முக்கிய மருந்தாக எடுத்து கொள்ளப்படுகிறது. இதில் உள்ள நோய் எதிர்ப்பு சக்தியானது பருக்களை தடுக்கிறது. பருக்களினால் ஏற்படும் வீக்கங்களை தடுக்கிறது.

22. ஹைட்ரஜன் பெராக்சைடு

  • தேவையான பொருட்கள்

3 சதவிகிதம் ஹைட்ரஜன் பெராக்சைடு
சிறிய குச்சி

  • பயன்படுத்தும் முறை

ஹைட்ரஜன் பெராக்சைடை காட்டன் குச்சியை பயன்படுத்தி முகப்பருக்கள் வந்த இடத்தில் பயன்படுத்த வேண்டும். இதனை சருமத்தல் தடவிய பின்பு 5 முதல் 7 நிமிடம் கழித்து முகத்தை கழுவி கொள்ள வேண்டும்.

  • கிடைக்கும் பலன்கள்

ஹைட்ரஜன் பெராக்சைடு அதிக நோய் எதிர்ப்பு சக்தி இருப்பதால் முகப்பருக்கள் இருப்பதை விரைவில் குணப்படுத்துகிறது.

23. எலுமிச்சை

  • தேவையான பொருட்கள்

எலுமிச்சை
பஞ்சு

  • பயன்படுத்தும் முறை

எலுமிச்சை சாறை பஞ்சில் நனைத்து
பாதிக்கப்பட்ட இடங்களில் பயன்படுத்த வேண்டும்.

  • கிடைக்கும் பலன்கள்

எலுமிச்சை நுண்ணுயிர்களை அழித்து புதிய செல்களை புத்துயிர் பெற செய்கிறது. மேலும் பருக்களினால் ஏற்படும் வீக்கங்களை தடுக்கிறது.

24. லீஸ்டரின்

  • தேவையான பொருட்கள்

லீஸ்டரின்
பஞ்சு

  • பயன்படுத்தும் முறை

லீஸ்டரினை பஞ்சில் நனைத்து பாதிக்கப்பட்ட
இடங்களில் பயன்படுத்த வேண்டும். முகம்
காய்ந்த பின்னர் முகத்தை கழுவ வேண்டும்.

  • கிடைக்கும் பலன்கள்

லீஸ்டரினில் நுண்ணுயிர்களை அழிக்கும் சக்தியுள்ளது. இதனால் எண்ணெய் முகத்திற்கு ஏற்படும் பருக்களை எளிதில் தடுக்கிறது.

25. இலவங்கப்பட்டை மற்றும் தேன்

  • தேவையான பொருட்கள்

1 தேக்கரண்டி இலவங்கப்பட்டை பொடி
1 தேக்கரண்டி தேன்

  • பயன்படுத்தும் முறை

இலவங்கப்பட்டை பொடி மற்றும் தேனை பேஸ்ட் போல் செய்து அதனை முகப்பருக்கள் உள்ள இடங்களில் பூச வேண்டும். இதனை அப்படியே இரவு முழுவதும் அப்படியே விட்டு காலை முகத்தை கழுவ வேண்டும்.

  • கிடைக்கும் பலன்கள்

இந்த கலவையை தொடர்ந்து பயன்படுத்துவன் மூலம் விரைவில் பருக்கள் பிரச்சனையில் இருந்து விடுபடலாம்.
கண் செட்டு மருந்து
தேவையான பொருட்கள்
கண் செட்டு மருந்து மட்டுமே போதுமானது.
பயன்படுத்தும் முறை
கண் செட்டு மருந்தை பருக்களின் மீது தடவ வேண்டும்.30 நிமிடங்கள் கழித்து முகத்தை கழுவ வேண்டும்.
கிடைக்கும் பலன்கள்
கண் செட்டு மருந்து பருக்களினால் ஏற்படும் வீக்கங்களை குறைக்கிறது.

26. ‘ரப்பிங் ஆல்கஹால்

  • தேவையான பொருட்கள்

70-90% ஆல்கஹால் தேய்த்தல்
பஞ்சு

  • பயன்படுத்தும் முறை

ரப்பிங் ஆல்கஹாலை பஞ்சில் நனைத்து
பாதிக்கப்பட்ட இடங்களில் பயன்படுத்த
வேண்டும்.

  • கிடைக்கும் பலன்கள்

ரப்பிங் ஆல்கஹால் பாக்டீரியாக்களை அழித்து
பருக்களை தடுக்கிறது. சருமத்தில் உள்ள
மாசுக்களை நீக்குகிறது.

27. மஞ்சள்

  • தேவையான பொருட்கள்

மஞ்சள்
தண்ணீர்

பயன்படுத்தும் முறை

மஞ்சள் தூளை தண்ணீரில் கலந்த பேஸ்டை பாதிக்கப்பட்ட இடங்களில் பயன்படுத்த
வேண்டும். தொடர்ந்து இதனை செய்ய வேண்டும்.

  • கிடைக்கும் பலன்

மஞ்சள் ஒரு கிருமி நாசினியாக இருப்பதால்
முகப்பரு பிரச்சனைக்கு முக்கிய பங்கு
வகிக்கிறது. மேலும் இறந்த செல்களை நீக்கி
புதிய செல்களை புத்துயிர் பெற செய்கிறது.

28. முட்டையின் வெள்ளை கரு

  • தேவையான பொருட்கள்

2 முட்டை
1 தேக்கரண்டி எலுமிச்சை சாறு
தண்ணீர்

  • பயன்படுத்தும் முறை

முட்டையின் வெள்ளை கருவை எலுமிச்சை சாறுவுடன் கலந்து கலவையை முகத்தில் பூசி 30 நிமிடங்கள் கழித்து சூட தண்ணீரில் முகத்தை கழுவ வேண்டும். பின்னர் குளிர்ந்த நீரில் கழுவ வேண்டும்.

  • கிடைக்கும் பலன்கள்

முட்டையின் வெள்ளை கருவில் உள்ள என்சைம் முகத்தில் ஏற்படும் பிளவுகளை தடுக்கிறது. மேலும் முகத்தில் ஏற்படும் மாசுக்களையும் இது குறைக்கிறது.

29. ஆலிவ் எண்ணெய்

  • தேவையான பொருட்கள்

ஆலிவ் எண்ணெய் மட்டுமே போதுமானது.

  • பயன்படுத்தும் முறை

ஆலிவ் எண்ணெய்யை சூடுபடுத்தி முகத்தில் தடவி சில நிமிடங்கள் மசாஜ் செய்ய வேண்டும்.
கிடைக்கும் பலன்கள்

முகப்பருக்களால் ஏற்படும் வீக்கங்களை குறைக்கிறது. வறண்ட சருமத்தை தடுக்கிறது. சரும பிரச்சனைகளுக்கும் மருந்தாக பயன்படுகிறது.

30. கீரின் டீ

  • தேவையான பொருட்கள்

2 தேக்கரண்டி கீரின் டீ தேயிலை
தண்ணீர்
தேன்

  • தயாரிக்கும் முறை

சூடு நீரில் கீரின் டீ இலையினை போட்டு சில
நிமிடங்கள் கொதிக்க விட வேண்டும். பின்னர்,
அதில் தேனை சேர்க்க வேண்டும்.

  • கிடைக்கும் பலன்கள்

கீரின் டீயை தொடர்ந்து குடித்தால் உடலுக்கு
தேவையான ஹார்மோனை சுரக்க வைக்கிறது.
மேலும் முகப்பருக்களை நீக்கி முகத்தை
பொலிவுற செய்யும்

31. உப்பு நீர்

  • தேவையான பொருட்கள்

1தேக்கரண்டி கடல் உப்பு
3 தேக்கரண்டி தண்ணீர்
பஞ்சு

  • பயன்படுத்தும் முறை

உப்பு நீரை பஞ்சில் நனைத்து பாதிக்கப்பட்ட
இடங்களில் பயன்படுத்த வேண்டும்

  • கிடைக்கும் பலன்கள்

நுண்ணுயிர்களை அழித்து சருமத்தை பாதுகாக்கிறது. இதில் வைட்டமின் மினரல் சத்துக்கள் நிரம்பியுள்ளது.

32. முல்தானி மெட்டி

  • தேவையான பொருட்கள்

2தேக்கரண்டி முல்தானி மெட்டி
1 தேக்கரண்டி ரேஸ் வாட்டர்
4-5 துளி எலுமிச்சை சாறு

  • பயன்படுத்தும் முறை

மேற்கண்டவற்றை கலவையாக்கி அதனைமுகத்தில் பூச வேண்டும். அதனை 15 நிமிடங்கள் கழித்து முகத்தை கழுவ வேண்டும்.

  • கிடைக்கும் பலன்கள்

முல்தானி மெட்டி நுண்ணுயிர்களை அழித்து புதிய செல்களை புத்துயிர் பெற செய்யும். இரத்த ஓட்டத்தை சீராக்கும்.

33. பழச்சாறு

  • தேவையான பொருட்கள்

8-9 காரட்
3 சமஅளவு பீச்
அரை எலுமிச்சை சாறு
துளசி இலைகள்

  • பயன்படுத்தும் முறை

மேற்கண்ட பொருட்களை கொண்டு பழச்சாறு தயாரித்து அதனை தினமும் ஒரு டம்ளர் என குடிக்க வேண்டும்

  • கிடைக்கும் பலன்கள்

இந்த பழச்சாறில் வைட்டமின்கள் ஏ,பி,இ, கே போன்றவைகள் கிடைக்கிறது. இதனால் சருமம் மிருதுவாகி பருக்கள் தடுக்கப்படும்.

34. இளநீர்

  • பயன்படுத்தும் முறை

இளநீர்
பஞ்சு

  • பயன்படுத்தும் முறை

இளநீரை பஞ்சில் நனைத்து பாதிக்கப்பட்ட இடங்களில் தடவ வேண்டும்.

  • கிடைக்கும் பலன்கள்

இளநீரில் உள்ள மினரல்கள் வறண்ட சருமத்தை தடுக்கும். பருக்களால் ஏற்படும் வீக்கத்தை குறைக்கும். கர்ப்பிணிகளுக்கு ஏற்படும் பருக்களை நீக்குகிறது.

35. யோகர்ட்

  • தேவையான பொருட்கள்

1-2 தேக்கரண்டி தயிர்

  • பயன்படுத்தும் முறை

தயிரை எடுத்து பாதிக்கப்பட்ட இடங்களில் தடவி 15 நிமிடங்கள் கழித்து முகத்தை கழுவ வேண்டும்

  • கிடைக்கும் பலன்கள்

இது முகப்பருக்களால் ஏற்படும் வீக்கங்களை தடுக்கும். வறண்ட சருமத்தை தடுக்கும்.

36. வெப்பம்

  • தேவையான பொருட்கள்

சூடு தண்ணீர்
துணி
டீஸ்யு

  • பயன்படும் முறை

சூடு தண்ணீரில் துணியை நனைத்து பாதிக்கப்பட்ட பகுதியில் சில நிமிடங்கள் வைக்க வேண்டும். இதனை 20 முதல் 30 நிமிடங்கள் வரை செய்ய வேண்டும்.

  • கிடைக்கும் பலன்கள்

சூடு தண்ணீல் முகப்பருக்களை துடைப்பதால் அது மேலும் பரவாமல் தடுக்கப்படுகிறது.

37. அரிசி நீர்

Rice water

Shutterstock

  • தேவையான பொருட்கள்

அரை கப் வேகாத அரிசி
2 கப் தண்ணீர்
பஞ்சு

  • பயன்படுத்தும் முறை

அரிசி தண்ணீரை பஞ்சால் நனைத்து முகப்பருக்கள் உள்ள இடங்களில் வைக்க வேண்டும். இவ்வாறு 10 முதல் 15 நிமிடங்கள் வரை செய்ய வேண்டும்.

  • கிடைக்கும் பலன்கள்

அரிசி தண்ணீர் முகத்தில் இறந்த செல்களை நீக்கி புதிய செல்களை புத்துயிர் பெற செய்கிறது. கருப்புள்ளிகளை தடுக்கிறது.

38. கிளிசிரின்

  • தேவையான பொருட்கள்

கிளிசிரின் மட்டுமே

  • பயன்படுத்தும் முறை

இரு துளிகள் கிளிசிரினை எடுத்து முகப்பருக்கள் இருந்த இடத்தில் சில மணி நேரம் தடவ வேண்டும்.

  • கிடைக்கும் பலன்கள்

இதில் உள்ள ட்ரைஹைட்ராக்ஸி ஆல்கஹால் முகப்பருக்களை தடுக்கிறது. மேலும், சருமம் பொலிவுற செய்யும்.

39. ரோஸ் வாட்டர்

  • தேவையான பொருட்கள்

2 தேக்கரண்டி சந்தன பொடி
1தேக்கரண்டி ரோஸ்வாட்டர்

  • பயன்படுத்தும் முறை

மேற்கண்டவற்றை கலவையாக்கி முகத்தில் பயன்படுத்த வேண்டும் இது வறண்ட சருமத்தை பாதுகாக்கிறது.

40. வேப்பிலை

  • தேவையான பொருட்கள்

சில வேப்பிலை
1 தேக்கரண்டி முல்தானி மொட்டி
ரோஸ் வாட்டர்

  • பயன்படுத்தும் முறை

மேற்கண்டவற்றை கலவையாக்கி பாதிக்கப்பட்ட இடங்களில் பூசி 20 நிமிடங்கள் கழித்து முத்தை கழுவ வேண்டும்.

  • கிடைக்கும் பலன்கள்

வேப்பிலையில் நோய் எதிர்ப்பு சக்தி உள்ளதால் இது அதிகமாக பயன்படுத்தப்படுகிறது. இதினை பயன்படுத்துவதால் வெப்பம் தணிந்து சருமத்தை பாதுகாக்கிறது.

41. பால்

  • தேவையான பொருட்கள்

1 தேக்கரண்டி தேன்
அரை தேக்கரண்டி பால்
பஞ்சு
துணி

  • பயன்படுத்தும் முறை

மேற்கண்டவற்றை கலவையாக்கி அதனை பஞ்சில் எடுத்து முகத்தை பூச வேண்டும். இதனை 15 முதல் 20 நிமிடங்கள் அப்படியே விட வேண்டும்

  • கிடைக்கும் பலன்கள்

பால் மற்றும் தேன் கலவை ஒரு அற்புதமான மேஸ்மேக் ஆகும். இது முகத்தில் உள்ள பாக்டீயாக்களை அழிக்கிறது. புதிய செல்களை புத்துயிர் பெற செய்கிறது.

42. ஜொஜோபா எண்ணெய்

  • தேவையான பொருட்கள்

சில துணி ஜொஜோபா எண்ணெய்

  • பயன்படுத்தும் முறை

ஜொஜோபா எண்ணெய்யை முகத்தில் தடவி மசாஜ் செய்ய வேண்டும்

  • கிடைக்கும் பலன்கள்

ஜொஜோபா எண்ணெய்யை சருமம் எளிதில் உள்ளிழுத்து கொள்ளும். இதில் உள்ள நோய் எதிர்ப்பு சக்தியானது முகப்பருக்களை தடுக்கும்.

பருக்களின் வகைகள் Types of Pimples

Types of Pimples

Shutterstock

  • வெண் கொப்புளம்
  • கரும்புள்ளிகள்
  • சிறு கொப்புளங்கள்
  • நீர்க்கட்டிகள்
  • வெண் கொப்புளங்கள் – எண்ணெய் வழியும் முகத்திற்கு இந்த பிரச்சனை ஏற்படும்
  • கரும்புள்ளிகள் – இந்த பிரச்சனை வறண்ட சருமம் உள்ளவர்களுக்கு ஏற்படும். இறந்த செல்களினாலும் ஏற்படும்
  • சிறு கொப்புளங்கள் – டிஸ்யு மற்றும் சுத்தமில்லாத துணிகளை பயன்படுத்துவதாலும் ஏற்படும்.
  • நீர்க்கட்டிகள் – முகப்பருக்கள் அதிகமாகும் போது ஏற்படுகிறது.
    வீட்டு வைத்திலும் இதனை குணப்படுத்தலாம்

ஊட்டச்சத்து மற்றும் உணவு Nutrition and Diet

Nutrition and Diet

Shutterstock

இது போன்ற ஊட்டச்சத்தான உணவுகளை உட்கொள்வதன் மூலம் இதனை தடுக்கலாம்.

  • முழு தானியங்கள்
  • மீன் மற்றும் சிப்பிகள் போன்ற லீன் இறைச்சி
  • இனிப்பு உருளைக்கிழங்கு, பச்சை இலை
  • காய்கறிகள், கேரட், வெள்ளரிக்காய்,
  • ப்ரோக்கோலி, மற்றும் வால் மிளகு
  • காய்கறிகள்
  • பெர்ரி, ஆரஞ்ச், பூசணி, பாப்பாளி, ஆப்பிள்கள் போன்ற பழங்கள்
  • வாதுமை, வறுத்த பூசணி விதைகள், வறுத்த ஸ்குவாஷ் விதைகள், உலர்ந்த தர்பூசணி விதைகள்
  • கீரின் டீ
  • யோகர்ட்

தவிர்க்க வேண்டிய உணவுகள் Foods to avoid

Foods to avoid

Shutterstock

சர்க்கரை அதிகம் உள்ள உணவினால் இன்சுலீன் அதிகரித்து இரத்த அழுத்தம் எற்பட்டு விக்கங்கள் ஏற்படும். இதனால் இது போன்ற உணவுளை தவிர்க்க வேண்டும்

  • மாட்டு பால் மற்றும் பிற பால் பொருட்கள்
  • பிஸ்கட் மற்றும் கேக் போன்ற சர்க்கரை உணவு
  • வெள்ளை ரொட்டி, வெள்ளை அரிசி,
  • உருளைக்கிழங்கு சிப்ஸ், பதப்படுத்தப்பட்ட காலை உணவு,
  • ஜங்க் புட்
  • சாக்லேட்

வைட்டமின்கள்

வைட்டமின்கள் சரும பிரச்சனைகளுக்கு முக்கிய தீர்வாகவும் அமைகிறது.
வைட்டமின் ஏ, வைட்டமின் டிவைட்டமின் சி வைட்டமின் இபோன்ற வைட்டமின்களும் சருமத்தை பொலிவாகவும், புத்துணர்ச்சியுடனும் வைக்கிறது.

வாழ்க்கை முறை மாற்றங்கள் Lifestyle changes

Lifestyle changes

Shutterstock

வாழ்க்கை முறையின் மாற்றங்களினாலும் சருமப்பிரச்சனைகள் ஏற்படும். அதனை தடுக்க நாம் தினமும் 8 முதல் 10 டம்ளர் தண்ணீர் குடிக்க வேண்டும் மனஅழுத்தத்தை குறைக்கு உடற்பயிற்சிகள் செய்ய வேண்டும்குறைந்தது ஒரு நாளைக்கு 8 மணி நேரமாவது தூங்க வேண்டும்புகைப்பிடித்தல் மற்றும் மரு அருந்துதல் பழக்கத்தை அறவே நினைக்க கூடாது. தினமும் நமது சருமத்தை சுத்தமாக வைத்து கொள்ள வேண்டும்.

முகப்பருவை மறைப்பதற்கு ஒப்பனை குறிப்புகள் Makeup tips to cover the acne

Makeup tips to cover the acne

Shutterstock

முதலில் முகத்தை சுத்தமாக வைத்து கொள்ள வேண்டும்
சருமத்தை ஈரப்பத்துடன் வைத்து கொள்ள வேண்டும்
மேக்கப் செய்வதற்கு முன்பு முகத்தில் மசாஜ் செய்து கொள்ள வேண்டும். உங்கள் முகத்திற்கும் உங்கள் தோல் நிறத்திற்கும் ஏற்றது போல் பவுண்டேசன் பயன்படுத்த வேண்டும்

முகப்பரு சிகிச்சைகள் Acne treatments

Acne treatments

Shutterstock

  1. லேசர் சிகிச்சை
  2. ஹோமியோபதி சிகிச்சை
  3. மூலிகை சிகிச்சை
  4. ப்ளூ லைட் முகப்பரு சிகிச்சை
  5. ஆயுர்வேத சிகிச்சை

போன்ற சிகிச்சைகளின் மூலமும் முகப்பரு பிரச்சனைகளுக்கு தீர்வு பெறலாம்.

முகப்பருவை தடுப்பதற்கான டிப்ஸ் Tips for preventing acne

Tips for preventing acne

Shutterstock

வீட்டு வைத்தியத்தின் மூலமும் முகப்பருக்களை அகற்றலாம்.குளிர்ந்த நீரில் முகம் கழுவினால் முகப்பருக்கள் வராது.வாரத்திற்கு ஒரு முறை பேஸ்மேக் செய்து கொள்ள வேண்டும் தினமும் 8 முதல் 12 டம்ளர் தண்ணீர் குடிக்க வேண்டும் யாரையும் கன்னத்தை தொட்டு பேச அனுமதிக்காதீர்கள். அவர்களின் கையில் உள்ள பாக்டீரியாக்கள் மூலமும் பரவும் வாய்ப்பு அதிகம் வைட்டமின்கள் நிறைந்த உணவுளை உட்கொள்ள வேண்டும் ஊட்ட சத்தான உணவும் சாப்பிடுவதன் மூலம் பொலிவான அழகான சருமத்தை பெறலாம்.

The post ஒரே இரவில் முருப்பருக்களை நீக்குவது எப்படி – Pimple Remedies in Tamil appeared first on STYLECRAZE.
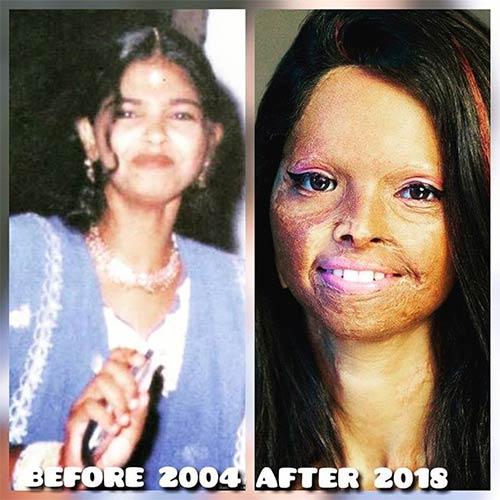

Keerthy Suresh’s Traditional Sarees Are Fashion Must-Haves For Every Saree Lover

$
0
0

I am a person who loves sarees! I have a collection of sarees. Some are borrowed from my mother, and some are gifted to me by my grandmother. For me, sarees are like legacies that have been handed over from one generation to another. And with every generation, some new elements are woven into the nine-yard saree creating another story.

The saree is a traditional attire of Indian women, especially in the southern region of India. South India is home to the traditional handloom silk weaves, which exist in a wide variety. Every handloom saree has its own story to tell.

While many women of my age (I’m in my twenties) take inspiration from fashion divas and the labels they wear, I’m one of those rare finds among the womenfolk who mirrors the fashion style of women who promote our Indian culture through sarees. And of late, if there is one person whom I’ve been admiring and going gaga over for her saree obsession, it has to be Keerthy Suresh. She is a Tamil beauty who has been making heads turn with her incredible acting and her beauty. Keerthy has repeatedly been spotted at various public events sporting different kinds of sarees. Her saree fashion is traditional, yet it has a modern feel to it. Here’s a peek into Keerthy’s world of sarees-

1. The Eternal Banarasi

All saree lovers will know that their saree collection is incomplete without a Banarasi weave. Keerthy is seen wearing a royal magenta Banarasi saree here. I absolutely love the flower motifs on the saree that depict the flower power which we as women possess. The boat neck blouse with minimal embroidery makes for a perfect match for the heavy saree.

2. The Classic Off-White

Off-white sarees are considered to be a classic as they can make any woman look beautiful and elegant irrespective of her skin tone. This beautiful saree worn by Keerthy has golden buttas and the small pink border adds a peppy touch to an otherwise simple saree. I absolutely love the messy bun and those huge jhumkas that she has teamed her saree with.

3. The Tissue Silk

Tissue silk sarees are extremely lightweight; it almost feels like you’re wearing paper. Love this grey color of the saree which has a metallic shine to it. And the silver mala further accentuates the look of this saree. I’m definitely planning to buy a tissue silk saree after having seen this. It’s like a modern and contemporary version of the heavy silk saree.

4. The Dhoti Bling

Essentially, the saree and the dhoti are the oldest known Indian attire. And when both of these are put together, it makes for an epic fusion wear, right? I absolutely love this dhoti-saree which is just plain fabric. The credit for the oomph factor here goes to the metallic sequinned, shimmery blouse that Keerthy is wearing. Such sarees are perfect wear for a cocktail party or a wedding function when you want to shake a leg and do a jiggy-wiggy, hassle-free.

5. The Dramatic Saree

At times, it’s the way we team up the saree with other elements, that makes us look stunning. Just as in this case, where Keerthy chose to team up her simple silk saree with a ruffle sleeved blouse and some quirky silver metal jewelry. Now, that’s how you drape a silk saree with utmost swag!

6. The Love For Whites

If you consider white gowns to be magical, well, white sarees are no less than that. Keerthy looks like a fairy in this white silk saree which has silver zari and buttas. Even her blouse is white, which has checked buttas on the sleeves. She’s kept her makeup minimal, and those heavy chandbalis with a bare neck make for a perfect look. Have you ever bought a white silk saree? If you haven’t, we hope you do after seeing this.

7. The Floral Saree

Keerthy’s nailed it in this floral saree with all the retro elements like the sunglasses and long braids. The long bindi and the floral handbag give the look a completely retro makeover. Floral sarees were a rage back in the 1960s, and even to this day, many women make it a point to add one of these to their collection.

It’s amazing how in a world where most of the leading actresses tie up with international brands, we have women like Keerthy who are promoting the traditional Indian wear. While I just cannot pick my favorite saree from her collection, I would love to know which one is yours. Let us know in the comments section below.

The post Keerthy Suresh’s Traditional Sarees Are Fashion Must-Haves For Every Saree Lover appeared first on STYLECRAZE.

நமது ஆரோக்கியத்திற்கு தேவையான பலன்களை அளிக்கும் வெந்தயம்! – Methi Benefits in Tamil

$
0
0

மூலிகை குணம் கொண்ட வெந்தயத்தின் இலையும் விதையும் பல ஆயிரக்கணக்கான ஆண்டுகளாக மக்களால் பயன்படுத்தப்பட்டு வருகிறது. இதன் பல மருத்துவ குணங்களால் வெந்தயத்தை எல்லோரது வீட்டிலும் கண்டிப்பாக வைத்திருப்பார்கள். வழக்கமாக நமது உடல்நலத்திற்கும் முடி வளர்ச்சிக்கும் பயனளிக்கும் வெந்தயம், வேறு பல வகைகளிலும் பலனளிப்பதாக சமீபத்திய ஆய்வுகள் தெரிவிக்கின்றன. முக்கியமாக நமது உணவின் சுவையை கூட்டுவதற்கும், பேர்கால சமயத்தில் நீரிழிவை கட்டுப்படுத்துவதற்கும் தோல் நலத்திற்கும் வெந்தயம் பயனளிக்கிறது.

வெந்தயம் எளிதாக கடைகளில் கிடைக்கக்கூடியது. இவை விதையாகவும் தூளாகவும் கிடைக்கிறது. வெந்தயத்தை எப்போதும் காற்று புகாத டப்பாவில் இருட்டான, குளிரான பகுதியில் வைத்திருக்க வேண்டும். இப்படிச் செய்தால் பல மாதங்களுக்கு வெந்தயம் கெட்டுப் போகாமல் இருக்கும்.

வெந்தயத்தால் உங்களுக்கு கிடைக்கும் நன்மைகள்: What Fenugreek Seeds Can Do For You

தோல் பராமரிப்பு

முகத்தில் ஈரப்பதம் போகாமல் பாதுகாக்கிறது; முகப்பருவை போக்குகிறது;

முடி பராமரிப்பு

முடி உதிர்வை தடுக்கிறது; பொலிவை கூட்டுகிறது; பொடுகு தொல்லையை நீக்குகிறது; நரை முடி வராமல் தடுக்கிறது

உடல்நல பராமரிப்பு

நீரிழிவை கட்டுப்படுத்துகிறது; நெஞ்சு வலி மற்றும் புற்றுநோய் வராமல் தடுக்கிறது; கொழுப்பையும் உடல் எடையும் மூட்டு வீக்கத்தால் ஏற்படும் வலியையும் குறைக்க உதவுகிறது; சிறுநீரகம் மற்றும் கல்லீரல் செயல்பாட்டை மேம்படுத்துகிறது; மாதவிடாய் காலத்தில் ஏற்படும் தசைபிடிப்பை நீக்குகிறது.

இளமையான தோற்றத்தை தருகிறது

Gives a young look

Shutterstock

உங்கள் தோலுக்கு தேவையான இளமை தோற்றத்தை அளிப்பதோடு முகச்சுருக்கத்தை போக்கவும் என பல பயன்களை ஆச்சர்யம் அளிக்கும் வகையில் தருகிறது வெந்தயம்.

இரவு முழுவதும் தண்ணீரில் ஊறப்போட்ட ஒரு மேஜை ஸ்பூன் வெந்தயத்தோடு ஒரு மேஜை ஸ்பூன் தயிரை சேர்த்து பசை போன்ற பதத்திற்கு கொண்டு வாருங்கள். இந்த பசையை உங்கள் முகத்தில் தேய்த்து அரை மணி நேரம் கழித்து குளிர்ந்த நீரில் கழுவுங்கள்.

வெந்தயத்தில் உள்ள ஆண்டி ஆக்ஸிடெண்ட் தன்மைகள், நமது தோல் வயதான தோற்றத்தை அடைய விடாமல் பாதுகாக்கிறது. தயிரில் உள்ள லேக்டிக் ஆசிட், நமது தோலை மென்மையானதாக மாற்றுகிறது.

முகப்பருவை போக்குகிறது

இரவு முழுவதும் ஊற வைத்த நான்கு டீ ஸ்பூன் வெந்தயத்தோடு நான்கு கப் தண்ணீரை சேர்த்து ஒரு 15 நிமிடம் கொதிக்க வையுங்கள். அதன்பிறகு வடிகட்டிய நீரை, துணியை கொண்டு தினமும் இரண்டு முறை உங்கள் முகத்தில் ஒத்தடம் கொடுங்கள். மீதமுள்ளதை உங்கள் ஃப்ரிட்ஜில் வைத்துகொள்ளலாம். வெந்தயத்தில் பாக்டீரியாக்களை எதிர்க்கும் டியோஸ்ஜெனின் என்ற பொருள் உள்ளதால் முகப்பருவை போக்க பயன்படுகிறது.

முடி உதிர்வை தடுப்பதற்கும் முடி வளர்வதற்கும் பயன்படுகிறது

ஒரு கப் தேங்காய் எண்ணெயோடு ஒரு டேபிள் ஸ்பூன் வெந்தயத்தை கலக்குங்கள். சூரிய ஒளி படாத குளிரான இடத்தில் இதை மூன்று வாரம் வைத்திருங்கள். இதில் முடி வளர்வதற்கு தேவையான புரதச்சத்தும் நிகோடினிக் ஆசிடும் உள்ளது. அதுமட்டுமல்லாமல் பூஞ்சையால் ஏற்படும் பொடுகு தொல்லையையும் போக்குகிறது. மேலும் நரை முடி வளராமலும் இருப்பதற்கு பண்டைய காலங்களில் இருந்து பயன்படுத்தப்பட்டு வருகிறது.

உங்கள் முடி அழகாகவும் பொலிவோடும் இருக்க வேண்டுமா? Do you want your hair to be beautiful and beautiful?

இரண்டு டேபிள் ஸ்பூன் வெந்தயத்தை ஒரு கப் நீரில் இரவு முழுவதும் ஊற விடுங்கள். காலையில் அதை அரைத்து உங்கள் தலை முடி முழுவதும் நன்றாக தேய்த்து கொள்ளுங்கள்,. அரை மணி நேரம் கழித்து முடியை கழுவுங்கள். வெந்தயத்தில் உள்ள லெசிதின் என்ற பொருள் முடிக்கு தேவையான பொலிவை கொடுக்கிறது.

நீரிழிவை கட்டுபடுத்துகிறது

நீரிழிவு நோய் உள்ளவர்கள் தங்கள் உணவில் வெந்தயத்தை சேர்த்துக் கொண்டால் அது அவர்களின் உடல்நலத்தில் நேர்மறையான மாற்றங்களை கொடுக்கும் என மருத்துவர்கள் கூறுகின்றனர். மேலும் உடலில் உள்ள சர்க்கரை அளவை குறைப்பதோடு இன்சுலின் எதிர்ப்பையும் குறைப்பதாக ஆய்வுகள் தெரிவிக்கின்றன.

இருதய நோய் ஏற்படாமல் தடுக்கிறது

நெஞ்சு வலியால் உலகளவில் பலர் இறக்கின்றனர். இருதயத்திற்குச் செல்லும் ரத்த குழாயில் அடைப்பு ஏற்படுவதால் தான் நெஞ்சு வலி வருகிறது. நெஞ்சு வலி ஏற்படும் போது உங்கள் இருதயத்திற்கு எந்த தீங்கும் ஏற்படாமல் பாதுகாக்கிறது வெந்தயம்.

புற்றுநோயை தடுக்கிறது

வெந்தயத்திலிருந்து எடுக்கப்படும் எண்ணெய் புற்றுநோயை தடுக்க பயன்படுவதாக ஆய்வுகள் தெரிவிக்கின்றன.

மாதவிடாய் தசைப்பிடிப்பை போக்குகிறது

Growth of menstrual cramps

Shutterstock

மாதவிடாய் சமயத்தில் ஏற்படும் வலிகளையும் தசைபிடிப்பையும் வெந்தயம் போக்குவதாக ஆய்வுகள் கூறுகின்றன. அழற்சியை நீக்கும் பண்பு வெந்தயத்தில் உள்ளதால் தான் மதவிடாய் சமயத்தில் ஏற்படும் வலிகளை போக்க இது உதவுகிறது. மேலும் சோர்வு, தலைவலி, குமட்டல் ஆகியவற்றையும் குறைக்க வெந்தயம் உதவுகிறது.

கொழுப்பை குறைக்கிறது

நமது உடலில் உள்ள கொழுப்பை, அதுவும் முக்கியமாக கெட்ட கொழுப்பை குறைக்க வெந்தயம் உதவுகிறது. இதிலுள்ள நரின்ஜெனின் என்ற ஃபிளாவொனாய்டு கொழுப்பின் அளவை குறைக்கிறது.

வெந்தயத்தில் உள்ள ஆண்டி ஆக்ஸிடெண்ட் பண்புகளால் மூட்டு வீக்கதால் ஏற்படும் வலியை குறைக்கவும் இது பயன்படுகிறது.

செரிமான பிரச்சனையை தீர்க்கிறது

வயிற்றுப் புண்களுக்கும் வாயுத் தொல்லைக்கும் ஜீரன கோளாறுகளுக்கும் மிகச்சிறந்த மருந்து வெந்தயம். இதில் இயற்கையாகவே அமைந்துள்ள செரிமான டானிக் மற்றும் மென்மை தன்மையும் உங்கள் வயிறு மற்றும் குடலில் ஏற்படும் புண்களை ஆற்றுகிறது.

சிறுநீரகம் மற்றும் கல்லீரலை பாதுகாக்கிறது

வெந்தயத்தில் உள்ள ஃபிளாவொனாய்டு தன்மையால் சிறுநீரகத்தில் ஏதும் பிரசனை ஏற்படாமல் அரண் போல் பாதுகாக்கிறது. உங்கள் உடலில் உள்ள கழிவுகளை நீக்க உதவுகிறது கல்லீரல். இவ்வுளவு முக்கியத்துவம் வாய்ந்த கல்லீரலில் காயம் ஏற்பட்டால் உங்கள் உடல் நலத்தில் மிகப்பெரிய பிரச்சனை ஏற்படும். அதிகமாக மது அருந்துவதால் கல்லீரல் கடுமையாக பாதிக்கப்டுகிறது. கல்லீரலில் மதுவின் தாக்கத்தை குறைக்க வெந்தயம் பயன்படுகிறது.

குறிப்பு; கருவுற்ற பெண்களும் குழந்தைகளும் வெந்தயம் சாப்பிடுவதை தவிர்க்க வேண்டும்.

The post நமது ஆரோக்கியத்திற்கு தேவையான பலன்களை அளிக்கும் வெந்தயம்! – Methi Benefits in Tamil appeared first on STYLECRAZE.
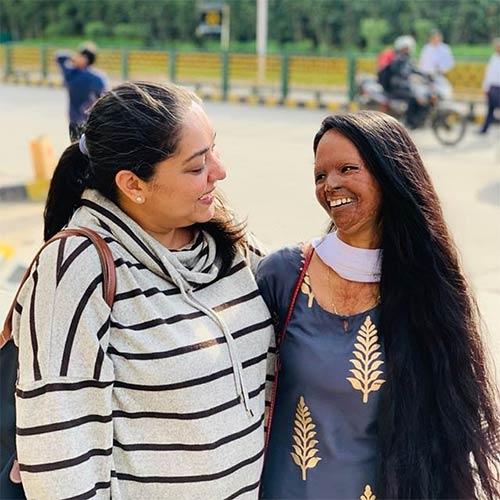
दांतोंं से टार्टर और प्लाक हटाने के 15 सबसे कारगर घरेलू उपाय – Home Remedies To Remove Tartar And Plaque From Teeth in Hindi

$
0
0

अनियंत्रित जीवनशैली का शिकार हमारे दांत भी हो रहे हैं। अब तो दांतों की समस्या हर उम्र के लोगों में देखी जा सकती है। बैक्टीरिया के संपर्क में आने से दांतों में कई तरह की समस्याएं हो सकती हैं, जिसमें टार्टर और प्लाक भी शामिल है। प्लाक दांतों पर चढ़ी बैक्टीरिया युक्त एक चिपचिपी परत होती है। वहीं, मसूड़ों के ऊपर-नीचे विकसित होने वाली बैक्टीरियल परत को टार्टर कहते हैं। इससे मसूड़ों की बीमारी होने का डर बना रहता है।

ओरल हेल्थ को बरकरार रखने के लिए रोजाना दांतों की सफाई, फ्लॉसिंग व नियमित दांतों की जांच बेहद जरूरी है। प्लाक और टार्टर को नंजरअंदाज करना आपके दांतों के लिए नुकसानदायक हो सकता है। इस लेख में हमारे साथ जानिए प्लाक-टार्टर से छुटकारा पाने के सबसे कारगर घरेलू उपायों के बारे में।

विषय सूची


टार्टर और प्लाक को दूर करने के घरेलू उपाय – Home Remedies For Tartar and Plaque Removal in Hindi

1. दांतों की नियमित सफाई

Regular cleaning of teeth

Shutterstock

टार्टर और प्लाक से मुक्त रहने के लिए भोजन के बाद दांतों की अच्छी तरह सफाई बेहद जरूरी है। ब्रश करने के लिए हमेशा नरम ब्रिसल वाले टूथब्रश का उपयोग करें। दांतों की सतह और सभी कोनों पर अच्छी तरह ब्रश घूमाएं, जिससे कि दांतों में गंदगी लगी न रह जाए। याद रखें कि ब्रश को हमेशा 45 डिग्री के कोण पर मसूड़ों पर रखें।

2. फ्लोराइड टूथपेस्ट का उपयोग करें

ओरल स्वास्थ्य के लिए आप फ्लोराइड टूथपेस्ट का इस्तेमाल करें। यह टूथपेस्ट दांतों में फ्लोराइड की उपस्थिति को बढ़ाता है और उन्हें मजबूत बनाकर कैवीटी से निजात दिलाने में मदद करता है। यह दांतों को जड़ से मजबूत बनाता है, जिससे अम्लीय खाद्य पदार्थ और पेय के सेवन से भी दांत ज्यादा प्रभावित नहीं होते हैं। फ्लोराइड टूथपेस्ट का उपयोग खराब हो रही जगह को फिर से भरने और टार्टर को विकसित करने वाले बैक्टीरिया से बचने के लिए कर सकते हैं (1)।

3. टार्टर कंट्रोल टूथपेस्ट का उपयोग करें

दांतों से प्लाक और टार्टर को हटाने के लिए टार्टर कंट्रोल टूथपेस्ट का इस्तेमाल बेहद फायदेमंद होता है। इस तरह के टूथपेस्ट में कई रासायनिक तत्व होते हैं, जैसे कि पायरोफॉस्फेट, जिंक सिट्रेट व फ्लोराइड आदि। ये तत्व दांतों पर टार्टर को विकसित होने से रोकते हैं (2)। कुछ टार्टर कंट्रोल टूथपेस्ट में ट्राइक्लोसन नामक एंटीबायोटिक भी पाया जाता है, जो मुंह में पनपने वाले बैक्टीरिया से लड़ने में अहम भूमिका निभाता है (3)।

4. बेकिंग सोडा मिश्रण से दांत साफ करें

Clean teeth with baking soda mixture

Shutterstock

सामग्री :
  • एक बड़ा चम्मच बेकिंग सोडा
  • एक चुटकी नमक
  • टूथब्रश
कैसे करें इस्तेमाल :
  • बेकिंग सोडा और नमक को मिलाएं।
  • इस मिश्रण को गीले टूथब्रश पर रखें।
  • अब धीरे-धीरे दांतों पर रगड़ें।
  • अब गुनगुने पानी से कुल्ला करें।
कितनी बार करें :

जल्द परिणाम के लिए हर दूसरे दिन इस प्रक्रिया को दोहराएं। प्लाक के साफ होने के बाद आप हफ्ते में एक बार इस प्रक्रिया को दोहरा सकते हैं।

5. एलोवेरा जेल और ग्लिसरीन स्क्रब का उपयोग

Use of Aloe vera gel and glycerin scrub

Shutterstock

सामग्री :
  • एक चम्मच एलोवेरा जेल
  • चार चम्मच वेजिटेबल ग्लिसरीन
  • चार-पांच बड़े चम्मच बेकिंग सोडा
  • लेमन एसेंशियल ऑयल की 10 बूंदें
  • एक कप पानी
कैसे करें इस्तेमाल :
  • सभी सामग्रियों को आपस में मिलाकर पेस्ट का निर्माण करें।
  • अब इस मिश्रण की कुछ मात्रा लें और दांतों पर रगड़ें।
  • इसके बाद अच्छी तरह कुल्ला कर लें।
कितनी बार करें :

इस प्रक्रिया को राजाना दोहराएं, जब तक कि दांतों पर लगा प्लाक खत्म न हो जाए।

कैसे है लाभदायक :

बेकिंग सोडा के साथ-साथ एलोवेरा जेल भी एंटीमाइक्रोबियल गुण से समृद्ध होता है। एलोवेरा में एंटीऑक्सीडेंट गुण भी पाए जाते हैं, जो बैक्टीरिया द्वारा उत्पन्न होने वाले मुक्त कणों को हटाकर दांत और मसूड़ों की सुरक्षित रखता है (7)। लेमन एसेंशियल ऑयल एक कारगर एंटीमाइक्रोबियल एजेंट है, जो दांतों में प्लाक और टार्टर पैदा करने वाले बैक्टीरिया से छुटकारा दिलाने का काम करता है (8)।

सावधानी :

यह उपाय लंबे समय तक न करें, क्योंकि ग्लिसरीन आपके दांतों की रिमिनिरलाइजेशन प्रक्रिया को बाधित कर सकता है।

6. फलों और सब्जियों को चबाना

दांतों से प्लाक और टार्टर हटाने के लिए सेब, खरबूजा, गाजर और सेलेरी को चबाना भी एक कारगर विकल्प है। दांतों को प्राकृतिक रूप से साफ करने के लिए आप भोजन के एक घंटे बाद इन फलों को चबा-चबाकर खा सकते हैं। ऐसा करने से न सिर्फ दांतों के प्लाक और टार्टर से छुटकारा मिलेगा, बल्कि मसूड़े भी मजबूत होंगे।

7. शीशम के बीज चबाएं

Chew Sesame Seeds

Shutterstock

सामग्री :
  • एक बड़ा चम्मच तिल
  • टूथब्रश
कैसे करें इस्तेमाल :
  • बीजों को चबाएं, लेकिन उन्हें निगले नहीं।
  • चबाने के बाद बिजों को मुंह में ही रहने दें और सूखे टूथब्रश से ब्रश कर लें।
कितनी बार करें :
  • हफ्ते में दो बार प्रक्रिया दोहराएं।
कैसे है लाभदायक :

ये बीज एक प्राकृतिक स्क्रब की तरह काम करते हैं। बिज दांतों को साफ व पॉलिश करते हैं और प्लाक व टार्टर को हटाने में मदद करते हैं।

8. करें अंजीर का सेवन

Eat Figs

Shutterstock

सामग्री :
  • दो-तीन अंजीर
कैसे करें इस्तेमाल :
  • अंजीर को धीरे-धीरे चबाकर खाएं।
कितनी बार करें :
  • रोजाना भोजन के बाद अंजीर का सेवन करें।
कैसे है लाभदायक :

अंजीर का सेवन दांतों की सफाई और मसूड़ों को मजबूत बनाने का कारगर तरीका है। यह प्रक्रिया लार ग्रंथियों को उत्तेजित करती है और लार के स्राव को बढ़ाती है। अंजीर दांतों को साफ करने और प्लाक व टार्टर को हटाने में मदद करती है।

9. इलेक्ट्रिक टूथब्रश का इस्तेमाल करें

कई दंत चिकित्सक दांतों को ब्रश करने के लिए इलेक्ट्रिक टूथब्रश का इस्तेमाल करने की सलाह देते हैं, क्योंकि आम (मैनुअल) टूथब्रश की तुलना यह ज्यादा बेहतर होता है। यह टूथब्रश दांतों से टार्टर व प्लाक हटाने और दांतों को साफ व चमकदार करने में ज्यादा मदद करता है।

10. नियमित रूप से फ्लॉस करें

दांतों के बीच प्लाक और बारीक भोजन कणों को हटाने के लिए फ्लॉसिंग एक कारगर तरीका है। रोज गरारे करने के बाद दांतों को फ्लॉस करने से टार्टर का निर्माण रुक जाता है, जिससे मुंह की स्वच्छता बनी रहती है। फ्लॉस न केवल दांतों के बीच, बल्कि मसूड़ों के बीच भी सफाई करता है। इसलिए, दांत टूटने व मसूड़ों के रोगों से बचने के लिए इसका प्रयोग किया जा सकता है।

11. एंटीसेप्टिक ओरल क्लींजर या पेरोक्साइड सॉल्यूशन से गरारे

Gararets from antiseptic oral cleanser or peroxide solution

Shutterstock

सामग्री :
  • एक बड़ा चम्मच एंटीसेप्टिक माउथवॉश
  • तीन बड़े चम्मच 3% हाइड्रोजन पेरोक्साइड सॉल्यूशन
कैसे करें इस्तेमाल :
  • इन दोनों सामग्रियों को मिला लें और एक या दो मिनट तक इस मिश्रण से गरारे करें।
  • अब साफ पानी से गरारे करें।
कितनी बार करें :
  • इस प्रक्रिया को सप्ताह में दो बार दोहराएं।
कैसे है लाभदायक :

एंटीसेप्टिक ओरल क्लींजर और पेरोक्साइड सॉल्यूशन दोनों एंटी एंटीमाइक्रोबियल प्रकृति के होते हैं। मुंह से प्लॉक और टार्टर हटाने के लिए आप इन दोनों का इस्तेमाल कर सकते हैं (10),(11)।

12. डेंटल पिक का इस्तेमाल करें

दांतों से प्लाक और टार्टर हटाने के लिए आप डेंटल पिक का इस्तेमाल कर सकते हैं। यह आपको आसानी से मेडिकल की दुकान से मिल जाएगा । मैग्नीफाई ग्लास की मदद से टार्टर का पता लगाएं और डेंटल पिक से साफ करें। टार्टर को थूक दें और पानी से कुल्ला कर लें।

सावधान :

डेंटल पिक से टार्टर की सफाई ध्यान से करें, क्योंकि डेंटल पिक के मसूड़ों की गहराई में जाने से संक्रमण का खतरा हो सकता है।

13. तीखा भोजन खाएं

दांतों से प्लाक और टार्टर हटाने के लिए तीखा भोजन करना भी एक विकल्प साबित हो सकता है। मसालेदार खाद्य पदार्थ मुंह में लार के स्राव को बढ़ाते हैं। मुंह में उत्पन्न अतिरिक्त लार दांतों और मसूड़ों को साफ करने में मदद करता है।

14. सैंगुनेरिया का रस ( ब्लड रूट)

सामग्री :
  • सैंगुनेरिया रस की तीन-चार बूंदें
  • एक कप गुनगुना पानी
कैसे करें इस्तेमाल :
  • गुनगुने पानी में सैंगुनेरिया के रस को मिलाएं।
  • अब इस मिश्रण से गरारे करें।
कितनी बार करें :
  • इस माउथवॉश का इस्तेमाल दिन में दो बार करें।
कैसे है लाभदायक :

टूथपेस्ट में ब्लडरूट एक सामान्य तत्व है, क्योंकि कारगर एंटीमाइक्रोबियल एजेंट की तरह काम करता है। इसका उपयोग सुरक्षित भी माना गया है। यह दांत के प्लाक व टार्टर के साथ मसूड़े की सूजन को भी कम करने का काम करता है (12)।

15. ऑयल पुलिंग

Oil Pulling

Shutterstock

सामग्री :
  • नारियल (वर्जिन) तेल की एक-दो बूंदें
कैसे करें इस्तेमाल :
  • तेल को मुंह में 10-15 मिनट तक घुमाएं।
  • अब तेल को थूक दें और गुनगुने पानी से कुल्ला कर लें।
कितनी बार करें :
  • इस प्रक्रिया को दिन में दो बार दोहराएं।
कैसे है लाभदायक :

ऑयल पुलिंग को ऑयल स्विशिंग के रूप में भी जाना जाता है। दांतों के प्लाक और टार्टर से छुटकारा पाने के लिए इस विधि को प्रयोग में लाया जा सकता है। ऑयल पुलिंग प्लाक और इसी प्रकार के संक्रमण से निजात दिलाता है। साथ ही यह मुंह की गंदगी को बाहर कर देता है। नारियल का तेल एंटीमाइक्रोबियल गुण से समृद्ध होता है, जो ओरल हेल्थ को बढ़ावा देता है (13)।

दांतों में टार्टर विकसित होने पर उसे हटाना और रोकना मुश्किल हो जाता है। इस लेख में बताए गए उपायों के परिणाम में थोड़ा समय लग सकता है, इसलिए धैर्य बनाए रखना जरूरी है। इसके अलावा, यह भी जरूरी हो जाता है कि दांतों का टार्टर या प्लाक मुंह की किसी अन्य समस्या का कारण न बने। अगर टार्टर का सही समय पर उपचार न किया जाए, तो यह दांतों में सड़न पैदा कर सकता है और दांत टूट भी सकते हैं। टार्टर और प्लाक से निजात पाने के लिए कुछ अन्य सुझाव नीचे दिए जा रहे हैं, जिनका आप पालन कर सकते हैं।

टार्टर से बचने के अन्य टिप्स – More Tips To Prevent Tartar in Hindi

  • दांत की सफाई और जांच के लिए दंत चिकित्सक से नियमित रूप से मिलें।
  • इनेमल को सुरक्षित रखने और दांतों से प्लेक को आसानी से हटाने के लिए नरम ब्रिसल वाले टूथब्रश का इस्तेमाल करें।
  • धूम्रपान से बचें, क्योंकि तंबाकू मसूड़ों के नीचे टार्टर के निर्माण के लिए जिम्मेदार होता है।
  • मुंह में बैक्टीरिया के विकास को बढ़ावा देने वाले स्टार्च और शर्करा युक्त खाद्य पदार्थ खाने से बचें। जंक फूड्स से दूरी बनाए रखें।
  • प्रत्येक भोजन के बाद पर्याप्त मात्रा में पानी पीना और मुंह धोना चाहिए, ताकि मुंह में रह गए बारीक खाद्य कणों को साफ किया जा सके।
  • भोजन के बाद तरबूज या सेब खाएं, क्योंकि ये प्राकृतिक रूप से दांतों को साफ करने और मसूड़ों को स्वस्थ रखने में मदद करते हैं।
  • विटामिन-सी से भरपूर फलों का सेवन करें, क्योंकि ये आपके संपूर्ण स्वास्थ्य के साथ-साथ दंत स्वास्थ्य में भी सुधार करते हैं।

अक्सर पूछे जाने वाले सवाल

टार्टर को हानिकारक क्यों माना जाता है?

यदि टार्टर को समय रहते हटाया नहीं गया, तो यह दांत और मसूड़ों पर जमता रहता है और बाद में सख्त हो जाता है। फिर यह हानिकारक बैक्टीरिया के लिए प्रजनन क्षेत्र बन जाता है। टार्टर दांतों और मसूड़ों को नुकसान पहुंचाता है, जिससे मसूड़े की सूजन, इनेमल डैमेज व मसूड़ों की बीमारियां जैसी गंभीर बीमारियां हो सकती हैं। गंभीर मामलों में टार्टर बोन हेल्थ को भी प्रभावित कर सकता है। यहां तक कि कई मामलों में हृदय रोग का कारण भी बन सकता है।

दांतों पर टार्टर का निर्माण क्यों होता है?

बैक्टीरिया जमने से दांतों पर प्लाक बनने लगते हैं। अगर दांतों से प्लाक को साफ न किया जाए, तो यह सख्त होकर टार्टर बन जाता है। स्टार्च और शर्करा वाले भोजन का सेवन करने से टार्टर के निर्माण की आशंका बढ़ जाती है।

टार्टर को दांतों पर बनने में कितना समय लगता है?

प्लाक से टार्टर बनने में लगभग 12 दिन लग सकते हैं।

प्लाक और टार्टर के बीच क्या अंतर है?

प्लाक, मसूड़ों पर जमने वाली एक नरम और रंगहीन परत है, जिसके अंदर बैक्टीरिया बायोफिल्म का प्रजनन कार्य शुरू करते हैं। दैनिक ओरल केयर से इससे निजात पाया जा सकता है। जब प्लाक को नियमित रूप से साफ नहीं किया जाता है, तो दांतों और मसूड़ों के चारों ओर एक कठोर पीले रंग का पदार्थ बनने लगता है। प्लाक हटाने की तुलना में इस कठोर पीले पदार्थ को हटाना मुश्किल हो जाता है।
इस लेख को पढ़ने के बाद अब आप प्लाक और टार्टर को साफ करने के तरीकों के बारे में जान गए होंगे। अगर आप भी दांतों की इस समस्या से ग्रसित हैं, तो प्रतिक्षा न करें, आज से ही इन उपायों को करना शुरू कर दें। लेख में बताए गए सभी उपचार बहुत ही कारगर हैं, जो आपको जल्द राहत देने का काम करेंगे। हालांकि, यह ध्यान रखना जरूरी है कि टार्टर कठोर होते हैं और इन्हें हटाने में समय भी लग सकता है। प्लाक और टार्टर से बचने के लिए आप अपने ओरल हेल्थ पर पूरा ध्यान दें। यह लेख आपको कैसा लगा हमें कमेंट बॉक्स में बताए। अन्य जानकारी के लिए आप कमेंट बॉक्स में सवाल पूछ सकते हैं।

संबंधित आलेख

The post दांतोंं से टार्टर और प्लाक हटाने के 15 सबसे कारगर घरेलू उपाय – Home Remedies To Remove Tartar And Plaque From Teeth in Hindi appeared first on STYLECRAZE.

Skin Care Acids Guide: How To Pick The Right Skin Care Acid

$
0
0

All these days, you believed that acids belonged to chemistry labs. I am sure that the term “acids” took you back to those organic chemistry classes in which you experimented with acids, bases, and other solvents. Well, acids no longer belong to just the labs – they also play a crucial role in skin care. Keep scrolling to learn about the different face acids and how they can help you keep your skin beautiful.

A Guide To Skin Care Acids

A Guide To Skin Care Acids

Shutterstock

Skin care acids are mainly of two types:

  • Alpha Hydroxy Acids (AHAs)
  • Beta Hydroxy Acids (BHAs)

While both the acids function as exfoliators, both are different and work differently on your skin.

For instance, AHAs (water-soluble acids, such as glycolic acid) exfoliate your skin by breaking down the dead skin cells on the surface while BHAs (oil-soluble acids, such as salicylic acid) sink deeper into your skin pores and unclog them.

Glycolic and salicylic acids are the two most common acids you will find in skin care products. However, some acids are neither AHAs or BHAs (such as azelaic acid), but they are good for your skin and can be found in skin care products. Let’s find out about all these types of acids and the skin types they suit.

1. Glycolic Acid

What Is It?

Glycolic acid is the most common alpha hydroxy acid used in skin care products, including chemical peels. It is usually derived from sugarcane. It gently exfoliates the skin and helps in reducing fine lines, wrinkles, and dark spots. It also improves skin texture and thickness and helps to even out the skin tone (1).

Suitable For

Glycolic acid can be used to brighten the skin and treat acne, acne scars, and hyperpigmentation. It is excellent for aging and mature skin (1). It is well tolerated by almost all skin types, especially oily skin. However, if you have sensitive skin, you should consult a dermatologist before trying glycolic acid.

Glycolic Acid Products That You May Try

Pixi Glow Tonic: This is an exfoliating toner with 5% glycolic acid.

Buy it here!

Mario Badescu Glycolic Foaming Cleanser: This GA-based cleanser removes dirt and makeup from your face and leaves it radiant.

Buy it here!

Reviva Labs 10% Glycolic Acid Crème: This is meant for mature skin. It improves skin texture and reduces sun-induced blemishes and spots.

Buy it here!

2. Salicylic Acid

What Is It?

Salicylic acid is a beta hydroxy acid. It has comedolytic property, which means it goes deep within the skin pores and unclogs them. Moreover, it helps in breaking down the topmost layer of your skin cells and dissolving the dead ones. That’s why it is very effective in treating acne and comedones (2).

Suitable For

Salicylic acid is especially beneficial for oily and acne-prone skin. However, salicylic acid is also a salicylate, and its structure is similar to that of aspirin (acetylsalicylic acid) (2). So, if you are allergic to aspirin, avoid salicylic acid.

Salicylic Acid Products That You May Try

CeraVe Renewing SA Cleanser: This mild cleanser exfoliates your skin, removes all traces of dirt and makeup and is non-comedogenic.

Buy it here!

Paula’s Choice RESIST Advanced Pore-Refining Treatment: This BHA gel exfoliator is non-abrasive and is suitable for daily use.

Buy it here!

Stridex Maximum Strength Pads: These pads are alcohol-free and can control acne without drying the skin.

Buy it here!

3. Azelaic Acid

What Is It?

Azelaic acid is a saturated dicarboxylic acid, and it naturally occurs on your skin (produced by a yeast that stays on your skin). It can also be found in wheat, rye, and barley and is an excellent exfoliator. It is very popular for treating acne and has anti-inflammatory properties (3). Apart from acne, it also helps in reducing skin pigmentation.

Suitable For

Azelaic acid suits all skin types, including sensitive skin. It is excellent for reducing inflammation, and anyone who has rosacea can use this acid for reducing the symptoms and calming their skin (4).

Azelaic Acid Products That You May Try

The Ordinary Azelaic Acid Suspension: This lightweight cream-gel evens out the skin tone and visibly improves your skin texture.

Buy it here!

Paula’s Choice Defense Antioxidant Pore Purifier: This is an anti-aging serum that protects your skin from environmental stressors and purifies it.

Buy it here!

Ecological Formulas Melazepam Cream: It helps control acne breakouts, prevents blemishes, and keeps your skin clean.

Buy it here!

4. Mandelic Acid

What Is It?

Mandelic Acid is an AHA that works like magic in treating acne, melasma, wrinkles, and hyperpigmentation (5). It is also said to improve the quality of aged skin by improving its elasticity (6).

Suitable For

Mandelic acid takes time to penetrate your skin, and this makes it ideal for sensitive skin. It is good for dry skin as it keeps it moisturized by increasing sebum production. This property makes it unsuitable for oily skin. Also, together with salicylic acid, mandelic acid works well for those with darker skin tones and skin discoloration issues.

Mandelic Acid Products That You May Try

Dr. Wu Renewal System: This facial mask keeps your skin hydrated and improves your skin tone.

Buy it here!

The Ordinary Mandelic Acid 10% + HA: This product promotes cell renewal to improve your skin texture and appearance. It is gentle and suitable for sensitive skin.

Buy it here!

5. Lactic Acid

What Is It?

Lactic acid is also an AHA and a gentle exfoliator. This acid is usually found in milk, and that’s why in ancient times, women preferred taking milk baths. Applying lactic acid on the skin improves its firmness and makes it smooth (7).

Suitable For

If you have dry skin and are looking for something to keep it moisturized, you can try lactic acid. This acid also works excellent on mature skin and prevents fine lines and wrinkles.

Lactic Acid Products That You May Try

The Ordinary Lactic Acid 5% + HA 2 %: This lactic acid peeling formula reduces inflammation and resurfaces the skin to make it bright.

Buy it here!

DRMTLGY Exfoliating Body Lotion: This body lotion is formulated for those who have keratosis pilaris and folliculitis. It prevents rough and bumpy skin.

Buy it here!

Splendora Lactic Acid Peel 50%: This peeling formula keeps your skin moisturized and improves hydration levels. It prevents premature aging and improves skin tone.

Buy it here!

6. Kojic Acid

What Is It?

Kojic acid is produced by different types of fungi, especially Aspergillus oryzae (called Koji in Japanese). It is also a by-product during the fermentation of rice wine and soy sauce. Kojic acid is used in skin care for its skin brightening properties (8). It can reduce the appearance of sun-induced damage, age spots, blemishes, and scars and has anti-aging effects.

Suitable For

Kojic acid gives you visible results, but on the flip side, it can also irritate your skin if it doesn’t suit you. It can also make your skin prone to sunburn. So, kojic acid should be used very carefully. It is better to consult a dermatologist to see if it suits your skin or not and know the correct way to use it on your skin.

Kojic Acid Products That You May Try

Kikumasamune Cream: This skin care cream made from Japanese sake provides intense hydration to the skin and keeps it nourished.

Buy it here!

Kojie San Kojic Acid Soap: This soap can be used on both the face and the body. It contains coconut oil that keeps your skin moisturized. The soap fades blemishes and spots effectively.

Buy it here!

Evagloss Lightening Serum With Kojic Acid: This serum evens out your skin tone and reduces dark spots, melasma, and discoloration.

Buy it here!

7. Hyaluronic Acid

What Is It?

Also called hyaluronan, this is a substance that is naturally produced by your body. It is mostly found in your connective tissues, skin, and eyes. It helps to keep your skin moisturized by binding water, thereby preventing premature aging (9). Environmental stress and sun exposure can affect the levels of hyaluronic acid in your body, especially your skin. You need to use HA skin care products to prevent this decline.

Suitable For

All skin types can benefit from hyaluronic acid. However, if you have dehydrated and mature skin, you need to include this acid in your skin care routine. It helps to keep aging skin plump and firm by boosting hydration levels.

Hyaluronic Acid Products That You May Try

Neutrogena Hydro Boost Hydrating Serum: This serum keeps your skin hydrated and makes it glow from within.

Buy it here!

The Ordinary Hyaluronic Acid 2% + B5: This product keeps your skin moisturized and makes it soft and supple.

Buy it here!

8. Ascorbic Acid

What Is It?

Ascorbic acid or vitamin C is an essential vitamin and a potent antioxidant that helps to reduce skin issues, such as hyperpigmentation, and protects it from oxidative stress and free radical damage. This often speeds up skin aging and causes inflammation (10).

Suitable For

Ascorbic acid suits almost every skin type and is especially suited for skin that struggles with hyperpigmentation. This powerful antioxidant is beneficial for brightening your skin and boosting collagen synthesis. Ascorbic acid or vitamin C is beneficial for mature skin.

Ascorbic Acid Products That You May Try

Tree Of Life Vitamin C Serum: This serum reduces the appearance of fine lines and wrinkles. It makes your skin soft and youthful.

Buy it here!

Eve Hansen Vitamin C Night Repair Cream: This collagen boosting cream repairs damaged skin, evens out skin tone, and makes it soft.

Buy it here!

TruSkin Daily Facial Moisturizer: This lightweight moisturizer keeps your face hydrated, prevents breakouts, and shrinks the pores.

Buy it here!

9. Malic Acid

What Is It?

Malic acid is a type of AHA that your body produces naturally. Like other AHAs, malic acid helps your skin retain moisture. This, in turn, promotes skin cell turnover rate, which means that your skin cells are renewed at a faster pace, reducing the appearance of fine lines and wrinkles. This also softens the skin and improves its texture.

Suitable For

Malic acid is best suited for mature, sensitive, and combination skin types. It doesn’t irritate the skin and gently exfoliates it to make it visibly smoother.

Malic Acid Products That You May Try

NewDayEssence Alpha Hydroxy Acid Nightly Exfoliating Pads: These pads are a blend of lactic, malic, and glycolic acids. These gently exfoliate your skin, promote cell renewal, and keep your skin hydrated.

Buy it here!

10. Ferulic Acid

What Is It?

Ferulic acid is a hydroxycinnamic acid, a compound that is usually found in plant cells. Like vitamin C, this compound has antioxidant properties and is a free radical scavenger. It protects and heals some of the most important structures of your skin, including elastin, collagen, keratinocytes, and fibroblasts (11).

Suitable For

It is ideal for mature skin and those looking for anti-aging creams and acids. Also, if your skin is prone to sun damage, you can use this acid to protect your skin.

Ferulic Acid Products That You May Try

The Ordinary Resveratrol 3% +Ferulic Acid 3%: This powerful blend of antioxidants makes your skin smooth and maintains the hydration levels.

Buy it here!

BioPure MED C+E Ferulic Acid: This serum reduces age spots and prevents sun damage. It also protects the skin from environmental stress.

Buy it here!

11. Retinoic Acid

What Is It?

Retinoic acid or retinoids are derivatives of vitamin A. They have shown excellent results in treating aging skin and preventing the effects of photoaging, such as wrinkles and hyperpigmentation. They also improve skin thickness (12).

Suitable For

Retinoic acid or retinoids suit almost all skin types, except for sensitive skin. Always consult a dermatologist to know the concentration and the correct ways to use retinoids on your skin.

Retinoic Acid Products That You May Try

Baebody Retinol Serum: This serum reduces the appearance of wrinkles and fine lines. It makes your skin look youthful.

Buy it here!

Skinceuticals Retinol 0.5 Repairing Night Cream: This night cream revitalizes your skin and reduces signs of aging to give you soft and smooth skin.

Buy it here!

Neutrogena Rapid Wrinkle Repair: This is a powerful blend of hyaluronic acid and retinol. This cream reduces visible signs of aging and also improves the hydration levels of your skin.

Buy it here!

When you start using face acids, you can expect to see results within the first two weeks. However, if you are new to the world of acids, it is better to consult a dermatologist before trying any new acid-based product on your face. If you have any questions on your mind, feel free to post them in the comments section below.

References

    1. Glycolic acid peel therapy..” Clinical, Cosmetic and Investigational Dermatology, US National Library of Medicine.
    2. Salicylic acid as a peeling agent..” Clinical, Cosmetic and Investigational Dermatology, US National Library of Medicine.
    3. Azelaic acid. A review of its pharmacological..” Drugs, US National Library of Medicine.
    4. Azelaic acid 15% gel in the treatment..” Expert Opinion on Pharmacotherapy, US National Library of Medicine.
    5. Summary of Mandelic Acid..” Cosmetic Dermatology.
    6. Effects of Topical Mandelic Acid..” Facial Plastic Surgery, US National Library of Medicine.
    7. Epidermal and dermal effects of..” Journal of American Academy of Dermatology, US National Library of Medicine.
    8. Depigmenting Effect of Kojic Acid..” Journal of Biomedical and Biotechnology, US National Library of Medicine
    9. Hyaluronic acid..” Dermato Endocrinology, US National Library of Medicine
    10. Vitamin C in Dermatology” Indian Dermatology Online Journal, US National Library of Medicine
    11. Antioxidant Properties of Ferulic Acid..” Skin Pharmacology and Physiology, Karger
    12. Retinoids in the treatment of skin aging..” Cinical Interventions in Aging, US National Library of Medicine

The post Skin Care Acids Guide: How To Pick The Right Skin Care Acid appeared first on STYLECRAZE.

Differences Between Rheumatoid Arthritis And Osteoarthritis

$
0
0

Arthritis is an umbrella term used to define a variety of inflammatory diseases affecting the bones and joints.

You might be quite familiar with two of its types – rheumatoid arthritis (RA) and osteoarthritis (OA). However, many tend to get confused between these two types as their symptoms are quite similar. How do you differentiate between these two? Which of these are you more likely to develop? Keep reading to find out the significant differences between rheumatoid arthritis and osteoarthritis.

What Causes Rheumatoid Arthritis And Osteoarthritis?

Rheumatoid arthritis (RA) and osteoarthritis (OA) are two different types of the same condition – arthritis. While RA is an autoimmune condition, osteoarthritis is a degenerative joint issue.

  • Cause Of RA

Rheumatoid arthritis is a result of your body attacking itself. In individuals with RA, the body misinterprets the soft lining of the joints to be a threat or a foreign particle (like a microbe). This leads to your immune system attacking the lining. Such attacks usually cause fluid to accumulate in your joints and symptoms like pain, swelling, stiffness, and inflammation in the affected joints.

  • Cause Of OA

Osteoarthritis is one of the most common types of arthritis. Since it is a degenerative disorder, people battling OA may have to face the breakdown of cartilage, which acts as a cushion for your bones. When the cartilage wears down, it may result in the bones rubbing against each other. This further leads to exposure of small nerves, which causes pain.

Let’s now take a look at the symptoms.

Symptoms – RA Vs. OA – Similarities And Differences

Both rheumatoid arthritis and osteoarthritis exhibit a few similar symptoms like (1), (2):

  • Stiffness of joints
  • Joint pain
  • Limited motion
  • Tenderness in the affected part
  • Increased severity of the symptoms in the morning

RA and OA also have individual symptoms that are unique to their type.

The main symptoms associated with rheumatoid arthritis are (1):

  • A low-grade fever, which is especially seen in affected children
  • Fatigue
  • Recurring muscle aches

As it is a systemic disease, RA can affect your entire body, including your lungs, eyes, and heart.

Those in advanced stages of the disease may start observing some hard yet tender lumps near the joints. Some lumps are referred to as rheumatoid nodules (1).

Unlike RA, individuals with OA are unlikely to exhibit overall symptoms. The symptoms are often limited to the joints.

One of the unique characteristics of osteoarthritis is the development of small lumps under the skin. These lumps are not similar to rheumatoid nodules. They occur only in people with OA and are referred to as bone spurs or osteophytes (2). These are excess bone growths that occur along the edges of the affected joints. Noisy joints are another common symptom of osteoarthritis.

While both the conditions have some common symptoms, they may occur in different joints. Find out more about the joints affected by each type right below.

Joints Most Often Affected – RA Vs. OA

Rheumatoid arthritis and osteoarthritis can affect different joints.

RA usually begins in the smaller joints. You are quite likely to experience symptoms of pain and stiffness in your finger and feet joints (metacarpophalangeal, proximal interphalangeal, and metatarsophalangeal joints) initially.

As the autoimmune disease progresses, similar symptoms will begin surfacing in your knees, ankles, and shoulders (3). As it is a symmetrical disease, rheumatoid arthritis can cause symptoms to occur on both sides of your body simultaneously.

Compared to RA, OA is less symmetrical, i.e., you may expect symptoms of pain and stiffness on both sides of your body, but the joints on one side experience the worst of it. Like rheumatoid arthritis, osteoarthritis also mostly affects the fingers and hand (2). However, in addition to the knees, OA can affect the hips and spine.

Certain factors can put you at a higher risk of developing both OA and RA. They are discussed below.

Risk Factors

The common risk factors for rheumatoid arthritis and osteoarthritis are:

  • Gender – They are more common in women than in men.
  • Family history – If any of your close family members have had a history of OA or RA, you are at increased risk of developing the disease.
  • Obesity

Certain risk factors are unique to both these conditions.

The risk factors for RA may include (4):

  • Age – Although it can occur at any age, it is more common in the middle-aged.
  • Smoking tobacco
  • Environmental exposure to toxins like silica
  • History of a serious microbial infection
  • Stress

The unique risk factors for osteoarthritis include (5):

  • Age – It is more common in older adults.
  • A history of joint injury
  • An occupation that requires repetitive activities like lifting, walking, climbing stairs, kneeling or squatting for hours
  • Poor posture
  • Congenital bone deformities
  • Medical conditions like gout or diabetes

If you have been exhibiting any of the symptoms associated with RA or OA and also relate to the above risk factors, consult a doctor immediately to rule out the chances of the disease.

How To Test For RA And OA

Rheumatoid arthritis may be quite difficult to diagnose in its early stages as the symptoms associated with it are similar to those of other conditions.

Your doctor may begin by carrying out a physical examination. They may check for signs of swelling, tenderness, or redness. Your reflexes and muscle strength may also be analyzed.

Tests that may be used to diagnose RA are (6):

  • Blood Test – Those affected by rheumatoid arthritis usually have an elevated erythrocyte sedimentation rate (ESR). They may also have an elevated level of C-reactive protein, both of which indicate inflammatory reactions taking place within the body. Some blood tests may also look for anti-cyclic citrullinated peptide (anti-CCP) antibodies or rheumatoid factor.
  • Imaging Tests – X-ray, MRI scan, and ultrasound tests may also be recommended to keep track of the progression of RA

The following tests may be prescribed to diagnose OA in suspected individuals:

  • Physical Examination – As in the case of RA, a physical examination may be carried out to look for tenderness, swelling, and stiffness in the affected joints.
  • Imaging Tests – X-rays may be suggested to reveal cartilage loss. MRI scans may be recommended in complex cases (7).
  • Laboratory Tests – Blood tests are often conducted to rule out other causes, such as RA. Another lab test for OA is joint fluid analysis where the fluid is drawn out from any of the affected joints and tested for symptoms of inflammation (8).

If the tests diagnose you with RA or OA, your doctor may refer you to an orthopedist or rheumatologist. The assigned doctor will prescribe treatment depending on your condition after discussing the possible treatment options with you.

Treatments – RA Vs. OA

Treatment for both rheumatoid arthritis and osteoarthritis is primarily aimed at:

  • Improving the functioning of the affected areas
  • Reducing pain
  • Minimizing further damage to the affected bones

Medications for RA are usually prescribed depending on the severity of the symptoms and how long you have been battling the condition. They may include (9):

  • Nonsteroidal Anti-Inflammatory Drugs (NSAIDs) Or Steroids: They help reduce pain and inflammation.
  • Disease-modifying Antirheumatic Drugs (DMARDS): They help slow down the progression of the disease and prevent permanent damage to the joints.

Other treatment approaches for rheumatoid arthritis are:

  • Occupational Therapy: It helps make day-to-day tasks easier to do, such that it puts less stress on your joints (10).
  • Use Of Assistive Devices: They help avoid stress on the affected joints.
  • Surgery: It includes synovectomy, which involves removing the inflamed joint lining. Tendon repair, joint fusion, and total joint replacement are the other surgical options for treating rheumatoid arthritis (11).

On the other hand, medications for relieving pain associated with OA are (12):

  • NSAIDs or nonsteroidal anti-inflammatory drugs
  • Steroids
  • Acetaminophen – Do not take more than the prescribed dose as it can cause liver damage.
  • Duloxetine

Other treatment options for osteoarthritis include (13):

  • Physical Therapy: Personalized exercise training to strengthen the joint muscles.
  • Occupational Therapy: It helps you find ways to perform everyday tasks without putting extra pressure on the affected joints.
  • Cortisone And Lubrication Injections: To relieve pain (14).
  • Surgery: It may include realignment of affected bones or joint replacement (15).

Early treatment not only prevents complications but also helps make the remission of the symptoms more likely.

Treating arthritis, be it RA or OA, is aimed at managing the symptoms and preventing the progression of the disease. However, there is no cure for either rheumatoid arthritis or osteoarthritis. By availing treatment, you can improve the quality of your life and protect your joints from further damage.

Hope you found this post helpful. Don’t forget to post your comments and feedback in the comments box below.

Expert’s Answers For Readers’ Questions

Can an X-ray show the difference between osteoarthritis and rheumatoid arthritis?

X-rays can help show the joint damage that has occurred as a result of rheumatoid arthritis as well as osteoarthritis. However, you may have to go for a blood test to confirm or rule out rheumatoid arthritis.

What is the most painful type of arthritis?

One of the most painful types of arthritis is gout. It is triggered by the presence of excess uric acid in the blood.

At what age does arthritis usually start?

Arthritis can occur in people of any age. However, depending on its type, it may sometimes be more prominent in the older or middle-aged lot.

References

  1. Rheumatoid arthritis: Overview” Institute for Quality and Efficiency in Health Care, US National Library Of Medicine.
  2. Osteoarthritis” The BMJ, US National Library Of Medicine.
  3. The clinical features of rheumatoid arthritis.” European Journal of Radiology, US National Library Of Medicine.
  4. Genetic and environmental risk factors for rheumatoid arthritis.” Best Practice & Research: Clinical Rheumatology, US National Library Of Medicine.
  5. Osteoarthritis prevalence and modifiable factors: a population study” BMC Public Health, US National Library Of Medicine.
  6. Rheumatoid Arthritis: Early diagnosis and treatment outcomes” Caspian Journal of Internal Medicine, US National Library Of Medicine.
  7. 5 Diagnosis” National Clinical Guideline Centre, US National Library Of Medicine.
  8. Synovial Fluid White Cell Count in Knee Osteoarthritis: Association with Structural Findings and Treatment Response” Arthritis & Rheumatology, US National Library Of Medicine.
  9. Arthritis, Rheumatoid” StatPearls, US National Library Of Medicine.
  10. Occupational therapy for rheumatoid arthritis.” Cochrane Database of Systematic Reviews, US National Library Of Medicine.
  11. Treatment strategies in surgery for rheumatoid arthritis.” European Journal of Radiology, US National Library Of Medicine.
  12. Use of NSAIDs in treating patients with arthritis” Arthritis Research And Therapy, US National Library Of Medicine.
  13. Rheumatology: 9. Physical and occupational therapy in the management of arthritis” Canadian Medical Association Journal, US National Library Of Medicine.
  14. Intraarticular injections (corticosteroid, hyaluronic acid, platelet rich plasma) for the knee osteoarthritis” World Journal of Orthopedics, US National Library Of Medicine.
  15. Surgical Management of Osteoarthritis” Arthritis Care & Research, US National Library Of Medicine.

The post Differences Between Rheumatoid Arthritis And Osteoarthritis appeared first on STYLECRAZE.

Viewing all 2726 articles
Browse latest View live